Although the built-in animations presets provided by AvatarAnimation
are a convenient way to animate the avatar, you will want to utilize
custom animations in your game. If your game requires more than the
avatar to just stand around, you need to use custom animations to do
movements like walk or throw a ball.
Creating the Custom Animation
Custom animations require an
artist to animate the avatar rig in a 3D content creation package. The
avatar rig is available on the XNA Creators Club Online site at the
following URL:
http://create.msdn.com/en-US/education/catalog/utility/avatar_animation_rig
The rig comes in a few versions
for a number of different 3D content creation packages such as Maya, 3D
Studio Max, and Softimage Mod Tool. After you download the rig, read the
corresponding readme file contained within the download. This file
instructs you on how to load the rig project file in the 3D content
creation package of your choice. It is important that you follow the
instructions in the readme file; otherwise, you might run into issues
later when you are loading or exporting animations.
After you have the avatar
rig loaded in a 3D content creation package of choice, you need to
create the animation. Depending on the 3D content creation package you
are using, this occurs in different ways. In most cases, the animator
sets keyframes for the bone positions across a timeline. Please refer to
documentation or tutorials for your specific 3D content creation
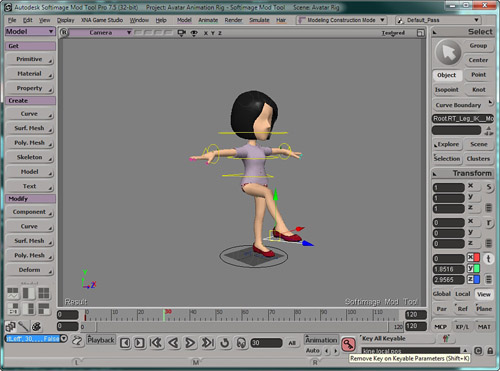
package on how to animate a rigged character. Figure 1 shows the avatar rig loaded and animated using the Softimage Mod Tool.
After the animation is
complete, it needs to be exported into an FBX file that you will load
using a custom processor .
There are a number of custom animations available on the XNA Creators Club Online site at the following URL:
http://create.msdn.com/en-US/education/catalog/utility/avatar_animation_pack
Building the Custom Animation Type
The AvatarRenderer
requires a set of bone transforms to set the positions of all the bones
that make up the avatar each frame when rendering. When you load the
custom animations, you will load a list of keyframes for each of the
bones in the avatar. The custom animation uses the keyframes to
determine which bone transforms to set at the current time in the
animation.
Create three types that are
used in both the content pipeline process you build and at runtime by
your game. The first type you create stores the data associated with
each keyframe. The second type stores the list of key fames and other
data associated with an animation. The third type is the custom
animation itself, which implements the IAvatarAnimation interface and can be used just like any other AvatarAnimation by your game.
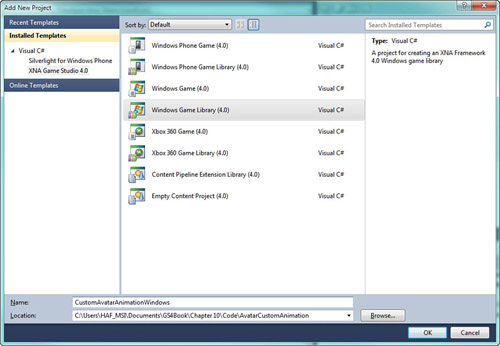
Before you create new types,
let’s create the project that they will be built in. Right-click the
solution and select Add -> New Project. In the Add New Project
dialog, select the Windows Game Library project type and give the
project the name CustomAvatarAnimationWindows and click the OK button as shown in Figure 2.
Now with your new project
created, add your new types. Right-click the project and select Add
-> Class. This creates a new C# code, which you should rename Keyframe. After renaming the file, double-click to open the file in the editor.
Although you created a new
class, you really want the keyframe to be a structure. To do this,
update the class definition to be a public structure like the following
line:
The keyframe structure is
simple and contains only three members for the bone index of the avatar,
the time when the keyframe occurs, and a matrix value of the transform
for the bone at the time. Add the following lines of code to the
keyframe structure:
// The index value of this bone in the avatar skeleton
public int BoneIndex;
// Time when this keyframe occurs in the animation
public TimeSpan Time;
// The bone transfrom
public Matrix Transform;

public Keyframe(int boneIndex, TimeSpan time, Matrix transform)
{
    BoneIndex = boneIndex;
    Time = time;
    Transform = transform;
}
Along with the three members
for the bone index, time, and transform, you also include a helpful
constructor that you will use when you create the keyframes in the
content processor.
Now you need a type to hold the
animation data that is saved out when you run the custom processor. Next
create another new class. This time, rename the file CustomAvatarAnimationData.cs and add the following code:
// The animation data that is processed by the content pipeline
public class CustomAvatarAnimationData
{
    // The name of the animation
    [ContentSerializer]
    public string Name { get; private set; }

    // The total length the animation plays
    [ContentSerializer]
    public TimeSpan Length { get; private set; }

    // All of the keyframes that make up the animation
    [ContentSerializer]
    public List<Keyframe> Keyframes { get; private set; }
    // Parameterless constructor needed by the XNB deserializer
    private CustomAvatarAnimationData() { }

    public CustomAvatarAnimationData(string name, TimeSpan length,
                                     List<Keyframe> keyframes)
    {
        Name = name;
        Length = length;
        Keyframes = keyframes;
    }
}
The first property of the type is the Name of the animation. The next is a TimeSpan property that specifies the Length of the animation. The main portion of the animation data is the list of Keyframe
objects. You also provide two constructors. The first is a
parameter-less constructor, which is required to desterilize the object
because the object needs to be constructed before the properties of the
object are set. The second constructor is provided for coding
convenience and sets the Name, Length, and Keyframes properties.
Now that you have the basic
data that is stored in the custom animation class, you can create the
actual custom animation type. Create a new class and change the name of
the file to AvatarCustomAnimation.cs. The AvatarCustomAnimation class inherits from the CustomAvatarAnimationData type and implements the IAvatarAnimation interface. Update the class definition to look like the following:
public class AvatarCustomAnimation : CustomAvatarAnimationData, IAvatarAnimation
public ReadOnlyCollection<Matrix> BoneTransforms
{
    get { return boneTransforms; }
}
private ReadOnlyCollection<Matrix> boneTransforms;
Matrix[] avatarBoneTransforms = new Matrix[AvatarRenderer.BoneCount];

public TimeSpan CurrentPosition
{
    get
    {
        return currentPosition;
    }
    set
    {
        currentPosition = value;
        // Reset the animation and update the current transfroms
        currentKeyframe = 0;
        Update(TimeSpan.Zero, false);
    }
}
private TimeSpan currentPosition = TimeSpan.Zero;
private int currentKeyframe = 0;

public AvatarExpression Expression
{
    get { return avatarExpression; }
}
AvatarExpression avatarExpression = new AvatarExpression();
Like the AvatarAnimation, the BoneTransforms and Expression are used by the AvatarRenderer
to set the current bone positions and expression when drawing the
avatar. The animation does not contain the expression data, so just set
the expression to a new instance of AvatarExpression.
To add the constructor that initializes the custom avatar animation, add the following constructor to the AvatarCustomAnimation:
public AvatarCustomAnimation(CustomAvatarAnimationData animationData) :
    base(animationData.Name, animationData.Length, animationData.Keyframes)
{
    // Initialize bone transforms
    for (int i = 0; i < AvatarRenderer.BoneCount; i++)
    {
        avatarBoneTransforms[i] = Matrix.Identity;
    }
    boneTransforms = new ReadOnlyCollection<Matrix>(avatarBoneTransforms);

    // Populate the transfroms for the first frame
    Update(TimeSpan.Zero, false);
}
The constructor calls the base CustomAvatarAnimationData constructor to set the Name, Length, and Keyframes. Next the avatarBoneTransforms array is initialized to the Identity. Finally, call the Update
method to have it set up the animation for playback in case the
animation is used to render an avatar before the developer calls the Update method for the first time.
Add the following Update method to the AvatarCustomAnimation class:
public void Update(TimeSpan timeSpan, bool loop)
{
    // Incrament the curret time
    currentPosition += timeSpan;
    // Check current time against the length
    if (currentPosition > Length)
    {
        if (loop)
        {
            // Find the right time in the new loop iteration
            while (currentPosition > Length)
            {
                currentPosition -= Length;
            }
            // Set the keyframe to 0.
            currentKeyframe = 0;
        }
        else
        {
            // If the animation is not looping,
            // then set the time to the end of the animation.
            currentPosition = Length;
        }
    }
    // Check to see if we are less than zero
    else if (currentPosition < TimeSpan.Zero)
    {
        if (loop)
        {
            // If the animation is looping,
            // then find the right time in the new loop iteration
            while (currentPosition < TimeSpan.Zero)
            {
                currentPosition += Length;
            }
            // Set the keyframe to the last keyframe
            currentKeyframe = Keyframes.Count - 1;
        }
        else
        {
            // If the animation is not looping,
            // then set the time to the beginning of the animation.
            currentPosition = TimeSpan.Zero;
        }
    }

    // Update the bone transforms based on the current time.
    UpdateBoneTransforms(timeSpan >= TimeSpan.Zero);
}
The Update method first updates the currentPosition with the elapsed time. It then check whether the animation has passed the end of the animation. If looping is used, then currentPosition is set back to the start of the animation; otherwise, it is set to the end Length of the animation. If the animation is run backwards, then check whether the currentPosition is less than TimeSpan.Zero and set the correct currentPosition before you finally call the UpdateBoneTransforms method.
Finally, implement the UpdateBoneTransforms method, which sets the current bone transforms to use based on the current keyframe time. Add the following method to the AvatarCustomAnimation class:
private void UpdateBoneTransforms(bool playingForward)
{
    if (playingForward)
    {
        while (currentKeyframe < Keyframes.Count)
        {
            // Get the current keyframe
            Keyframe keyframe = Keyframes[currentKeyframe];

            // Stop when we've read up to the current time.
            if (keyframe.Time > currentPosition)
                break;

            // Apply the current keyframe's transform to the bone array.
            avatarBoneTransforms[keyframe.BoneIndex] = keyframe.Transform;

            // Move the current keyframe forward.
            currentKeyframe++;
        }
    }
    else
    {
        while (currentKeyframe >= 0)
        {
            // Get the current keyframe
            Keyframe keyframe = Keyframes[currentKeyframe];

            // Stop when we've read back to the current time.
            if (keyframe.Time < currentPosition)
                break;

            // Apply the current keyframe's transform to the bone array.
            avatarBoneTransforms[keyframe.BoneIndex] = keyframe.Transform;
            // Move the current keyframe backwards.
            currentKeyframe—;
        }
    }
}
UpdateBoneTransforms finds the current animation keyframes to use for the avatar bone transforms. The list of Keyframes is looped over starting at the currentKeyframe index. The loop stops when a keyframe’s Time property is greater than the currentPosition in the animation or when there are no keyframes left.
