1. Problem
You have an image with
sensible touch zones—for example, a graphical game menu—and you need to
manage gestures only when they occur in those zones.
2. Solution
You can create a mask image and use the WriteableBitmap class to retrieve the chosen pixel color. In your code, you associate a color to an operation.
3. How It Works
In this recipe, we are going further with the 7Drum
application developed in this article. In this case, you are going
to examine the virtual drumming functionality. An image of a drum kit
is shown on the screen, and the user can tap the drum components and
hear the related sounds.
Because drum components
have different sizes and shapes, memorizing their positions on the
screen is not really the best thing to do. You can retrieve the position
of the tap, but then you have to check which drum component has those
coordinates. Because a drum component cannot have a linear shape, this
is really a bad approach.
You can use the WriteableBitmap class, which provides the Pixels
array used to retrieve a pixel to a provided x and y coordinate. You
can create a mask image from the original image, load it in memory
without showing it in your application, and use the Pixels
array to retrieve the color of the chosen pixel. In your code, you have
associated a color to an operation or a menu item, so you know what to
do.
In our case, the drum-kit mask image contains different-colored zones related to drum components (see Figure 1). The drum-kit image shown to the user is definitively much better (see Figure 2).


When the user taps the snare,
the code retrieves the pixel with blue color and plays the snare sound .
NOTE
To produce the mask image, we used the Paint.NET free drawing tool (you can download it from www.getpaint.net).
You load the main image in the tool and add a new layer. You start to
draw over the sensitive picture zones, giving each a different color.
You remove the layer (the background, in this case) where you set the
original image, remaining with the mask. Finally, you have to save the
mask image in either a 16- or 256-color bitmap format so that oixels use
solid colors.
4. The Code
To demonstrate this technique, we have added the virtual drumming functionality to the 7Drum application. Open the 7Drum project and add a Windows Phone Landscape Page called VirtualDrum.xaml. Create an images folder with the original image and the related mask image. Select the Content value from the Build Action
property in the Property window. In this way, images will be added to
the final XAP file as distinct files and not inserted as resources. This
is done so that in the Image control, you can set the Source attribute to the image's relative path.<phone:PhoneApplicationPage
x:Class="_7Drum.VirtualDrum"
xmlns="http://schemas.microsoft.com/winfx/2006/xaml/presentation"
xmlns:x="http://schemas.microsoft.com/winfx/2006/xaml"
xmlns:phone="clr-namespace:Microsoft.Phone.Controls;assembly=Microsoft.Phone"
xmlns:shell="clr-namespace:Microsoft.Phone.Shell;assembly=Microsoft.Phone"
xmlns:d="http://schemas.microsoft.com/expression/blend/2008"
xmlns:mc="http://schemas.openxmlformats.org/markup-compatibility/2006"
mc:Ignorable="d" d:DesignWidth="800" d:DesignHeight="480"
FontFamily="{StaticResource PhoneFontFamilyNormal}"
FontSize="{StaticResource PhoneFontSizeNormal}"
Foreground="{StaticResource PhoneForegroundBrush}"
SupportedOrientations="Landscape" Orientation="Landscape"
shell:SystemTray.IsVisible="False">
<Image x:Name="imgDrum" Source="images/Drum_Kit_480x800.jpg" Width="800" Height="480" />
</phone:PhoneApplicationPage>
In the VirtualDrum.xaml.cs file, you use the constructor code to load the mask image and add the FrameReported event handler:
// Constructor
        public VirtualDrum()
        {
            InitializeComponent();

            bmpMask = new BitmapImage(new Uri("images/mask_480x800.jpg", UriKind.Relative));
bmpMask.CreateOptions = BitmapCreateOptions.None;

. . .

            Touch.FrameReported += new TouchFrameEventHandler(Touch_FrameReported);
        }
In the Touch_FrameReported event handler, the GetTouchPoints method is used to retrieve the collection of touched points within the TouchPointCollection object. Next, a foreach loop goes through the retrieved collection, checking only those points having Action set to the TouchAction.Down enumerable value. This is necessary because the TouchPointCollection contains points for every kind of operation such as drag, pinch, and so on.
The position of the tapped screen is passed to the PickTappedColor private method, which returns the Color
object of the pixel. A LINQ query is used to retrieve the drum-kit
component associated to the picked color, and the related sound is
played.
void Touch_FrameReported(object sender, TouchFrameEventArgs e)
        {
            TouchPointCollection tpc = e.GetTouchPoints(this);

            foreach (TouchPoint t in tpc)
            {
                if (t.Action == TouchAction.Down)
                {
                    System.Windows.Media.Color pickedColor = PickTappedColor(t.Position.X,
                                                                             t.Position.Y);

DrumKitComponent component = (from d in drum
                              where d.maskColor == pickedColor
                              select d).SingleOrDefault<DrumKitComponent>();

                    if (component != null)
                    {
                       // Play sound
                    }
                }
            }
        }
Let's take a look at the PickTappedColor method in detail. An object from the WriteableBitmap class is created from the bitmap mask stored in memory. The WriteableBitmap contains the Pixels
array but—surprise—it is not a two-dimensional one, so we cannot use x
and y as array indexes. We need a simple math formula to transform x and
y coordinates into one dimensional index. The formula is the y
coordinate by the sum of the x coordinate with the bitmap width
dimension.
After having retrieved the pixel, we can return the related Color by using the FromArgb static method provided by the Color class.
private System.Windows.Media.Color PickTappedColor(double X, double Y)
        {
            wbmp = new WriteableBitmap(bmpMask);
            int pixel = (int)Y * (int)wbmp.PixelWidth + (int)X;
            int i = wbmp.Pixels[pixel];
            System.Windows.Media.Color color = System.Windows.Media.Color.FromArgb(255,
                                              (byte)((i >> 16) & 0xFF),
                                              (byte)((i >> 8) & 0xFF),
                                              (byte)(i & 0xFF));

            return color;
        }
5. Usage
This may be one of the most fun "Usage"
sections of the entire book. We can make a lot of noise with a virtual
drum! From Visual Studio 2010, press Ctrl+F5 and wait a few moments
until the emulator starts (check that Windows Phone Emulator is the
current output target).
From the main menu, choose Take Your Groove. The drum kit appears, as shown in Figure 3.
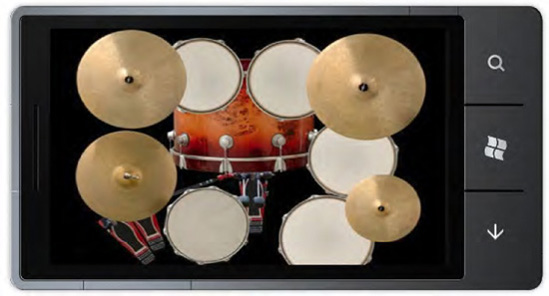
Now you can tap on one or more drum components to hear the related sound.
