Modifying Avatar Lighting
Now that you have been able to
load and draw some avatars, it’s time to dig a little deeper so they
can better integrate into your game. Your game might take place at night
or use some special colors in the lighting of your game. The AvatarRenderer provides the capability to set the ambient light color and one directional light.
Let’s modify the existing sample to update the lighting to use when drawing the avatar. Add the following code to your game’s Draw method before calling the AvatarRenderer.Draw method.
// Set the avatar lighting values
Vector3 lightDirection = new Vector3(1, 1, 0);
lightDirection.Normalize();
avatarRenderer.LightDirection = lightDirection;
avatarRenderer.LightColor = new Vector3(0, 1, 0);
avatarRenderer.AmbientLightColor = new Vector3(0.25f, 0.25f, 0.25f)
First, create a new light
direction, which is pointing in the right and up direction. The
direction needs to be normalized before setting the LightDirection property on the AvatarRenderer.
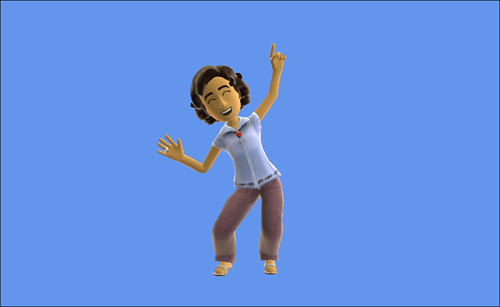
Set the color of the directional light to fully green by using the LightColor property.
Finally, set the ambient lighting value to around 25 percent of each color channel by using the AmbientLightColor property.
Running the sample now shows a green light on the avatar’s lower left. It should look similar to Figure 1.
Playing Multiple Animations
Although we have been
concentrating on the built-in animations, it is possible to customize
the animation. One example might be that you want to play a walking
animation on the lower half of the avatar while the upper arms of the
avatar throw a baseball.
To
use two different animations for different portions of the avatar
skeleton, identify which bones you want to update with which animation.
Let’s update the existing
sample to play back two animations at the same time. Use the celebrate
animation for most of the avatar and play the wave animation on the
avatar’s right arm.
You need an additional AvatarAnimation and some additional member variables in your game. Add the following member variables to your game:
AvatarAnimation avatarAnimationCelebrate;
AvatarAnimation avatarAnimationWave;

// Combined transforms for the two animations
List<Matrix> combinedBoneTransfroms = new List<Matrix>(AvatarRenderer.BoneCount);

// Bone index values for the right arm
List<int> rightArmBones;
Along with the two AvatarAnimation variables for the celebrate and wave animations, you need two additional variables and a List of matrices that will store the avatar skeleton bone positions. The number of bones is defined by BoneCount
constant field. You also need a list of index values for the bones that
make up the right arm so you know which index values to update with the
wave animation.
Next, in the games LoadContent method, add the following lines of code:
// Load celebrate animation
avatarAnimationCelebrate = new AvatarAnimation(AvatarAnimationPreset.Celebrate);
// Load the wave animation
avatarAnimationWave = new AvatarAnimation(AvatarAnimationPreset.Wave);

// Find all of the children of the right shoulder
rightArmBones = FindChildrenBones(AvatarBone.ShoulderRight,avatarRenderer.ParentBones);

// Populate the list of bone transforms
for (int i = 0; i < AvatarRenderer.BoneCount; ++i)
{
    combinedBoneTransfroms.Add(Matrix.Identity);
}
The first two lines load the celebrate and wave animations. Populate the rightArmBones List by calling a helper method FindChildrenBones, which you create next. This helper method finds all of the children for a given AvatarBone. The last portion of code adds some default values to the combinedBoneTransfroms List that you use to draw the avatar.
Create the FindChildrenBones method that returns all of the children for a given AvatarBone.
private List<int> FindChildrenBones(AvatarBone parentBone,
                                    ReadOnlyCollection<int> parentBones)
{
    List<int> children = new List<int>();
    children.Add((int)parentBone);

    // Start search one past the parent
    int currentBone = (int)parentBone + 1;

    // Loop over all of the bones
    while (currentBone < parentBones.Count)
    {
        // See if the bone has a parent in the list
        if (children.Contains(parentBones[currentBone]))
        {
            children.Add(currentBone);
        }
        currentBone++;
    }

    return children;
}
To find all of the children for the given parentBone, you need the collection of parentBones from the AvatarRenderer. The ParentBones property returns a collection of index values that represent the parent for each index location. For example, the AvatarBone.Neck enumeration has an integer value of 14. If you look up the fourteenth item in the parentBones collection, you get an integer value of 5, which is the integer value for the AvatarBone.BackUpper enumeration because the upper back is the parent of the neck.
The avatar skeleton is sorted by
depth so the lower index values represent bones that are closer to the
root. This also means that you can loop over the list of bones and know
that the parent of the current bone has already been processed. This is
useful in cases where you want to add all of the parent bones for a
given bone. As you loop over all of the bones, check whether the parent
index value is already in the list. If it is, then the current bone must
be a child of one of the parent bones already in the list.
For each frame, you should update both animations and copy the bone positions to the combinedBoneTransfroms. In your game’s Update method, add the following lines of code:
// Update both animations
avatarAnimationCelebrate.Update(gameTime.ElapsedGameTime, true);
avatarAnimationWave.Update(gameTime.ElapsedGameTime, true);

// Copy the celebrate transforms
for (int i = 0; i < combinedBoneTransfroms.Count; i++)
{
    combinedBoneTransfroms[i] = avatarAnimationCelebrate.BoneTransforms[i];
}

// Overwrite the transforms for the right arm using the values
// from the wave animation
for (int i = 0; i < rightArmBones.Count; i++)
{
    combinedBoneTransfroms[rightArmBones[i]] =
                                    avatarAnimationWave.BoneTransforms[right
                                    ArmBones[i]];
}
First, call each animation’s Update method passing in the frame’s ElapsedGameTime and a loop value of true. Copy all of the BoneTransfroms from the celebrate animation. Then, loop all of the rightArmBones index values and copy the bone values from the wave animation into the combinedBoneTransfroms list.
The final change is to update how the AvatarRender draw call is called. In the games Draw method, update the following lines of code:
// Draw the avatar using the combined bone transforms
avatarRenderer.Draw(combinedBoneTransfroms, avatarAnimationCelebrate.Expression);
In this overload of the
AvatarRenderer Draw method, it takes a list of the bone transforms and
an AvatarExpression. Use the Expression from the celebrate animation and
your combinedBoneTransfroms list.
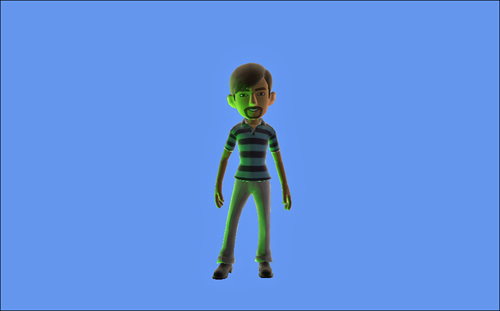
Running the sample now
should display the avatar playing the celebrate animation except for the
right arm, which is waving as shown in Figure 2 below.