1. Problem
You want to customize your
application with a different resource dictionary, depending on whether
the light or dark theme is selected, and you want test it with fake
data.
2. Solution
You must create different dictionaries with your brushes. Then you select PhoneLightThemeVisibility and apply the theme that you prefer, using sample data created inside Blend.
3. How It Works
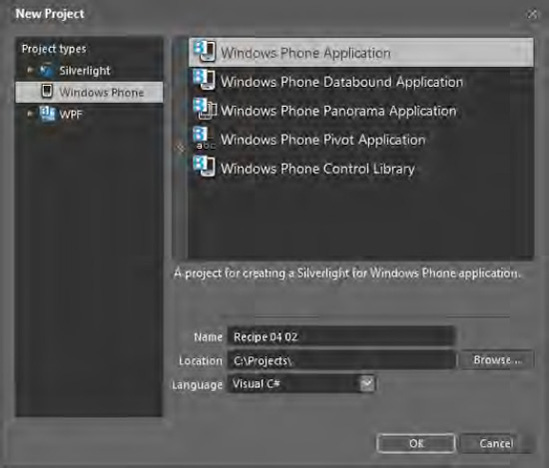
This recipe is achievable in part only with Blend. In Visual Studio, you can edit only the app.xaml.cs code, and then from one of the two instruments you create a new project for Windows Phone (in Blend, as you can see in Figure 1).
Once you have created the project, add a folder named Skins, and add to this folder two dictionaries, DarkTheme.xaml and LightTheme.xaml. Next, edit the app.XAML
file, which you will be automatically linked to the dictionary taking
care of comment underlined two lines representing the themes to be
applied (unfortunately, not at design time, but at runtime). If you also
have settings that are shared by both themes, you could add a resource
dictionary that contains the shared keys.
...
<ResourceDictionary.MergedDictionaries>
<!--<ResourceDictionary Source="Skins/DarkTheme.xaml" />-->
<!--<ResourceDictionary Source="Skins/LightTheme.xaml" />-->
</ResourceDictionary.MergedDictionaries>
...
At this point, you use
Blend's Data panel, which enables you to manage your application data
sources and to generate sample data to test your pages. Another very
nice feature offered by this panel is the creation of data
representation from data. Follow along step by step:
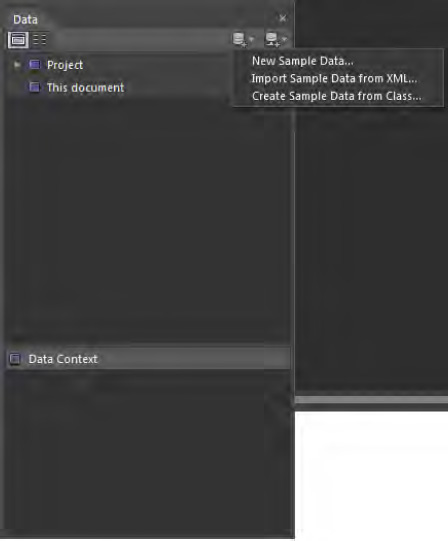
Click the button  to displays the menu in Figure 2.
From this menu, select New Sample Data. A dialog box appears, where you
can choose the data source's name, the point at which to define the
scope, and the data source's visibility.
to displays the menu in Figure 2.
From this menu, select New Sample Data. A dialog box appears, where you
can choose the data source's name, the point at which to define the
scope, and the data source's visibility.
Call the data source SampleDataSource.
If you are using a domain-oriented approach, consider creating the data
source at the project level so that you can reuse it in another view.
And because this is an application that is simply allowing to take into
consideration these features offered by Blend, enable the sample data at
runtime.
At this point, the base template has generated a data source called SampleDataSource, which (through the template hierarchy that you see in Figure 4-8) will have a complex type called SampleDataSource. Within the complex type, you can find a collection of objects composed of two properties called Property1 and Property2 (which will be the ones that are going to change).
To simulate an
application domain, think of your application as an organizer that lets
you keep track of your money. Rename the two properties automatically
generated by the tool as Reason and Money, and add another by clicking the plus (+) symbol next to collection and naming it Date.
At this point, by clicking the Edit Sample Value button  , you can edit the values that the properties must take. For Date, you define a type String => Date (remember that Windows Phone doesn't have StringFormat in binding). For Money, you define a type String => Price, and for Reason, you use String => loremipsum.
From this screen, you can specify the number of items that must be
contained in your collection. To have a good amount of data, we have
chosen 30.
, you can edit the values that the properties must take. For Date, you define a type String => Date (remember that Windows Phone doesn't have StringFormat in binding). For Money, you define a type String => Price, and for Reason, you use String => loremipsum.
From this screen, you can specify the number of items that must be
contained in your collection. To have a good amount of data, we have
chosen 30.
Assuming that it was up to the
developer to create the sample data source, it's now up to the designer
to create a view template. (It is true that often these two job titles
merge into one person, but it's always nice to talk of an ideal world).
In fact, you can just drag the
collection contained in the data source on the page where you want it to
display the list to create a list box with already an ItemTemplate. Unfortunately, the basic template is not as appealing as a designer might hope, but it still saves a bit of work.
...
<DataTemplate x:Key="ItemTemplate">
 <StackPanel>
  <TextBlock               Text="{Binding Date}"/>
  <TextBlock               Text="{Binding Money}"/>
  <TextBlock               Text="{Binding Reason}"/>
</StackPanel>
</DataTemplate>
...
Starting from this template, you want to get a table design, and then you will delete the StackPanel to get a Grid to define columns from 182/76/200 pixels (above the list box, you will create another Grid with the same columns to make the header of the grid).
Then the XAML for your template must be similar to this:
<DataTemplate x:Key="ItemTemplate">
        <Grid>
 <Grid.ColumnDefinitions>
                <ColumnDefinition Width="182" />
  <ColumnDefinition               Width="76" />
  <ColumnDefinition               Width="200" />
 </Grid.ColumnDefinitions>
        <TextBlock Text="{Binding Date}" />
        <TextBlock Text="{Binding Money}"  Grid.Column="1" />
        <TextBlock Text="{Binding Reason}"  Grid.Column="2" />
</Grid>
</DataTemplate>
At this point, the
information is displayed in white on black, and vice versa, depending on
the theme. Create your theme and try it to see if you like the result.
The wisest choice is to uncomment the chosen theme and use the Device
panel to change the theme of your phone. So first you define within the
dark theme the following brushes:
...
<SolidColorBrush x:Key="DateBrush" Color="#FFFFFFFF" />
<SolidColorBrush x:Key="ReasonBrush" Color="#FBBEBE00" />
<SolidColorBrush x:Key="MoneyBrush" Color="#FFFF0000" />
...
In the light theme, the brushes are defined the same way but with different colors:
...
<SolidColorBrush x:Key="DateBrush" Color="#FF160FF9" />
<SolidColorBrush x:Key="ReasonBrush" Color="#FBE707AB" />
<SolidColorBrush x:Key="MoneyBrush" Color="#FFA90000" />
...
You now have two themes and
you have tested them in various combinations for the phone. The last
thing to do is apply them at runtime. Unlike everything you've done so
far, this task must be done by hand with code at runtime, because only
at this time can you know which theme has been chosen by the user.
Within the App.xaml.cs file, create a private method that has the scope to apply the theme and call it (with extreme imagination) ApplyTheme().
This method should be invoked to raise either of the events Launching
or Activated for the simple reason that, in case your application has
been simply reactivated following a tombstoning, you must be ready to
acknowledge any change in theme settings made by the user in the
meantime.
...
private void Application_Launching(object sender, LaunchingEventArgs e)
{
        ApplyTheme();
}

private void Application_Activated(object sender, ActivatedEventArgs e)
{
        ApplyTheme();
}

private void ApplyTheme()
{
  Visibility vis = (Visibility)Application.Current.Resources["PhoneLightThemeVisibility"];
  ResourceDictionary dict = new ResourceDictionary();
  dict.Source = new Uri((vis == System.Windows.Visibility.Visible)
      ? "/Skins/LightTheme.xaml"
      : "/Skins/DarkTheme.xaml", UriKind.Relative);

  Application.Current.Resources.MergedDictionaries.Clear();
  Application.Current.Resources.MergedDictionaries.Add(dict);
}
...
The method ApplyTheme() checks the value of the system resource PhoneLightThemeVisibility. If Visible loads the dictionary for the theme, the application uses the light theme, and otherwise uses dark. After this, cleans the MergedDictionaries
collection of the application and adds the dictionary you have just
loaded. This enables you to have different views, depending on the theme
that the user has chosen.
4. Usage
You can run the project from
Blend or Visual Studio by pressing F5. Look for the information
displayed according to the color scheme you've chosen with respect to
the mood of the user. Now go back to the start page, pressing the
windows button. Enter the settings and change the theme to light or dark
depending on what you had before. Go back into your application and
view it in the theme with the mood chosen, but with the colors changed
for better display.
