You can use Silverlight animations in a couple different ways to move an element around the screen. One way is to target a TranslateTransform set to the element’s RenderTransform property. But programmers who are more comfortable with Canvas might want to animate the Canvas.Left and Canvas.Top attached properties. A special syntax is required to animate attached properties, but it’s fairly simple.
This program defines a Canvas that is 450 pixels square, centers it in the content area, instantiates an Ellipse that is 50 pixels in size, and then moves that EllipseCanvas in four seconds, repeated forever. around the perimeter of the
Example 1. Silverlight Project: MoveOnCanvas File: MainPage.xaml (excerpt)
<Grid x:Name="ContentPanel" Grid.Row="1" Margin="12,0,12,0">
    <Canvas Width="450" Height="450"
            HorizontalAlignment="Center"
            VerticalAlignment="Center">

        <Ellipse Name="ball"
                 Fill="{StaticResource PhoneAccentBrush}"
                 Width="50" Height="50" />

        <Canvas.Triggers>
            <EventTrigger>
                <BeginStoryboard>
                    <Storyboard RepeatBehavior="Forever">
                        <DoubleAnimationUsingKeyFrames
                                        Storyboard.TargetName="ball"
                                        Storyboard.TargetProperty="(Canvas.Left)">
                            <DiscreteDoubleKeyFrame KeyTime="0:0:0" Value="0" />
                            <LinearDoubleKeyFrame   KeyTime="0:0:1" Value="400" />
                            <DiscreteDoubleKeyFrame KeyTime="0:0:2" Value="400" />
                            <LinearDoubleKeyFrame   KeyTime="0:0:3" Value="0" />
                            <DiscreteDoubleKeyFrame KeyTime="0:0:4" Value="0" />
                        </DoubleAnimationUsingKeyFrames>

                        <DoubleAnimationUsingKeyFrames
                                        Storyboard.TargetName="ball"
                                        Storyboard.TargetProperty="(Canvas.Top)">
                            <DiscreteDoubleKeyFrame KeyTime="0:0:0" Value="0" />
                            <DiscreteDoubleKeyFrame KeyTime="0:0:1" Value="0" />
                            <LinearDoubleKeyFrame   KeyTime="0:0:2" Value="400" />
                            <DiscreteDoubleKeyFrame KeyTime="0:0:3" Value="400" />
                            <LinearDoubleKeyFrame   KeyTime="0:0:4" Value="0" />
                        </DoubleAnimationUsingKeyFrames>
                    </Storyboard>
                </BeginStoryboard>
            </EventTrigger>
        </Canvas.Triggers>
    </Canvas>
</Grid>
|
Notice that the Storyboard.TargetName is set to reference the Ellipse element, and the Storyboard.TargetProperty attributes are set to the strings “(Canvas.Left)” and “(Canvas.Top)”. When targeting attached properties in an animation, put the fully-qualified property names in parentheses. Simple.
What isn’t so simple—and you’ll find the same problem with targeting TranslateTransform— is the complexity of moving an object in more than one dimension. You need to handle the X and Y
coordinates separately, and this is often confusing. The approach I’ve
used involves key frames. Both start with an unnecessary DiscreteDoubleKeyFrame that sets the property to zero, but the DiscreteDoubleKeyFrame objects and LinearDoubleKeyFrame objects alternate as the EllipseCanvas. makes it way around the edges of the
It’s usually much easier handling both X and Y coordinates in unison with PointAnimation or PointAnimationUsingKeyFrames. Of course, there are very few classes in Silverlight that define dependency properties of type Point, but those that do—in particular, the Geometry derivatives—are central to vector graphics.
Let’s rewrite this program with a DoubleAnimationUsingKeyFrames to target the Center property of an EllipseGeometry:
Example 2. Silverlight Project: MoveInGrid File: MainPage.xaml (excerpt)
<Grid x:Name="ContentPanel" Grid.Row="1" Margin="12,0,12,0">
    <Grid Width="450" Height="450"
          HorizontalAlignment="Center"
          VerticalAlignment="Center">

        <Path Fill="{StaticResource PhoneAccentBrush}">
            <Path.Data>
                <EllipseGeometry x:Name="ballGeometry"
                                 RadiusX="25" RadiusY="25" />
            </Path.Data>
        </Path>

        <Grid.Triggers>
            <EventTrigger>
                <BeginStoryboard>
                    <Storyboard RepeatBehavior="Forever">
                        <PointAnimationUsingKeyFrames
                                        Storyboard.TargetName="ballGeometry"
                                        Storyboard.TargetProperty="Center">
                            <DiscretePointKeyFrame KeyTime="0:0:0" Value=" 25  25" />
                            <LinearPointKeyFrame   KeyTime="0:0:1" Value="425  25" />
                            <LinearPointKeyFrame   KeyTime="0:0:2" Value="425 425" />
                            <LinearPointKeyFrame   KeyTime="0:0:3" Value=" 25 425" />
                            <LinearPointKeyFrame   KeyTime="0:0:4" Value=" 25  25" />
                        </PointAnimationUsingKeyFrames>
                    </Storyboard>
                </BeginStoryboard>
            </EventTrigger>
        </Grid.Triggers>
    </Grid>
</Grid>
|
The coordinates have to be adjusted a bit because now we’re positioning the center
of the ball rather than its upper-left corner, but the progression of
the animation is much clearer, and it’s been reduced to one animation
rather than two.
And now, the downside: Animations that target properties of type Point are not handled in the GPU on the render thread. If that’s a concern, stick to animating properties of type double.
If you value fun more than performance, you can construct a PathGeometry using explicit PathFigure, LineSegment, ArcSegment, BezierSegment, and QuadraticBezierSegment objects, and every property of type Point can be an animation target.
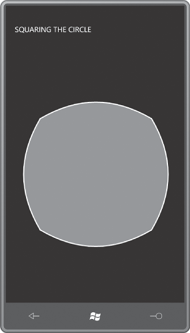
Here’s a program that
stretches that concept to an extreme. It creates a circle from four
Bézier splines, and then animates the various Point
properties, turning the circle into a square and solving a geometric
problem that’s been bedeviling mathematicians since the days of Euclid:
Example 3. Silverlight Project: SquaringTheCircle File: MainPage.xaml (excerpt)
<Grid x:Name="ContentPanel" Grid.Row="1" Margin="12,0,12,0">
    <Path HorizontalAlignment="Center"
          VerticalAlignment="Center"
          Fill="{StaticResource PhoneAccentBrush}"
          Stroke="{StaticResource PhoneForegroundBrush}"
          StrokeThickness="3" >
        <Path.Data>
            <PathGeometry>
                <PathFigure x:Name="bezier1" IsClosed="True">
                    <BezierSegment x:Name="bezier2" />
                    <BezierSegment x:Name="bezier3" />
                    <BezierSegment x:Name="bezier4" />
                    <BezierSegment x:Name="bezier5" />
                </PathFigure>
                <PathGeometry.Transform>
                    <TransformGroup>
                        <ScaleTransform ScaleX="2" ScaleY="2" />
                        <RotateTransform Angle="45" />
                        <TranslateTransform X="200" Y="200" />
                    </TransformGroup>
                </PathGeometry.Transform>
            </PathGeometry>
        </Path.Data>
        <Path.Triggers>
            <EventTrigger>
                <BeginStoryboard>
                    <Storyboard RepeatBehavior="Forever"
                                AutoReverse="True" >
                        <PointAnimation Storyboard.TargetName="bezier1"
                                        Storyboard.TargetProperty="StartPoint"
                                        From="0 100" To="0 125" />

                        <PointAnimation Storyboard.TargetName="bezier2"
                                        Storyboard.TargetProperty="Point1"
                                        From="55 100" To="62.5 62.5" />

                        <PointAnimation Storyboard.TargetName="bezier2"
                                        Storyboard.TargetProperty="Point2"
                                        From="100 55" To="62.5 62.5" />

                        <PointAnimation Storyboard.TargetName="bezier2"
                                        Storyboard.TargetProperty="Point3"
                                        From="100 0" To="125 0" />

                        <PointAnimation Storyboard.TargetName="bezier3"
                                        Storyboard.TargetProperty="Point1"
                                        From="100 -55" To="62.5 -62.5" />

                        <PointAnimation Storyboard.TargetName="bezier3"
                                        Storyboard.TargetProperty="Point2"
                                        From="55 -100" To="62.5 -62.5" />

                        <PointAnimation Storyboard.TargetName="bezier3"
                                        Storyboard.TargetProperty="Point3"
                                        From="0 -100" To="0 -125" />

                        <PointAnimation Storyboard.TargetName="bezier4"
                                        Storyboard.TargetProperty="Point1"
                                        From="-55 -100" To="-62.5 -62.5" />

                        <PointAnimation Storyboard.TargetName="bezier4"
                                        Storyboard.TargetProperty="Point2"
                                        From="-100 -55" To="-62.5 -62.5" />

                        <PointAnimation Storyboard.TargetName="bezier4"
                                        Storyboard.TargetProperty="Point3"
                                        From="-100 0" To="-125 0" />

                        <PointAnimation Storyboard.TargetName="bezier5"
                                        Storyboard.TargetProperty="Point1"
                                        From="-100 55" To="-62.5 62.5" />

                        <PointAnimation Storyboard.TargetName="bezier5"
                                        Storyboard.TargetProperty="Point2"
                                        From="-55 100" To="-62.5 62.5" />

                        <PointAnimation Storyboard.TargetName="bezier5"
                                        Storyboard.TargetProperty="Point3"
                                        From="0 100" To="0 125" />
                    </Storyboard>
                </BeginStoryboard>
            </EventTrigger>
        </Path.Triggers>
    </Path>
</Grid>
|
Here’s halfway between a square and a circle: