1. Problem
You want to subscribe to a message based on the contents of the message.
2. Solution
Property schemas allow you to
promote properties so that they can be used when setting up filter
expressions. As long as the PassThruReceive pipeline is not used, these
promoted properties are added to the message context during pipeline
processing. Once added to the message context, they can be used as
filter expressions on send ports. These properties are also available to
be evaluated or modified in orchestrations. To create a property schema
and promote a property, follow these steps:
Open the project that contains the schema.
Double-click to open the schema.
Select the node that you wish to promote.
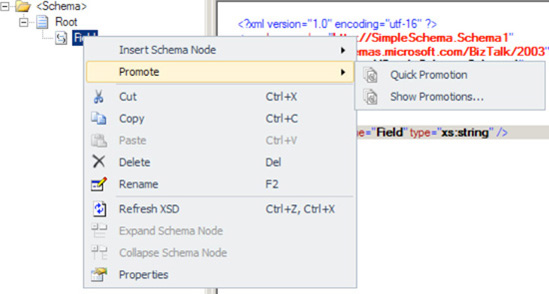
Right-click and select Promote => Quick Promotion, as shown in Figure 1.

You
will be asked if you wish to add the property schema to the project.
Click OK. The property schema is created with a reference to the
promoted property, as well as a default property of Property1. This may be removed from the property schema.
NOTE
You may also add a property schema by highlighting the project in the Solution Explorer and selecting Add => New Item =>
Property Schema. Once the property schema is added to the project, you
must associate it with a schema. To do this, select the schema in the
Solution Explorer, right-click a node in the schema, and select Promote =>
Show Promotions. In the dialog box, select the Property Fields tab, and
click the Folder icon to launch the BizTalk Type Picker dialog box.
Browse to the property schema, select it, and click OK.
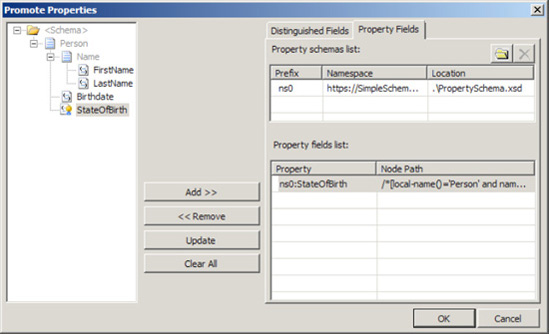
To view all promoted properties, select any node in the schema and select Promote => Show Promotions to open the Promote Properties dialog box.
Select the Property Fields tab to view all of the promoted properties, as shown in Figure 2.
You may promote additional fields directly from this dialog box, or repeat steps 3 and 4 to promote other fields.

3. How It Works
Once you have
deployed the solution with the promoted properties, they may be used to
perform content-based routing on the documents. Following is a simple
example of content-based routing. Assume you have the following two
documents:
<Person>
        <Name>
                <FirstName>John</FirstName>
                <LastName>Doe</LastName>
        </Name>
        <Birthdate>1979-05-31</BirthDate>
        <StateOfBirth>Washington</StateOfBirth>
</Person>

<Person>
        <Name>
                <FirstName>Sam</FirstName>
                <LastName>Evans</LastName>
        </Name>
        <Birthdate>1973-03-15</BirthDate>
        <StateOfBirth>California</StateOfBirth>
</Person>
You would like to send each of these documents to a different destination based on the StateOfBirth field. After creating a simple schema to represent these documents, the StateOfBirth element is promoted using the steps outlined in the "Solution"
section. Once the project is built and deployed, you are able to
reference the promoted property when creating a send port filter
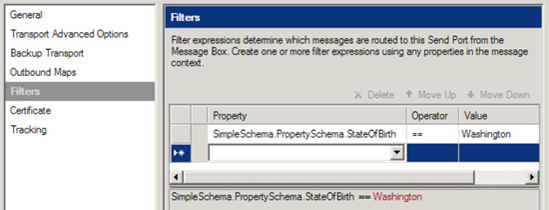
expression. In this example, two distinct send ports are created. Figure 3 shows the filter expression on the first send port. The subscription is based on the value of the StateOfBirth field being equal to Washington.

On the second send port, the subscription is based on the value of the StateOfBirth field being equal to California, as shown in Figure 4.

Although this example is simple,
it is easy to see how you can leverage this feature to create
content-based routing scenarios through the use of promoted properties.
It is also possible to create
message context properties that do not exist in the message itself, but
only in the message context. This may be valuable when you are not
allowed to modify the schema but would like to associate additional
information with the document. This may be accomplished by adding a node
to a property schema and setting its Property Schema Base property to MessageContextPropertyBase.
This property is then available and can be set in an orchestration, and
ultimately, the document may be routed based on its value. For example,
perhaps you would like to calculate the age for each person processed
in the preceding example, but you cannot add an Age element to the schema. As opposed to adding a node to the schema, a node is added to the property schema, as shown in Figure 5.

After building and redeploying the solution, a second property, Age, is now available (see Figure 6) for generating filter expressions.

To complete the scenario, you would do the following:
Create an orchestration that subscribes to all of the documents with no value for Age.
In this orchestration, calculate the Age value based on the birth date, and set the property accordingly.
Send the document back into the MessageBox database.
Add a second filter expression to the existing send ports to subscribe based on the StateOfBirth and if the Age value is present.
In summary,
content-based routing is a typical scenario, and property schemas are
used to extend the message context properties that come with BizTalk
Server.