As stated in the section "Configuring Your
Development Environment," BizTalk development is an isolated model.
Because of that, whenever you have a team of people working on a
project, you will need to create a build-and-integration environment in
which you can deploy and test the unit-tested assemblies and artifacts
from each team. You can then use the build-andintegration environment to
produce the new version of the installation package through which to
update any other environments. It is crucial that this installation
package be versioned to allow for bugs/issues to be logged against
specific versions of the application to ensure that regression bugs can
be tracked down quickly.
The hardware configuration for a
build-and-integration environment is usually fairly simple. This usually
consists of one machine that is not used for development purposes,
generally one small server or developer workstation that is used to get
the latest version of the source code from Visual SourceSafe, label the
source code, build the code, deploy to the integration environment, and
build the MSI deployment package. The environment must be configured as a
stand-alone environment with the BizTalk databases installed and
configured separately from other environments.
It is critical that the build-and-integration
environment not be used for development purposes as this needs to be a
"clean" environment that only contains source code to be used in other
environments. It is the responsibility of the Build Manager to ensure
that this is the case.
1. Five-Step Build Process
Every development team needs a process to build
and test their software. This is as importantas the creation of the code
itself. Many different build processes exist, but they are all
essentially the same with slight twists or enhancements. If your team
does not have a formal build process, you need to get one. For this
reason, a simplified build process is included here. This process is
simple enough that it can be used by even novice teams, yet flexible
enough to allow it to scale to larger development groups.
Step 1: Developer Check-In
Pick a regular time each day when unit-tested
code needs to be checked into source control. Ideally, this check-in
occurs at the same time each day to help enforce a "rhythm" to the
project. The most important rule to enforce in this step is code checked in for a build must compile.
If code in source control does not compile, there
needs to be a process in place to ensure that only compilable code is
in source control. If not, the build is considered "broken." Usually
there is a special gift for any developer who breaks a build. One of us
was once on a team where we would have a dunce cap for the coder who
checked in broken code. It was required that he wear the "I Broke the
Build" cap for two days while at work. It only took this particular
author once to learn to never check bad code in again. Since this form
of negative encouragement is often frowned upon by the politically
correct, another trick is to have a "swear" jar. Each line of code
checked into the build that doesn't work costs $20. At the project's
completion, the money goes towards the party.
Step 2: Build Manager Sets Version and Labels Code
Labeling the code is the process of time-stamping
all source files with an identifiable tag so that a specific version
can be retrieved. In SourceSafe, a label can be anything, but usually
the label contains the build number for that day. For example, if the
build number for today were 1.0.3.45, then the label would also be
1.0.3.45. This allows the Build Manager to easily retrieve source code
for previous builds if there ever is an issue with regression. It is
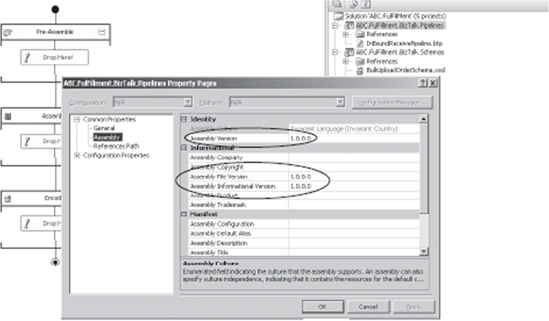
critical that the version label from SourceSafe match the assembly
version information that is included in the build. Each .NET assembly
must have its AssemblyInfo file updated with the proper build and
version number for each build. By default, Visual Studio sets the
version number to 1.0.*. This will cause the version to auto-increment
each time the solution is built. It is necessary to change this number
manually or by using a version structure as outlined in the next
section. BizTalk projects must have the assembly information updated in
the VS .NET project properties as shown in Figure 1.
The dialog boxes are only relevant for BizTalk assemblies. For assemblies that are standard.NET
assemblies such as pipeline component projects or utility classes, you
need to change the assembly version information using the
AssemblyInfo.vb or AssemblyInfo.cs file depending on your language. An
example of one is provided here:
Common Utilities AssemblyInfo.VB file
Imports System
Imports System.Reflection

Imports System.Runtime.InteropServices
' General information about an assembly is controlled through the following
' set of attributes. Change these attribute values to modify the information

' associated with an assembly.
' Review the values of the assembly attributes

<Assembly: AssemblyTitle("")>
<Assembly: AssemblyDescription("")>
<Assembly: AssemblyCompany("")>
<Assembly: AssemblyProduct("")>
<Assembly: AssemblyCopyright("")>
<Assembly: AssemblyTrademark("")>
<Assembly: CLSCompliant(True)>
'The following GUID is for the ID of the typelib if this project is exposed to COM
<Assembly: Guid("20E39685-AC83-461A-917F-019D99DFAD20")>
' Version information for an assembly consists of the following four values:
'
'      Major Version
'      Minor Version
'      Build Number
'      Revision
'
' You can specify all the values or you can default the build and revision numbers
' by using the '*' as shown below:

<Assembly: AssemblyVersion("1.0.3.45")>
Using an Assembly Info Manager
An assembly info manager is a simple .NET-based
structure that can be used to store static properties for assemblies
within a solution. This class is then used by all AssemblyInfo.vb files
within the solution. This will allow the Build Manager to have to change
only one file and have its information reflect in all assemblies within
the build. An example implementation is given here:
Namespace ABC.FulFillment.Common

    Public Class AssemblyInfoManager
        Public Const Company As String = "ABC Company"
        Public Const ProductName As String = "FulFillment Application"
        Public Const Copyright As String = "Copyright (c) 2006 ABC Inc."
        Public Const Trademark As String = ""
        Public Const MajorVersion As String = "1"
        Public Const MinorVersion As String = "01"
        Public Const BuildNumber As String = "1"
        Public Const RevisionNumber As String = "35"
    End Class

End Namespace
In order to use the class a reference to the
assembly which contains the class will need to be made. In addition, the
AssemblyInfo.vb file will need to be modified to look like the
following:
Imports System.Reflection
Imports System.Runtime.InteropServices
Imports ABC.FulFillment.Common
' General Information about an assembly is controlled through the following
' set of attributes. Change these attribute values to modify the information
' associated with an assembly.

' Review the values of the assembly attributes

<Assembly: AssemblyTitle("ABC.BizTalk.PipelineComponents")>
<Assembly: AssemblyDescription("ABC Pipeline Components")>
<Assembly: AssemblyCompany(AssemblyInfoManager.Company)>
<Assembly: AssemblyProduct(AssemblyInfoManager.ProductName)>
<Assembly: AssemblyCopyright(AssemblyInfoManager.Copyright)>
<Assembly: AssemblyTrademark(AssemblyInfoManager.Trademark)>
<Assembly: CLSCompliant(True)>

'The following GUID is for the ID of the typelib if this project is exposed to COM
<Assembly: Guid("6717G042-E07G-6E4f-9G8E-G64370453666")>

' Version information for an assembly consists of the following four values:
'
'      Major Version
'      Minor Version
'      Build Number
'      Revision
'
<Assembly: AssemblyVersion(AssemblyInfoManager.MajorVersion & "." _
AssemblyInfoManager.MinorVersion & "." _ AssemblyInfoManager.BuildNumber &"." _
AssemblyInfoManager.RevisionNumber)>
Step 3: Build the Master Solution
Depending on the configuration (single, multiple,
or none) of the Visual Studio solution files, this step can either be a
single task or a multistep task. Assuming there is a Master Build
Visual Studio .NET solution that contains all VS .NET projects to be
included in the build, the Build Manager opens this solution within
Visual Studio and builds it. Each Visual Studio project should be
configured to output its assembly to the proper folder so that it can be
loaded from the proper location.
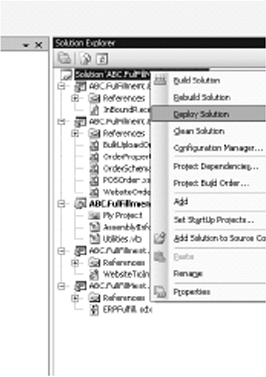
Step 4: Deploy to the Integration Environment
This is a simple step that can be completed by selecting the Deploy build option within Visual Studio as demonstrated in Figure 2.
The name of the server to deploy the solution is hardcoded in the .sln
file. A way around this is to use the "." (dot) as the server name. This
will cause Visual Studio to deploy the solution to the local machine.
VS .NET will automatically deploy any BizTalk assemblies to the
management database without having to create any additional build
scripts.
Step 5: Run a Build Verification Test
Once the build is installed in the
integration environment, the last task is to perform a test of the
build. Generally this is an automated test such as processing a set of
test messages and verifying that the output is as expected. This is
often called a build verification test or BVT.
An easy way to implement this is to configure a file-based receive
location that a set of test messages can be dropped into. These messages
would simulate a process that produces a known result such as a set of
output messages. A series of messages should be created that model
several different test scenarios. Once each of the scenarios has been
run and the results verified, the build is said to be "good."
