Business-critical software
solutions must have a disaster recovery plan in order to protect against
major system disruptions. A disaster recovery plan must include steps
to bring the backup site online as well as steps to deal with potential
data loss as a result of the major system disruption. BizTalk Server
2009-based solutions require a comprehensive disaster recovery plan that
covers both the BizTalk servers and the BizTalk Group running in SQL
Server. BizTalk Server 2009 disaster recovery requirements include the
following:
BizTalk Server 2009 Log Shipping configuration for disaster recovery
BizTalk Server 2009 Log Shipping procedures for restoring the BizTalk Group as part of disaster recovery
BizTalk runtime environment disaster recovery procedures
These items make up the core disaster recovery
requirements for BizTalk Server 2009. Additional disaster recovery
procedures are required for any additional application databases,
application code, other middleware products, and so on.
NOTE
Application teams must plan to test disaster
recovery procedures before entering production and on a recurring basis
to ensure current operations personnel understand the process and can
implement it successfully.
There is better automation of the required tasks to
configure and implement disaster recovery for a BizTalk Server 2009
solution that helps to simplify the process. Also, the BizTalk Server
2009 core documentation greatly increases the amount of documentation
regarding BizTalk Server Log Shipping and disaster recovery.
|
The steps to manually update the required database
fields in order to move a BizTalk Group to a new set of database server
instances without using BizTalk Log Shipping are not documented for
BizTalk Server 2009. Therefore, we strongly recommend configuring
BizTalk Log Shipping as part of any BizTalk Server 2009 production
environment.
|
|
Next, let's take a look at how BizTalk Log Shipping works.
1. How Does BizTalk Log Shipping Work?
Because BizTalk Server 2009 implements distributed
transactions between BizTalk databases in the BizTalk Group through log
marks, typical SQL Server disaster recovery technology such as SQL
Server Log Shipping and Database Mirroring cannot be used for BizTalk
databases that participate in DTC transactions. Therefore, BizTalk
Server 2009 provides BizTalk Log Shipping.
|
When referring to BizTalk Log Shipping, the source
system is the production SQL Server database instances, and the
destination system is the disaster recovery SQL Server database
instances.
|
|
BizTalk Log Shipping uses capabilities within SQL
Server that takes into account log marks and DTC transactions while
providing very similar functionality to SQL Server Log Shipping. As with
SQL Server Log Shipping, BizTalk Log Shipping performs log backups at
the specified interval in the Backup BizTalk Server SQL Agent job. The
log backups are then continuously applied to a SQL Server instance that
is the disaster recovery server.
The primary difference between SQL Log Shipping and
BizTalk Log Shipping is that when performing a disaster recovery event
with BizTalk Group databases, the last log is applied with the STOPATMARK SQL Server RESTORE
command option to restore all databases to the same point by the SQL
Agent job named BTS Log Shipping—Restore To Mark for each database
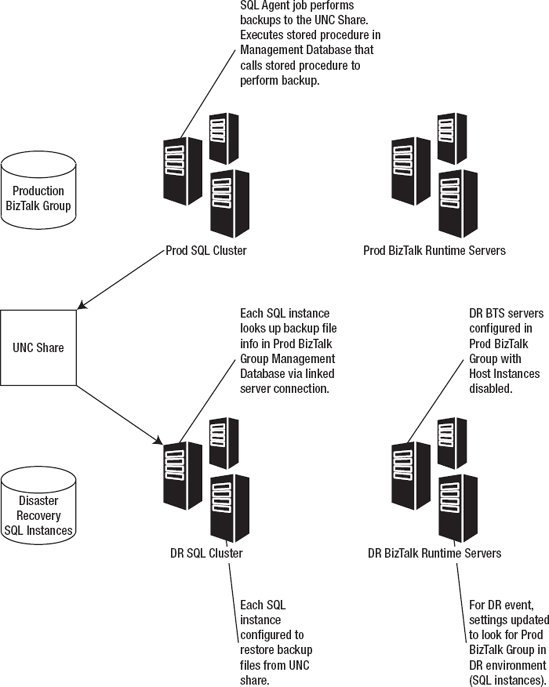
instance in the destination system. Figure 9-4 describes how BizTalk Log Shipping works.
When the disaster recovery SQL Server instances in
the destination system are configured for BizTalk Log Shipping, the
backup files created by the Backup BizTalk SQL Agent job are restored at
the disaster recovery site every 15 minutes. The backup files are
copied over the network by a SQL RESTORE command. Full backup files are copied only in the following situations:
When BizTalk Log Shipping is first configured
When a new database is added to the BizTalk Log Shipping SQL Agent job
When a RESTORE failure occurs
Each SQL instance at the disaster recovery site is
configured individually as part of BizTalk Log Shipping. When a SQL
instance is configured for BizTalk Log Shipping and the SQL Agent job is
enabled, the SQL Agent job will connect to the management database on
the production BizTalk Group, find the most recent full backup set at
the UNC share, and attempt to restore the database.
NOTE
If you move the full or log backups for a source
database from the location in which the Backup BizTalk Server job put
them, the associated row for that database in the
bts_LogShippingDatabases table on the destination system must be updated
by setting LogFileLocation or DBFileLocation to the new location where
the destination system should retrieve them. By default these values are
Null, which tells the destination system to read the backup files from
the location stored in the adm_BackupHistory table.
On the disaster recovery SQL instances configured for
BizTalk Log Shipping, the databases will be displayed in a "restoring"
state in SQL Server 2005. This is because the last log in a backup set
is never restored automatically. Once a new log is available, BizTalk
Log Shipping restores the next-to-last log. When a disaster recovery
event occurs and the disaster recovery site must be brought online, the
last log is restored automatically using the STOPATMARK command
by the SQL Agent job named BTS Log Shipping—Restore To Mark on each
destination system SQL instance to recover the databases, and the
databases will no longer be in a "loading" or "restoring" state.
BizTalk Server 2009 Log Shipping supports two
scenarios: In one scenario, all databases on all BizTalk databases on
all production SQL server instances are log-shipped to a single disaster
recovery SQL server database instance. The other scenario maps all
source databases on each source SQL Server instance to an associated
destination SQL Server instance. Note that it is fully supported to have
the same number of SQL Server database instances in the disaster
recovery site as there is in production, but on fewer physical servers.
In other words, it is not required to have the same number of physical
servers, just the same number of database instances for the second
option.
The next subsection covers configuration of the destination system SQL Server instance for BizTalk Log Shipping.
2. Configuring the Destination System for Log Shipping
Here we cover the steps to configure BizTalk Log
Shipping. As mentioned previously, ensure that the same path where
database files are located in production exists on the destination
system. So, in the earlier example where there are three SQL Server
database instances in production, all three database instances must
store the database files (MDF and LDF files) in the same path on each
server, and this path must also exist on the destination system SQL
Server database instances. The database file path can be set or changed
within SQL Server.
Another configuration step on the destination system
SQL instances is to create a linked server that points to the source
system SQL instances. There should be a linked server created that
points to the production SQL instance hosting the management database.
This will allow the SQL Agent job running on the destination system SQL
Server instances to access the BizTalk Management Database to retrieve
the backup history and database and log backup file location.
|
A key requirement for BizTalk Log Shipping to
function is that the same file path where the BizTalk database files
(MDF and LDF files) are installed must exist on the destination system.
Therefore, if a database in the production BizTalk Group is stored at
F:\Data, the drive/path F:\Data must exist on the server where the
destination system SQL Server instance is configured. Otherwise, an
error message similar to this one will occur: "File 'DBFileName' cannot
be restored to 'drive\path'. Use WITH MOVE to identify a valid location
for the file." BizTalk Log Shipping does not support WITH MOVE, so the path must be present on the destination system for BizTalk Log Shipping to work.
|
|
NOTE
Path references to Microsoft BizTalk Server 2009
will be located in the Microsoft BizTalk Server installation directory
if an in-place upgrade was performed when BizTalk Server 2009 was
installed. For example, if you upgrade BTS 2006 to BTS 2009, your
installation directory will be {Program Files}\Microsoft BizTalk Server
2006\.
Follow these steps to configure BizTalk Log Shipping:
In
Management Studio on SQL Server 2005/2008, open a query window to
execute a SQL file. Connect to the SQL instance on the destination
system that must be configured for Log Shipping.
Select File =>
Open, and then browse to the location of the script
LogShipping_Destination_Schema.sql. This script is located on the drive
where BizTalk Server 2009 is installed in the following default
directory location: \Program Files\Microsoft BizTalk Server
2009\Schema\LogShipping_Destination_Schema.sql.
Select File =>
Open, and then browse to the following SQL script:
LogShipping_Destination_Logic.sql. This script is located on the drive
where BizTalk Server 2009 is installed in the following directory:
\Program Files\Microsoft BizTalk Server
2009\Schema\LogShipping_Destination_Logic.sql.
NOTE
This script is located on the server where
BizTalk Server 2009 is installed in the directory \Program
Files\Microsoft BizTalk Server 2009\Schema\ by default, so you may need
to copy it to the SQL Server machine.
In
SQL Server 2005/2008, the Ad Hoc Distributed Queries option is disabled
by default. This must be enabled on the destination system or disaster
recovery SQL Server database instances in order to allow the disaster
recovery SQL Server database instances to perform the necessary steps.
To enable this option, execute the following SQL command in the master
database on each production SQL Server database instance:
sp_configure 'show advanced options', 1;
GO
RECONFIGURE;
GO
sp_configure 'Ad Hoc Distributed Queries',1;
GO
RECONFIGURE
GO
To confirm the change, run this query to view the configured value:
SELECT * FROM sys.configurations ORDER BY name
Ad Hoc Distributed Queries should now be set to a value of 1.
Open a new query window, and enter the following command:
exec bts_ConfigureBizTalkLogShipping @nvcDescription =
'<MyLogShippingSolution>',
@nvcMgmtDatabaseName = '<BizTalkServerManagementDatabaseName>',
@nvcMgmtServerName = '<BizTalkServerManagementDatabaseServer>',
@SourceServerName = null,
-- null indicates that this destination server restores all databases
@fLinkServers = 1
-- 1 automatically links the server to the management database
Replace <MyLogShippingSolution> in the preceding command with a description of the solution, surrounded by single quotes. Also, replace <BizTalkServerManagementDatabaseName> and <BizTalkServerManagementDatabaseServer> with the name and location of your source BizTalk Management Database, surrounded by single quotes.
If
there are multiple SQL Server instances in the source system, each
source SQL instance can be restored to its own destination SQL instance.
On each SQL instance in the destination system, run the preceding
scripts and command, but in the @SourceServerName = null parameter, replace null with the name of the appropriate source server, surrounded by single quotes: @SourceServerName = 'SQLSvrInstance1'.
Execute
the preceding command in the query window. The BizTalk Server 2009
documentation has this information: If the command fails, after you fix
the problem with the query, you must start over from step 1 of this
procedure to reconfigure the destination system.
NOTE
When you execute the preceding command, this
warning will occur, which can be ignored: "Warning: The table '#Servers'
has been created but its maximum row size (25059) exceeds the maximum
number of bytes per row (8060). INSERT or UPDATE of a row in this table
will fail if the resulting row length exceeds 8060 bytes."
View the Jobs node in the SQL Management Studio depending on which version of SQL you are running. There will be three new jobs:
BTS Log Shipping Get Backup History:
This SQL Agent job copies backup history records from the source system
to the destination every minute, and it is enabled by default.
BTS Log Shipping Restore Databases:
This SQL Agent job restores backup files for the specified databases
from the source system SQL Server instance on to the destination system
SQL Server instance. It is enabled by default and runs continuously.
BTS Log Shipping Restore To Mark:
This SQL Agent job restores all of the databases to a log mark in the
last log backup. It ensures that all databases are transitionally
consistent. It also re-creates the SQL Server SQL Agent jobs on the
destination system, saving the administrator from having to manually
re-create the SQL Agent jobs running on the source system.
Create
SQL Server security logins for the disaster recovery site that
correspond to the production site so that in the event that a failover
to the disaster recovery site is required, all required security logins
are present on the destination system.
Once
everything is configured, check the status of the newly created SQL
Agent jobs to make sure that they are running successfully. Here are a
couple of items to check in the event a SQL Agent job is failing:
Ensure that the system time and time zone are consistent between all servers.
Ensure that the job has the correct account as the owner.
Ensure that NETWORK COM+ and NETWORK DTC are enabled in Add/Remove Windows Components.
Ensure that the MSDTC security configuration in Control Panel => Administrative Tools =>
Component Services is configured correctly for your environment. Try
checking Network DTC Access, Allow Remote Clients, and Transaction
Manager Communication Allow Inbound and Allow Outbound to see if doing
so resolves connectivity issues.
The last step is to edit the update scripts and XML files to prepare for a disaster recovery event by following these steps:
On
a computer running BizTalk Server 2009, browse to the following folder:
\Program Files\Microsoft BizTalk Server 2009\Schema\Restore.
Right-click SampleUpdateInfo.xml, and then click Edit.
For
each database listed, replace "SourceServer" with the name of the
source system SQL Server database instance, and then replace
"DestinationServer" with the name of the destination system SQL Server
instance.
|
Do not perform a blanket search and replace, since
databases may be present on different SQL Server instances in the source
system and may be restored to different SQL Server instances in the
destination system. Be sure to include the quotation marks around the
name of the source and destination SQL Server instances. Also, if you
renamed any of the BizTalk Server databases, you must also update the
database names as appropriate.
|
|
If you have more than one Messagebox database in the source system, add another MessageBoxDB line to the list, and then set IsMaster="0" for the non-master databases.
If the source system is using BAM, SSO, the Rules Engine, or EDI, uncomment these lines as appropriate.
If
custom databases have been added to the Backup BizTalk Server SQL Agent
job, add the custom databases as appropriate under the
<OtherDatabases> section.
When finished editing the file, save it and exit.
