6. IDOC Deep Dive
It is now time to take a closer look into the
structure of IDOCs to better understand some of the segments that a
BizTalk Developer must understand.
In each IDOC schema, you can expect the following elements:
The EDI_DC40 node is also referred to as the Header
node, or record. Within this node we will discover several fields that
we need to populate including:
|
Element Name
|
Purpose
|
|---|
|
IDOCTYP
|
The basic structure of the IDOC.
|
|
CIMTYP
|
The structure of the custom extension. If an SAP basic structure is extended, a name must be given for the extension.
|
|
MESTYP
|
A logical representation of the message. The name should provide a business contextual meaning.
|
|
SNDPOR
|
Sending System Port
|
|
SNDPRN
|
Sending System/Partner
|
|
SNDPRT
|
Sender Partner Type
|
|
RCVPRT
|
Receiver Partner Type
|
|
RCVPRN
|
Receiving System/Partner
|
|
IDOCTYP
|
The basic structure of the IDOC
|
Depending upon the IDOC there may be one or more SAP
tables that are represented within the IDOC. In the case of the CONF32
IDOC, there is only one called E2CONF5. Within this segment, or node, there are a number of fields that we need to populate.&;
|
Element Name
|
Purpose
|
|---|
|
LDATE
|
Logical date/actual date of the confirmation. In our situation we are just going to provide the current date.
|
|
BUDAT
|
Posting date of the confirmation. In our situation we are just going to provide the current date.
|
|
LTIME
|
Logical time/actual time of the confirmation. In our situation we are just going to provide the current time.
|
|
ERTIME
|
Entry time of the confirmation. In our situation, we are just going to provide the current time.
|
|
ARBPL
|
Work center
|
|
AUFNR
|
This field is where the Order Number for the job is submitted.
|
|
VORNR
|
Order Numbers, usually have an Operation associated with them so we can leverage this field to provide the Operation Number.
|
|
ISMNW
|
The duration of the work that was performed.
|
Finally, a GUID element exists that associates itself
with the SAP transaction ID (TID). We can provide our own GUID, or let
the adapter provide a GUID.&;
7. Building a BizTalk application — Sending IDOC
The application that we are going to build will
receive Vehicle Timesheets from our Work Order Management system,
transform the data and construct a CONF32 Confirmation IDOC. You may be
asking yourself "Vehicles have Timesheets"? Yes they do! This scenario
is an example of a real world solution where we have employees in the
Energy sector out working on the maintenance of energy infrastructure.
Much like we would expect to track the time that an employee spends on a
job, we also want to track the time of equipment that has been used. A
Vehicle makes up a significant portion of the overall costs on the job
and therefore we want to ensure these costs are recorded in SAP. The,
out-of-the-box, CONF32 IDOC allows us to send this information to SAP
without customization.
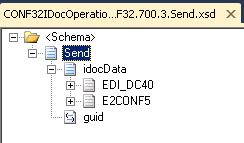
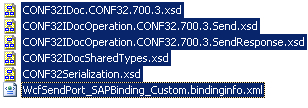
The first task that we are going to take on is generating the CONF32 IDOC. To simplify this process, we can leverage the steps discussed in the How to Generate IDOC schemas section in this chapter. The end result is that we should have the following schemas:
The
next area that we need to focus on is generating a schema that
represents the XML that the Work Order Management system will be
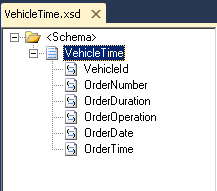
sending. A simple schema called VehicleTime.xsd exists in this chapter's source code.
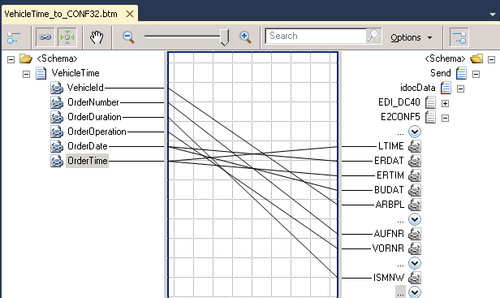
We now need to construct a map called VehicleTime_to_CONF32.btm. Within this map, we will have two tabs. The first tab that we are going to build is the Control Record
tab. Within this tab, we need to provide SAP with metadata about the
IDOC that we are about to send. SAP will use this information to
determine how it should process the IDOC. SAP will also use the Partner
information provided to determine if the BizTalk user that is submitting
the IDOC has the appropriate permissions to do so.
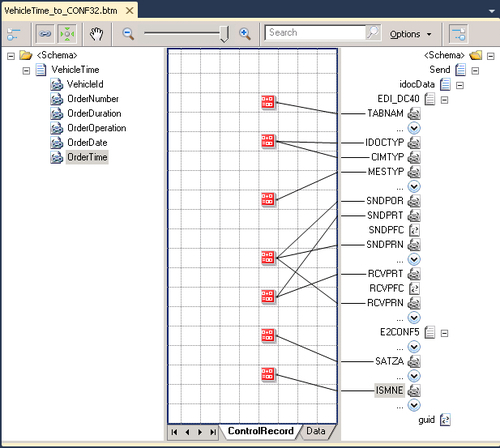
The
following table contains the values that have been provided to each
node. This information is generally static, but it is a good idea to
store this information in a common Helper class so that if you have to
make a change you can do so in one place. For the purpose of this
chapter, we will simply embed this information with String Concatenate
functoids. Do note that some values like SNDPOR, SNDPRN, and RCVPRN will most likely be different on your SAP system.
|
Node
|
Value
|
|---|
|
/EDI_DC40/TABNAM
|
EDI_DC40
|
|
/EDI_DC40/IDOCTYP
|
CONF32
|
|
/EDI_DC40/CIMTYP
|
CONF32
|
|
/EDI_DC40/MESTYP
|
CONF32
|
|
/EDI_DC40/SNDPOR
|
MTSIDOC
|
|
/EDI_DC40/SNDPRT
|
LS
|
|
/EDI_DC40/SNDPRN
|
MTSIDOC
|
|
/EDI_DC40/RCVPRT
|
LS
|
|
/EDI_DC40/RCVPRN
|
MTSIDOC
|
|
/E2CONF5/SATZA
|
I20
|
|
/E2CONF5/ISMNE
|
H
|
The next tab that we want to create is the Data
tab. Within this tab, we will focus on the data that is being passed
from the Work Order Management system and perform any formatting
required for SAP.
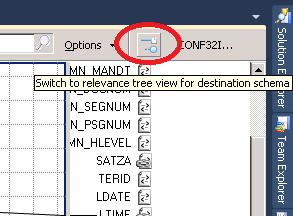
Note: A new feature of the BizTalk 2010 mapper is
the ability to display only nodes that are currently mapped. To enable
this feature, click on the Switch to relevance tree view for destination schema
button. When selected, the BizTalk mapper will only display nodes that
are currently being mapped. This feature is very helpful when mapping
SAP IDOCs that have many nodes.
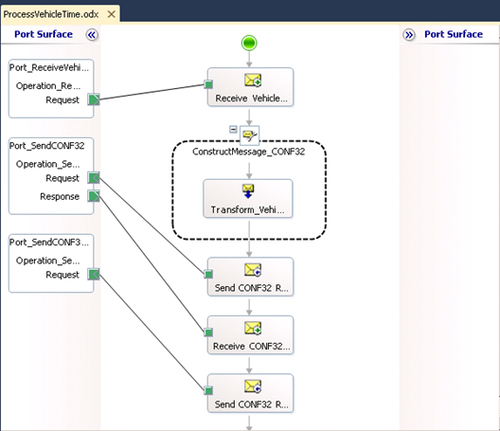
With
the BizTalk Map complete we can focus on the BizTalk Orchestration that
will be responsible for orchestrating the events between the Work Order
Management System and SAP. The Orchestration will be responsible for the
following functions:
Receiving the Work Order Management request that includes the Vehicle Time.
Transforming this request into the SAP CONF32 IDOC request.
Receiving the SAP CONF32 IDOC Response.
Writing the SAP CONF32 IDOC Response to disk so that we can verify whether the exchange with SAP was successful.
Since
we are not using a Flat File schema and will opt to use the SOAP
messaging capability of the SAP adapter, we can now deploy our
application by right mouse clicking on the solution and selecting Deploy
Solution.
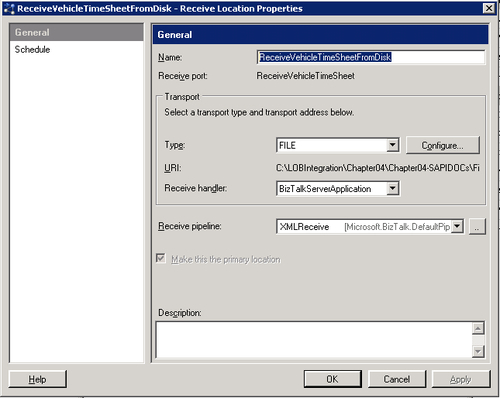
Once inside the BizTalk Administration Console, we will discover that an application called Chapter04-SAPIDOCs now exists.
Within this application, we can find a Receive Port called ReceiveVehicleTimeSheet and a Receive Location called ReceiveVehicleTimeSheetFromDisk. This Receive Location will use the FILE adapter, the BizTalkServerApplication Receive handler and the XMLReceive Receive Pipeline.
We
will have two Send Ports with the first one being the Send Port that
will be used to communicate with SAP. The Consume Adapter Wizard
generated a binding file that we could use to generate a Send Port
automatically. The issue with this approach is that the binding file
will use the WCF Custom adapter, which does not allow us to manipulate
the SAP connection details easily. Since we often create our SAP IDOC
schemas in non-Production environments, it is not likely that we will be
able to take full advantage of the generated Binding file anyways as
our targets will be different within each BizTalk environment.
The name of the SAP Send port is SendCONF32IDOC. It will use the WCF-SAP custom adapter, the BizTalkServerApplication Send Handler, the XMLTransmit Send pipeline, and the XMLReceive pipeline. By clicking the Configure button, we can further explore the properties that are exposed by the SAP Adapter.
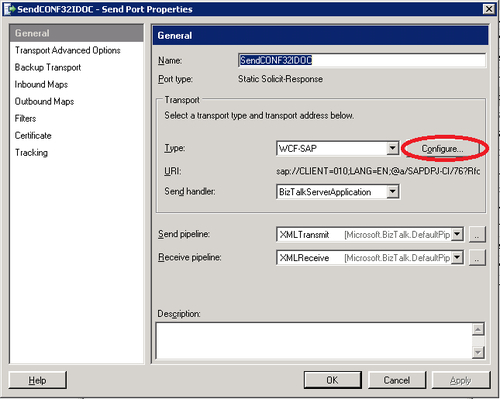
The General tab will expose our Endpoint Address and SOAP Action header. To further explore the Address URI we can click on the Configure button.
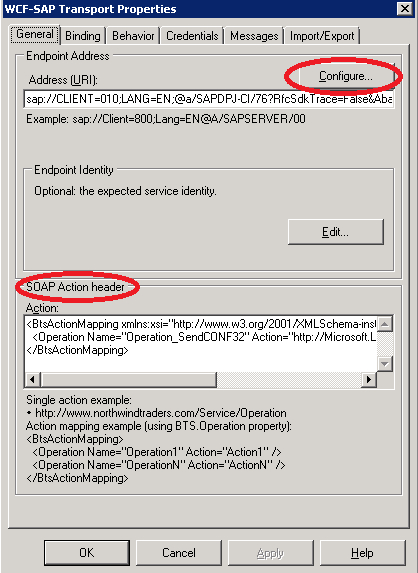
The configure button on the General
tab is one of the key differentiators between using the WCF-Custom
adapter, with SAP Binding, and the WCF-SAP adapter. As you can see in
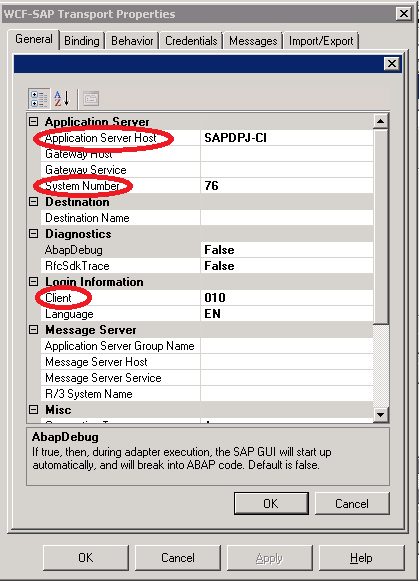
the following image the WCF-SAP Adapter provides us more options when
configuring our SAP configuration. The key properties that we want to
populate are:
If you are unsure of the values for your organization, please contact your BASIS administrator.
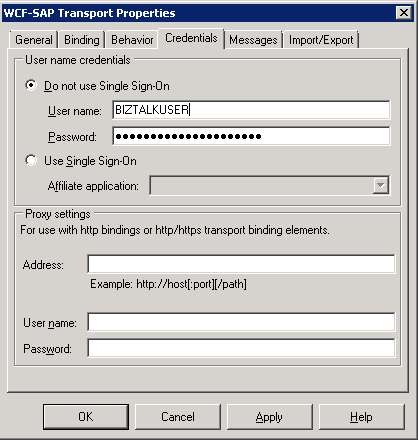
The next tab that we need to be concerned with is the Credentials
tab. On this tab we will provide the BizTalk credentials that will be
used to communicate with SAP. We do have the ability to specify a
Username/Password combination or an SSO Affiliate application. For the
purposes of this chapter, we will simply provide a Username/Password.
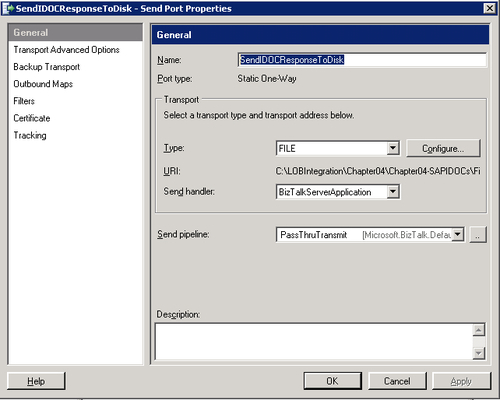
The
next Send Port that we need to create is the Send Port that will write
the SAP IDOC response to disk. The name of this Send Port is SendIDOCResponseToDisk, and it will use the FILE Adapter, a Send Handler of BizTalkServerApplication, a Send Pipeline of PassThruTransmit.
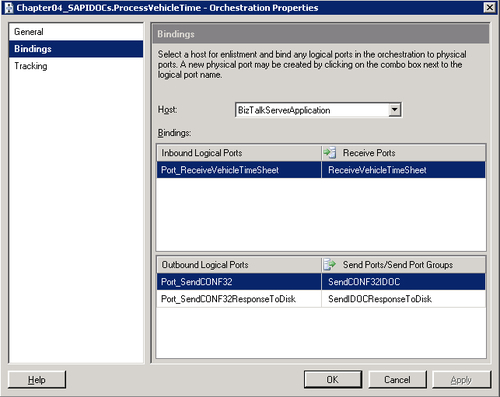
We now need to configure our Orchestration to use the Receive Port and Send Ports that we just created.
We can now start our application so that it is ready for Application Testing.
