1. Extending Dynamics GP with the Support Debugging Tool
It has been said that bacon is the meat that makes
other meat taste better. Along those lines, the Support Debugging Tool
is the bacon of the Dynamics GP world. It makes working with Dynamics GP
better in so many ways.
The Support Debugging Tool is a free utility from
Microsoft with enough features to fill several recipes. We'll do just
that and spend the next several recipes looking at specific Support
Debugging Tool features. The Support Debugging Tool is free but because
of its power, it has to be obtained from a Microsoft partner; it cannot
be downloaded directly.
The Support Debugging Tool is the creation of
Microsoft Escalation Engineer and all-around dexterity guru David
Musgrave. David, along with help from some folks in the Dynamics GP
community, created the Support Debugging Tool to improve error tracing.
The tool has morphed into an extremely handy utility for Dynamics GP.
One of the benefits of the Support Debugging Tool is
that it works with Dynamics GP security. The Support Debugging Tool
comes with two predefined security roles. One role, MBS DEBUGGER USER,
provides access to standard mode features such as logging and support
requests. This role can safely be given to average users.
The Support Debugging Tool also includes a more
adv㋚nced MBS DEBUGGER ADMIN role that provides access to the more
advanced sections of the tool. Finally, GP security can be used with the
associated tasks to fine tune these security options.
Before we can dig into the Support Debugging Tool we
need to install it. We will do that here and turn on the Administrator
mode so that we don't have to revisit this with each new recipe.
How to do it...
To install and set up the Support Debugging Tool to activate company-based color schemes:
1. Obtain the DEBU_1100.zip file from Microsoft via a Microsoft partner.
2. With Dynamics GP closed, right click the DEBU_1100.zip file, select Extract All, and follow the prompts to unzip the file.
3. In the new DEBU_1100 folder copy the CNK file to the location where Dynamics GP is installed. By default this is c:\Program Files\Microsoft Dynamics\GP\.
4.
Start Microsoft Dynamics GP and agree to the Add New Code message.
Dynamics GP may need to be run as an administrator with some versions of
Windows.
5. In Microsoft Dynamics GP select the Microsoft Dynamics GP menu option and then Tools | Support Debugging Tool.
6. To turn on Administrator settings select Debugger | Dex.ini Settings.
7. Select the Enable Debugger Advanced Mode Features checkbox and enter the system password if prompted:

8. Click on OK to finish.
2. Coloring windows by company
Many companies use several company databases in
Dynamics GP. This may be because they have multiple entities to account
for or because they want a test and a production database. Invariably,
data entry mistakes are made because users inadvertently key information
to the wrong company. For some time, users have asked for a way to
visually tell one company from another. One feature of the Support
Debugging Tool is designed to do just this.
The Support Debugging Tool allows a user to change
the window background color for a specific company. This provides a
consistent visual cue to identify the company being used.
In this recipe, we will look at how to assign colors to specific companies to distinguish them from each other.
Getting ready
The Support Debugging Tool needs to be installed on
each user's machine and users need access to the MBS DEBUGGER USER
security role for the company-based color schemes to work. Additionally,
the Administrator mode needs to be activated within the tool.
How to do it...
To use color to identify specific companies:
1. In Microsoft Dynamics GP select the Microsoft Dynamics GP menu option and then Tools | Support Debugging Tool.
2. In the Support Debugging Tool window select Debugger | Administrator Settings.
3. Enter the system password if prompted.
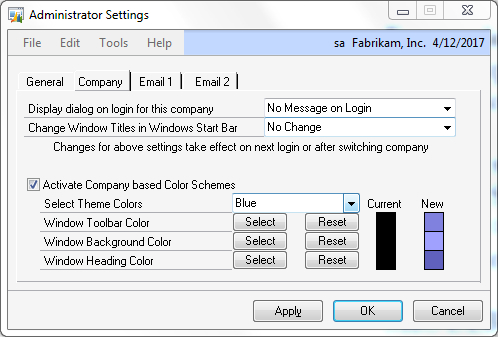
4. Select the Company tab.
5. Select the drop-down menu next to Select Theme Colors and set the theme to Blue. This provides a preset blue theme throughout this company:

6. Click on Apply to see the changes. The window colors change to blue to match the theme. This setting is retained for this company.
7. Repeat this process by opening other companies and changing their window colors.
8. Colors can be controlled individually for the Toolbar, Background, and Window Heading with the selections below the theme.
How it works...
This feature of the Support Debugging Tool started
out as a simple Visual Basic for Applications (VBA) add-on. Eventually,
it was incorporated into the Support Debugging Tool.
Changing the background color is a great way to
prevent data entry errors. I've even seen firms match the color of a
company's check stock to the color of the company database to prevent
check printing errors.