1.3 Validation Criteria
Each
object, other than the Registry object, has a validation tab; by using
this tab, you specify the criteria for validating that the object
exists. Add criteria in the top list box by clicking the New button.
This results in a pop-up menu where you choose from one of the
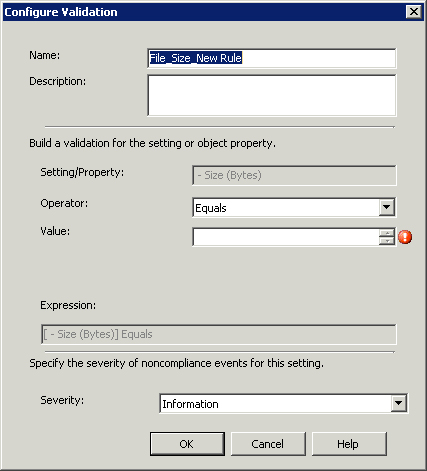
validation properties, as specified in Table 16.2. This opens the Configure Validation dialog box shown in Figure 16.

The Name field is a display name for the rule
and the Description field is optional. The Setting/Property field is
read-only and already filled in based on the selection you made on the
New pop-up menu. You have nine operators to choose from for numbers,
dates, and versions:
Between
Equals
Greater than
Greater than or equal to
Less than
Less than or equal to
None of
Not equals
One of
String values have 13 possible operators:
Equals
Not equals
One of
Begins with
Ends with
Contains
Matches
All Of
None Of
Does not begin with
Does not end with
Does not contain
Does not match
For
One of, All of, or None of, the Value field can contain a
comma-separated list of values. For the Between operator, the second
Value field is added to the tab to specify the maximum value. Using
Windows environment variables for values is not valid. The Expression
field is read-only and built for you based on the choices you make in
the tab.
Similar to the object validation criteria,
every setting also has a validation tab. The primary difference is that
with settings, you are not validating the existence of the setting; you
are validating the value of the setting and specifying the expected
value or values against which to validate the setting. This means you do
not choose from a predefined set of properties to validate against;
instead, the validation criteria specified are compared against the
setting itself as defined on the General tab. As an example, for a
Registry setting, the validation criterion that you specify on the
Validation tab evaluates the Registry value you specify on the General
tab.
One additional property to set for validation
criteria on settings is the data type. With objects, you choose from a
predefined list of properties so DCM knows what the data type is. With
settings, there is no way for DCM to predetermine the data type to
decide how the value is compared to expected values. Possible data types
include the following:
String
Integer
Date/Time
Floating Point
Version
The choice of data type also affects the operators available for the validation criteria, as noted earlier in this section.
The final section at the bottom of the
Validation page is wholly enabled or disabled by checking Report a
non-compliance event when this instance count fails. This setting
performs an additional validation check by counting the number of
objects that match the criteria specified on the General tab, and it
raises another noncompliance event if the count does not fall within the
criteria specified.
An example of this is definitely in order.
Suppose that per organizational standard, each server must have at least
two and no more than four SCSI drives, and these must be formatted with
512 bytes per sector. This is a check you will want in a DCM baseline.
The following steps outline setting this up:
1. | Navigate
to Site Database -> Computer Management -> Desired Configuration
Management -> Configuration Items in the ConfigMgr console tree.
|
2. | Right-click
the configuration item to add the check to and select Properties, or
you can create a new one by right-clicking the Configuration Item in the
tree and selecting New.
|
3. | Open the Settings tab.
|
4. | Click New near the bottom left of the tab and choose WQL Query from the pop-up menu.
|
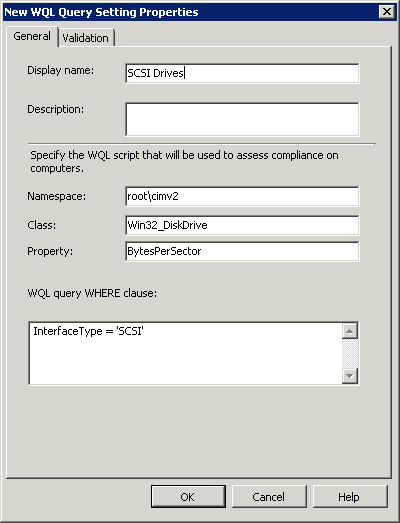
5. | On the General tab of the New WQL Query Settings Properties dialog box, fill in the criteria as follows (and as shown in Figure 17). This query returns a list of all the disk drives attached to the local system that are connected using a SCSI interface.
- Namespace— root\cimv2
- Class— Win32_DiskDrive
- Property— BytesPerSector
- WHERE clause— InterfaceType = ‘SCSI’.

|
6. | Open the Validation tab.
|
7. | Select Integer for the Data Type setting at the top.
|
8. | Choose New at the bottom left of the Details list.
|
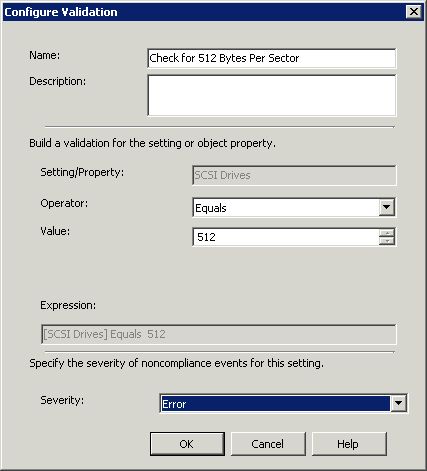
9. | Configure the Configure Validation dialog box as follows (and as shown in Figure 18):
- Name— Check for 512 Bytes Per Sector
- Operator— Equals
- Value— 512
- Severity— Error

|
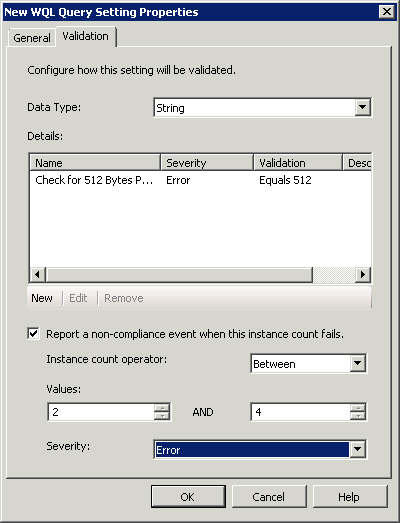
10. | Check the box labeled Report a non-compliance event when this instance count fails.
|
11. | Change the Instance count operator to Between and enter 2 and 4 in the Values boxes.
|
12. | Change the Severity to Error. Figure 19 displays the completed Validation tab.

|
This criterion causes a noncompliance event, with a severity of Error raised according to the stated criteria in step 12.
The biggest challenge when creating custom
configuration items is translating the business requirement or user
interface–based setting into items DCM expects and can act on. The most
common place to store and query settings from is the Windows Registry.
Other locations include WMI, Active Directory, and SQL Server. DCM,
using one of the object or setting types can evaluate all of these and
more.
However, how do you determine where to look in
the first place? Many resources can help you with this endeavor. First
and foremost is experience with Windows. An intimate knowledge of the
Registry and of where Windows stores values will make your task much
easier. The ability to write custom scripts and use WMI will also help
tremendously. As the old cliché goes, “There’s no substitute for
experience.”
1.4 Using Microsoft Tools
An excellent resource is the Microsoft-provided
configuration packs. Microsoft has put a lot of work into creating
them, and they provide great examples of how and where to find settings.
Even if you do not actually intend to use them, it is still a good idea
to download and install these CPs just to dissect them and use them as a
reference. Many of the evaluation criteria are checked using custom
scripts. You can easily copy these scripts and use them in your own
configuration items as is or with simple modifications—it is usually
much easier to modify someone else’s working script than create your own
from scratch.
Registry Monitor (RegMon) and Process Monitor
(ProcMon) are some of the greatest all-around Windows utilities
available—these are available as free downloads from Microsoft’s
Sysinternals site at http://technet.microsoft.com/en-us/sysinternals/default.aspx.
(Note that the capabilities of RegMon are rolled into ProcMon and that
RegMon does not run on Windows Vista or Windows 2008.) These tools
monitor the Registry and record every change made to it, letting you
identify the exact location of any modification occurring to a system.
As an example, suppose you wanted to create an evaluation criteria to
determine if Remote Desktop is disabled but don’t know where this
setting is stored in the Registry. After starting ProcMon, simply make
the change in the GUI, and the Registry change will be displayed in the
ProcMon window.
1.5 Third-party Tools
Profiling a current system is an obvious way to
create new configuration items. This involves surveying a system’s
current configuration and building configuration data from that
configuration. Unfortunately, the built-in ConfigMgr toolset does not
have this capability. You will have to resort to a third-party tool to
get this functionality. One such tool, CP Studio from Silect Software.
1.6 Configuration and Content Versions
When editing baselines and configuration items,
you can modify one of two parts—the administrative or informational
part that does not play a role in evaluation, or the content criteria
part that does play a role in evaluation. The properties that make up
the administrative part include the following:
Display name and description
Categories
Dependencies (not applicable to configuration items)
Collection assignments (not applicable to configuration items)
Auditing information, such as creation times
Security rights
Only configuration items have a content version; properties that are part of the content include the following:
The objects and settings assessed by clients
The validation and validation criteria used during compliance evaluation
The detection method used for application configuration items
The applicability criteria for application and general configuration items
Both these parts have separate, independent
version numbers that are tracked by ConfigMgr. These version numbers are
incremented as you make changes to their respective properties; and it
is important to distinguish between the two areas when reviewing the
results of an evaluation. The version numbers are displayed in most
reports.
1.7 Exporting the Baseline
A final step after creating a new baseline is
to export it. Exporting the baseline gives you a way to share it with
others, copy the baseline to a separate ConfigMgr site, edit it in its
native Service Modeling Language (SML) format, and back up the baseline.
Exporting the baseline creates a CAB file in the folder you specify and
includes any contained configuration items. To export a baseline, right-click it and choose Export Configuration Data from the context menu.
Inside the CAB file of an exported baseline is
an XML file for each configuration item and the baseline itself. You can
actually create or edit these files outside of ConfigMgr, as discussed
in the next section, “External Authoring.”