2. Configuring the Update Inventory Tools
Once it has been determined that the inventory
tools have been installed and tested successfully on the preproduction
client systems, you need to configure the inventory tools for the
production environment. Two areas need careful attention.
The first is the removal of limitations on the collections created
during the installation of the tools, and the second is configuration of
the sync host that’s responsible for fetching the latest update and
security databases from Microsoft.
Removing Limitations from Collections
The collections created during installation of
the inventory tools are limited collections and should be configured for
the organization’s needs. The collection marked Pre-production should
be populated manually with the site systems that will be used to test
packages of software updates before general deployment. The other
collection should include all production systems in the site that will
be scanned for missing software updates. You do this by selecting the
collection, editing its properties, and changing the collection query in
the Membership Rules tab to remove the limited query. This will make
all systems in the SMS site members of the collection and will cause
each to receive an advertisement for the inventory tools packages and
begin scanning for missing updates.
By default, the advertisements for the
inventory tools scanning packages run every seven days. For many
organizations this will be too long a period between scans, especially
if the reports generated and displayed under the Software Updates node
in SMS 2003 Administrator Console are used to determine the update
status and compliance across IT assets in the organization. There’s also
another reason for dropping the advertisement interval, at least
initially. A particular software update will be listed in the console
only if at least one client runs a scan and finds that the update is
applicable, even if it’s already installed and therefore not required.
You might wish to consider dropping the scan interval to a day or two
until all systems in the site have received the package and have
performed at least two scans to verify update status.
Configuring the Sync Host
If it’s configured, the sync host will attempt
to retrieve the latest database of Office updates and security updates
from Microsoft’s Web sites on a daily basis. The program will run only
when a user is logged on to the system. It’s possible to configure the
program to run when no one is logged on or regardless of whether a user
is logged on or not, but these configurations have implications. The
program is designed to run under the context of a logged-on user. If no
user is logged on, the program runs using the LocalSystem account, if
the SMS Advanced Client is installed, or the account
SMSCliToknLocalAcct& for those systems with the Legacy Client. As
neither of these accounts is afforded network access, the package source
folder must be local to the sync host and not on
a network share. If a firewall or proxy server is used, it must also be
configured to allow unauthenticated outbound access to Microsoft’s Web
sites where the databases of updates are published. Lastly, the
LocalSystem and SMSCliToknLocalAcct& accounts aren’t granted access
to the package object that’s required to update the distribution points
after synchronization. To set up unattended synchronization, complete
the following steps:
1. | When
installing the inventory tools, place the synchronization component on
the same system as the package source folder specified in the Select
Destination Directory page of the installation wizard.
|
2. | Grant the local Administrators group the right to change the contents.
|
3. | Using
the Properties dialog box, modify the synchronization command for each
inventory tool’s package’s synchronization program so that it reads as
follows:
syncxml.exe /s /unattend /site <site server> /code <site code> /target
<package source> /package <packageID>
|
4. | Still using the Properties dialog box, select Whether Or Not A User Is Logged In for the option Program Can Run.
|
5. | Using the Package Properties Data Source tab, modify the package so that the distribution points can be updated on a schedule.
|
6. | On
the sync host, start Microsoft Internet Explorer and open the Internet
Options dialog box from the Tools menu. In the Advanced tab, select Use
Http 1.1 Through Proxy Connections and then click OK to save the
changes.
|
7. | Ensure
that if a firewall or proxy server is used, it allows unauthenticated
connections to pass through. If the firewall or proxy server can’t be
configured to allow unauthenticated connections through, you can use the
command PatchDownloader.exe, installed with SMS 2003 in the
C:\SMS\bin\i386\00000409 folder, to set credentials used by the
synchronization task. For details on the parameters used by this
program, use the /? option.
|
8. | Make sure that the source directory for the scan component package is on the synchronization host.
|
On synchronization hosts that are site servers,
there’s no need to specify the /unattend option in step 3 and you can
omit step 5.
3. Authorizing and Distributing Software Updates
Once
SMS 2003 has been configured to advertise the packages that contain the
inventory tools and compliance reports are received, you can begin to
authorize and distribute software updates. Several steps are involved in
distributing software updates using SMS 2003, ranging from preparing
the folders where the packages will be stored, to creating the packages,
to testing the packages, to deploying the packages, and, finally, to
monitoring the deployment’s progress.
Preparing Package Source Folders
Package source folders will contain the files
that will be distributed to SMS clients. For this reason their integrity
should be strictly maintained. The Access Control List on a package
folder should be set so the Administrator account has Full Control and
the SMS service account or LocalSystem (depending on configuration) has
Read access. No other user or group should have access to the package
source folders. Instead of specifying permissions each time a folder is
created, you can consider creating a folder hierarchy exclusively for
use in storing package sources, securing the top folder, and ensuring
that permissions are inherited to all subfolders as they’re created.
Building the Package
The next step in distributing a software update
is to build the package that contains it. Although a package can
contain more than one update, you might wish to restrict the number of
updates in a package, especially if you’re unsure about the interaction
between the updates when they’re applied. Before building a package, you
should identify the category or categories of IT assets the package is
targeted at (the patch management team might provide this information)
and be certain that the updates have been tested independently to ensure
that they work as expected. For updates that have been identified as
required by the inventory tools, you can use the Distribute Software
Updates Wizard. You launch it by right-clicking a collection, package,
advertisement, or the Software Updates node in the SMS Administrator
Console, selecting All Tasks, and then selecting Distribute Software
Updates. Be careful not to confuse this wizard with the Distribute
Software Wizard (DSW), which is available from the collections nodes.
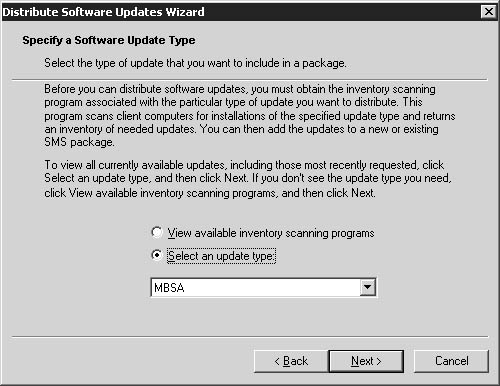
The first step you’re asked to complete after the Welcome page is to select the update type, as shown in Figure 7. The list of available update types is driven
by the inventory tools updates reported back to the SMS site server by
the SMS clients through the Hardware Inventory Client Agent.
The next step in the wizard asks you if you
wish to create a new package or update an existing one. If you choose to
create a new package, you’re prompted for the package name. The package
name is used to provide a default value for the program name, too. In
the next step you’re given the option of specifying who the package is
coming from. You can also choose to include a Rich Text File (RTF) that
provides information to the users about the package and the software
updates it contains. For mandatory advertisements there might be little
benefit to the organization in specifying that an RTF file be downloaded
to the client, but in those situations where the end user is given
control over when to install the package there might be more use to this
feature.
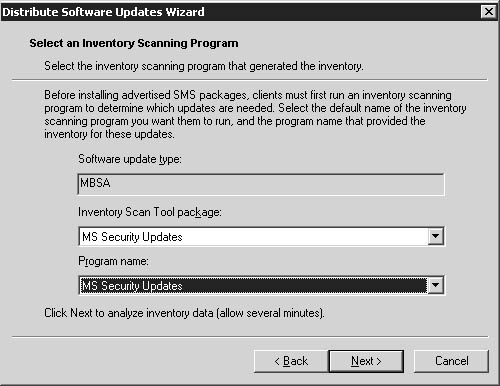
Before an advertised package containing
software updates can be run on an SMS client, an inventory must be
performed to ensure that the updates are applicable to the client. The
wizard’s next step gives you the option of choosing which inventory
tools to run, as shown in Figure 8.
The wizard picks the default scanning program in the inventory tools
package created during installation and shouldn’t be changed unless
you’ve created an alternate scanning program.
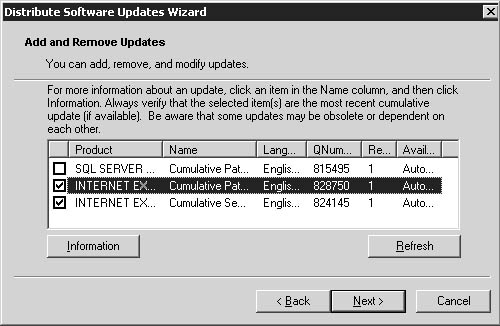
The
next step in the wizard allows you to select the software updates
available in the update type, which need to be applied to one or more
machines, as determined by a previous scan. Figure 9
shows an example of the updates made available for inclusion in the
package. The Information button on the wizard page can be used to go to
the authoritative source for information about the selected software
update listed in the latest database fetched by the sync host. This
provides you with an easy means of researching each update to determine
whether or not to include it in the package.
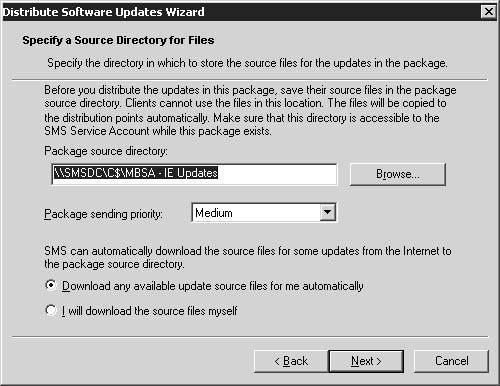
The
next page in the wizard asks you to specify the package source
directory, the sending priority for the package, and whether to download
the software update automatically from its authoritative source. These
options are shown in Figure 10.
If directed to download update source files, the wizard visits the
authoritative location for them, as detailed in the database of updates
fetched by the sync host, and checks that they have been signed. If the
specified package source folder does not exist, the wizard creates it.
You should take care to secure the folder using the guidelines described
earlier. You’ll need to select the sending priority for the package:
Low, Medium, or High. Lastly, on this page of the wizard, you’ll need to
specify whether to have the wizard automatically download the source
files for the updates selected previously to the package source folder.
If you choose not to download the source files automatically, or are
unable to do so, the files must be copied manually to the package source
folder.
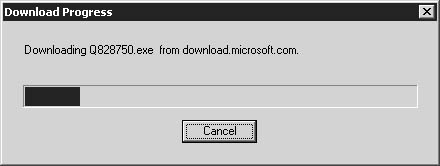
If you choose to have the wizard download
update source files, several progress windows are displayed, similar to
the one shown in Figure 11,
as each is downloaded. If an update cannot be downloaded, perhaps
because the SMS site server does not have Internet connectivity, you
must fetch and manually validate the update source files and place them
in the package source folder.
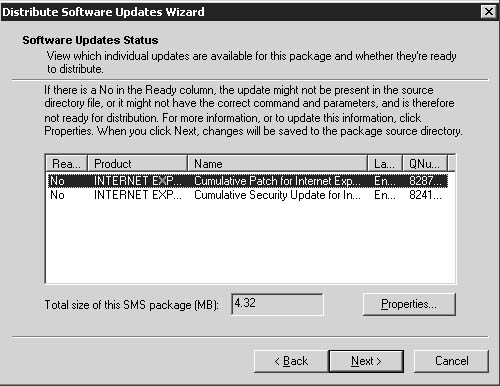
The next page in the wizard is the Software Updates Status page, shown in Figure 12.
You are shown information about each of the selected software updates
that will be included in the package. The first column, called Ready, is
used to show whether each update is ready to be packaged. If an update
is not ready, it might be because the update source files are not
available or because you are required to verify the command that is run
and any arguments before you can apply the update to a system.
You can check each update listed by the wizard by selecting it and clicking on the Properties button. Figure 13
shows the properties for an update. You should ensure that the correct
program and parameters are specified to apply the software update on a
client system. Many updates are interactive in nature and require
command-line parameters to install successfully using SMS 2003. The
information about command-line parameters for each update can be found
in its bulletin, which can be viewed by clicking the Information button.
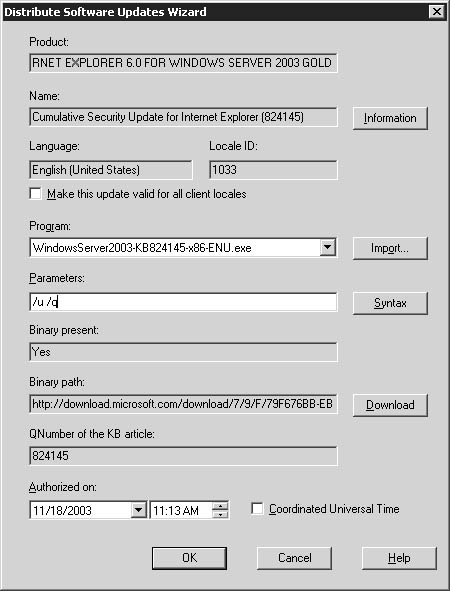
You
can also download the update source files to the package source folder
here by clicking the Download button. The Import button is used to
select the program to run, where more than one program was downloaded to
the package source folder, and the Syntax button takes you to a Web
page that describes in general terms the format of the command line and
arguments for an update. Once the properties have been configured, click
OK to save the settings.
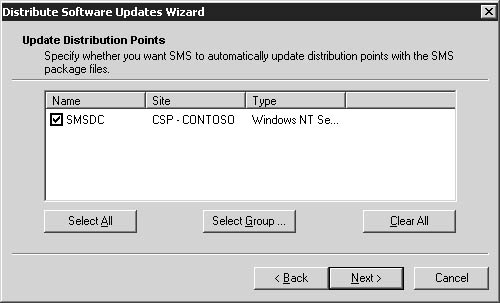
Once you’ve verified all the properties for
each of the updates to be included in the package, click Next to get to
the next page of the wizard. Here you are prompted to select the
distribution points for the package, as Figure 14 shows.
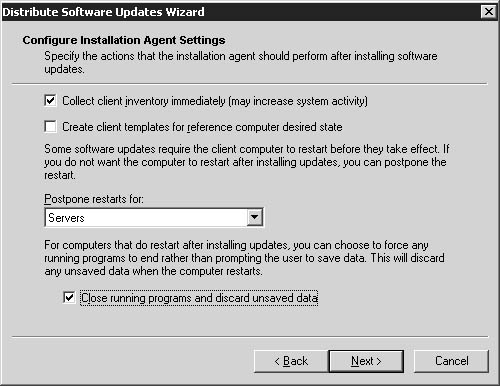
The next page in the wizard, shown in Figure 15,
allows you to configure installation agent settings by choosing whether
to perform a client inventory after the update has been applied,
whether to create reference templates, whether to postpone a reboot, and
to set reboot options. The options available for postponing restarts
are Never, Servers, Workstations, and Workstations And Servers.
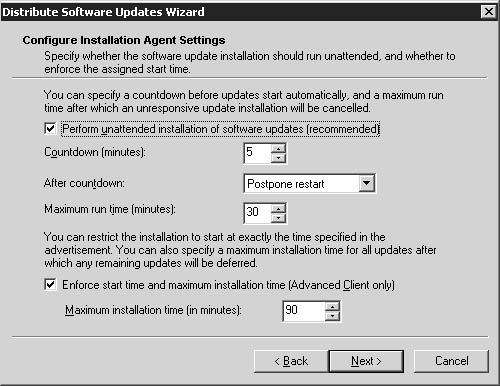
The next page in the Distribute Software Updates Wizard, shown in Figure 16,
allows you to set more installation agent settings. The main choice
presented to you is whether to perform an unattended installation of the
update, which is recommended. For unattended installations, the
logged-on user is either prompted to restart the computer or is warned
of an impending restart, depending on the option selected from the After
Countdown drop-down list. If the option to perform an unattended
installation is not selected, the user is either prompted to install the
software or is warned of an impending installation of the software
updates contained within the package.
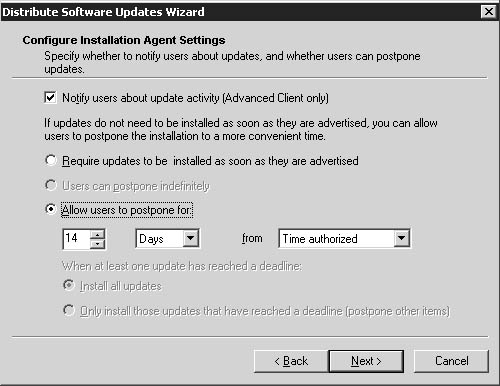
The
last set of installation agent options, displayed on the last page of
the Distribute Software Updates Wizard, is used to configure whether
users are prompted to run the programs in the package once it is
downloaded to the client, or are allowed to postpone the operation (and,
if so, for how long). The default options are shown in Figure 17.
In
many situations, the default settings will not be appropriate and you
may choose to modify them, for example, to force updates to be installed
as soon as they are advertised.
When the wizard finishes, a new package is
created with programs to apply the software updates contained within it.
No advertisements are created for the package, and they must be created
manually. The procedure for creating advertisements is the same as it
is for any other package, with the same considerations (which systems
will the advertisement be made to, how often will it be made, etc.).
Considerations When Deploying Office Updates
Deploying software updates for Office is not as
straightforward as deploying security updates. Office applications can
be installed as an Administrative installation or as a Client
installation. Software updates for each are distributed and applied
differently. Administrative installation updates are applied to
Administrative installations and Client installation updates are applied
to Client installations. An Administrative installation update can be
applied to a Client installation, but from then on, only Administrative
installation updates can be applied to the installation. Not all Office
updates can be applied directly using an update package downloaded from a
Microsoft Web site. There are also subtle differences in the way the
different versions of Office are updated. When installing updates for
various versions of Office in the production environment, or when both
Administrative and Client installations of Office are present, it is
recommended that different collections be created and used when
advertising packages containing Office updates, tailored for each
collection.
The Office Resource Kits for various versions
of Office contain a tool called Ohotfix.exe, which can be used to
execute a series of install instructions and also can determine which
updates are necessary for a particular client. The tool, along with
instructions for its use with each version of Office, is available from
the Microsoft Office Resource Kit Web site, found at http://www.microsoft.com/office/ork.
To distribute updates that are installed using Ohotfix.exe, use the
Distribute Software Updates Wizard to create a package and then perform
the following steps:
1. | Place the following files, which are used by Ohotfix.exe, into the package source folder:
Ohotfix.exe
Ohotfix.ini
Ohotfix.dll
|
2. | Edit
the file Ohotfix.ini using the instructions contained within it, on the
Office Resource Kit Web site, and in the bulletin for the software
update. Make sure the following settings are configured as shown here to
ensure a smooth installation:
ShowSuccessDialog=0
OHotfixUILevel=q
MSiUILevel=q
|
3. | In
the package source folder for the Office update, extract each update
file using arguments to the update found in the bulletin describing it
and then delete the update executable itself. The format of the command
to extract each update will look something like the following:
<update name>.exe /c /t:<package source folder>
|
4. | Run the Distribute Software Updates Wizard and select the package containing the updates.
|
5. | On the Software Updates Status page, select each update in the package that is distributed to clients and click Properties.
|
6. | In
the Properties dialog box, click the Import button next to the Program
text box, select Ohotfix.exe, and click OK. An error message will appear
saying that the executable selected is not the recommended executable
for the update and asking if you wish to proceed. Click Yes.
|
7. | Click
OK to close the Properties dialog box. An error message will appear
saying that no command-line parameters have been specified. This message
can be safely ignored.
|
Monitoring the Progress of the Deployment
Monitoring of deployment of packages created by
the Distribute Software Updates Wizard can be accomplished in much the
same way that other packages can be monitored, by viewing the
Advertisement Status in the SMS Administrator Console. The summary view
provides a snapshot of how many clients have received the advertisement
and run the package successfully, and how many clients had errors when
they ran the package. The detailed messages corresponding to the
advertisement also can be viewed. As with other packages, you can create
a query that can be used to retrieve details of the systems to which
the package has been distributed. Lastly, the Software Updates node in
the console also provides a snapshot of the number of systems that have
applied each update either from a package distributed using SMS 2003 or
by some other method such as the Windows Update Web site.