Although OWA is a feature-rich interface into
Exchange, the primary reason people use it is for the ability to access
their email quickly and easily via the Internet. The new version of OWA
makes using the email portion of OWA easier and more robust than it has
been previously. The following sections cover how to create and send
email messages, including new features in OWA 2007 and advanced features
available for dealing with sending and receiving email.
Creating an Email
Several methods exist for creating a new email
message. The most common way to create a message is to be in the Inbox
view and simply click the New icon in the toolbar. This icon has a
picture of a mail message on it. The other method is available from any
view and is based on the same New icon. Instead of clicking the main
icon, you can click the down arrow next to it to be presented with several options. Select Message and you will generate a new email message.
Addressing an Email
You can add recipients to an OWA email message
in a few different ways. When the new message is created, the To, CC,
and BCC fields appear and are blank. These areas are used to enter
recipient names to which the message will be sent.
When sending a message, the primary recipients’
names go into the To field of the message. Secondary recipients go in
the CC (carbon copy) field. The BCC field stands for blind carbon copy,
which means that the BCC recipient is invisible to all other recipients
receiving the same message. In addition, when you use the Reply to All
option, the recipient in the BCC box does not receive the reply.
As general email etiquette, place a recipient in
the To field if the message is directed at them or if are you expecting
them to reply. Use the CC field for people who are being “kept in the
loop” on information and who won’t likely be replying.
Note
Interesting to note is that if you BCC a
recipient who has their out of office reply set, it replies back to all
users on the original distribution. If you were using the BCC field to
prevent primary recipients from knowing that a third-party was being
copied, this behavior could potentially give you away.
To address an email, type a name (for example, John Doe) or an email address (for example, [email protected])
into one of the three boxes. Note that multiple names can be entered
into any of the fields; each name or address must be separated by a
semicolon (;).
Note
When a name is entered and before it has been
checked by Exchange and verified, it appears as a single line of text
with no underline. After Exchange has checked the name—either against
the Global Address List (GAL) or contact list—or has confirmed that it
is a legitimately formatted email address, the name becomes underlined,
ensuring that Exchange regards the address as valid. Any subsequent,
unverified addresses go into the bottom box on the screen until they are
checked, and then they are moved to the upper box.
After names or partial names have been entered,
you can click the Check Names button to have OWA check against the
Global Address List (GAL) to find the closest match. If several matches
are available, they will be displayed and the user is able to click the
correct address.
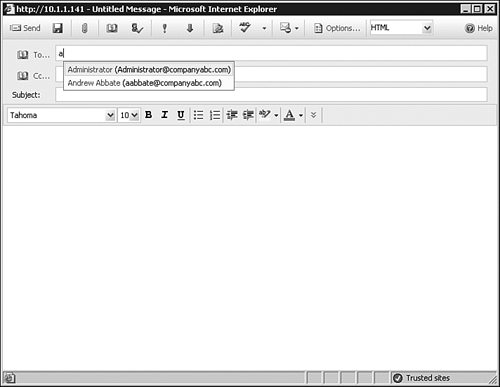
When typing in the name of a previously used recipient, OWA provides a shortcut to the full name, as shown in Figure 1. This functionality was previously only available in the full Outlook client.
Alternatively, you can use the Find Names option to populate the fields:
1. | Click the To button to the left of the box area. This causes the Address Book dialog box to appear.
|
2. | Enter the partial or full name of the recipient (for example, John), and click the magnifying glass.
|
3. | Click the recipient to highlight the name.
|
4. | Click To, CC, or BCC.
|
5. | Click OK.
|
The final method is to trigger the new message
via the address book. By clicking the icon for the address book, you are
able to search for a user or contact by name. From here, you can
right-click the name from the address book, choose New Message, and a
new message appears with the user chosen already in the To field.
Removing a User from the To, CC, or BCC Fields in a Message
If you find that you have accidentally added an
incorrect recipient or if you change your mind about a recipient, you
don’t have to cancel the message. You can remove a recipient from
any of the three fields by right-clicking the recipient name or email
address that needs to be removed, and then click Remove on the shortcut
menu, or context menu. When removing names in the manner, it is
important to know that there is no confirmation pop-up box; the name is
immediately removed.
