When Office Web Apps are installed in a SharePoint
Foundation 2010 or SharePoint Server 2010 farm, the Word Viewing
Service, PowerPoint Service, and Excel Calculation Services are created
in as service applications. No OneNote service application is created,
because OneNote is capable of sharing documents natively.
The Word Viewer Service and
PowerPoint service applications use worker processes to then convert
documents and presentations into PNG images or into XAML (if Silverlight
is installed), which are stored in a cache, which can be used for
future requests for the same content. The Excel Web Application uses
DHTML and JavaScript to render and enable sharing and editing of
content, and Excel Calculation Services is used to load the workbook,
perform Excel calculations, and maintain the session.
This section gives
instructions for installing Office Web Apps for SharePoint 2010 on a
two-server farm, where SharePoint Server 2010 Enterprise is in use and
has been fully configured. This section also outlines several areas
where the default behavior for opening documents in the browser (that
is, using Office web applications) or in the Office application (for
example, Word, Excel, or PowerPoint) can be modified by the farm or site
collection administrators.
Microsoft provides a
detailed document titled, “Deploy Office Web Apps (Installed on
SharePoint 2010 Products)” at http://technet.microsoft.com/en-us/library/ff431687.aspx, and this article also provides the PowerShell
scripts that can be run to shortcut the manual process presented in
this section. It is important to note that there are four installation
scenarios that this document covers, whereas the following steps cover
only a single common scenario. The Microsoft document covers the
following different configurations:
Install and
configure Office Web Apps on an existing stand-alone SharePoint server
Install and configure Office Web
Apps on a new stand-alone SharePoint server
Install and configure Office
Web Apps on an existing SharePoint server farm
Install and configure Office Web
Apps on a new SharePoint server farm
The following steps apply to
the third scenario, that of installing and configuring Office Web Apps
on an existing SharePoint server farm. Assuming your environment meets
that requirement, perform the following steps to configure Office Web
Apps:
1. | Insert
the CD/DVD or mount the .iso image (in this example,
en_web_apps_2010_x64_dvd_515376.iso was used) and run Setup.exe.
|
2. | Enter the product key on the Enter Your Product Key
page, and click Continue.
|
3. | Check the box next to I Accept the Terms of This
Agreement, and click Continue.
|
4. | On the Choose a File location page, leave the defaults
unless there is a specific reason for changing the file locations. If
the existing server build, for example, stores the index files on the
D:\ drive, then it makes sense to also store the Office web applications
search index files on the same volume. Click Install Now.
|
5. | When the Run Configuration Wizard window opens, leave
the box next to Run the SharePoint Products Configuration Wizard Now
checked and click Close.
|
6. | The Welcome to SharePoint Products window opens; click
Next.
|
7. | Click Yes
when the window opens, mentioning that several services might have to be
started or reset during configuration.
|
8. | On the Completing the SharePoint Products Configuration
Wizard window, click Next.
|
9. | When the process completes, the Configuration Successful
window appears; click Finish and adminconfigintro.aspx page from
Central Administration opens.
|
10. | Click Start the Wizard.
|
11. | Assuming the farm has already been configured, which
was an assumption for this section, the Service Account section should
already be filled in, and a number of the services should already be
checked and grayed out because they will already be configured. Verify
that Excel service application, PowerPoint service application, and Word
Viewing service are checked and then click Next.
|
12. | Next, the createsite.aspx page appears. Because the
assumption is that the farm was already configured, and a default site
collection was already created, click Skip.
|
13. | The next page shows the results of the farm
configuration and lists the configured and available service
applications. Click System Settings in the Quick Launch.
|
14. | From the Servers section, click Manage Services on
Server to ensure that the relevant services are enabled.
|
15. | Verify that Excel Calculation Services, PowerPoint
Service, and Word Viewing Service are all started. If not, click Start
for any that need to be started and complete any additional
configuration if needed.
|
16. | Next, click Application Management from the Quick
Launch.
|
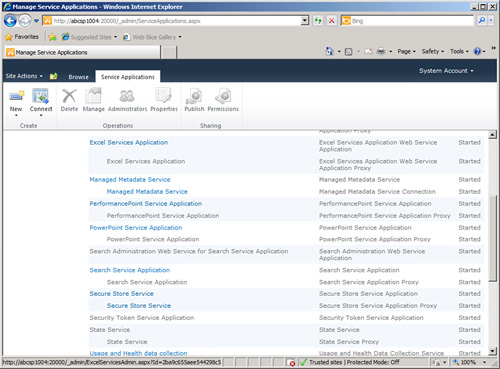
17. | From the
Service Applications section, click on Manage Service Applications.
Verify that there is an Excel Services Application, a PowerPoint Service
Application, and a Word Viewing service application. Figure 1 shows a portion
of this page with the Excel service application and the PowerPoint
service application visible.
|
Steps at this point can vary
based on the base farm configuration and the preferences of the
administrator. For example, for testing purposes, the administrator may
choose to create new service applications for one or more of the Office
Web Apps. To create a new service application for Excel Services, follow
these steps:
1. | From the
Manage Service Applications page, on the Service Applications tab of the
Ribbon, click the New drop-down menu, and select Excel Services
Application.
|
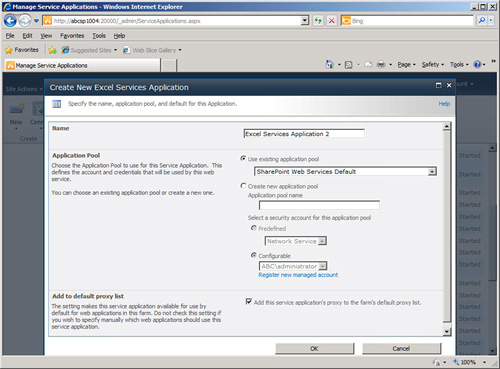
2. | From the
Create New Excel Services Application page, enter a name for the service
application, such as Excel Services
Application 2.
|
3. | Check the box next to Use Existing Application Pool, and
choose SharePoint Web Services Default, as shown in Figure 2.
|
4. | Verify
that the check box next to Add This Service Application’s Proxy to the
Farm’s Default Proxy List is checked, and click OK.
|
5. | When this process completes, verify that the new
service application appears in the list of service applications on the
Manage Service Applications page.
|
A similar process should be
followed to create additional PowerPoint service applications or Word
Viewing service applications.
