Using Email Disclaimers
Email disclaimers are
notices that are automatically appended to outgoing messages. These
disclaimers are primarily intended to reduce liability, and to caution
recipients not to misuse the information contained within. The following
is a sample email disclaimer:
“The
information contained in this message is intended solely for the
individual to whom it is specifically and originally addressed. This
message and its contents may contain confidential or privileged
information. If you are not the intended recipient, you are hereby
notified that any disclosure or distribution, or taking any action in
reliance on the contents of this information, is strictly prohibited.”
When implementing
an email disclaimer, you should seek the review and approval of the
disclaimer by the organization’s legal department, if any.
Creating an Email Disclaimer in Exchange Server 2010
Email disclaimers are easily configured in the Exchange Management Console by performing the following actions:
1. | Open the Exchange Management Console.
|
2. | In the console tree, click Organization Configuration, and then click Hub Transport.
|
3. | In the action pane, click New Transport Rule.
|
4. | In the Name field, enter the name of the disclaimer. If you have notes for this disclaimer, enter them in the Comments field.
|
5. | If
you want the disclaimer to be created in a disabled state, clear the
Enabled check box. Otherwise, leave the Enabled check box selected.
Click Next to continue.
|
6. | In
the Step 1. Select the Condition(s) dialog box, select all the
conditions that you want to be applied to this disclaimer. If you want
this disclaimer to be applied to all email messages, do not select any
conditions in this step. However, if you want the disclaimer to only be
applied to outgoing messages, select Sent to Users Inside or Outside the
Corporation, or Partners.
|
7. | If
you selected conditions in the previous step, in the Step 2. Edit the
rule description by clicking underlined value option, click each blue
underlined word.
|
8. | When
you click a blue underlined word, a new window opens to prompt you for
the values to apply to the condition. Select the values that you want to
apply, or type the values manually. If the window requires that you
manually add values to a list, type a value. Then click Add. Repeat this
process until you have entered all the values, and then click OK to
close the window.
|
9. | Repeat the previous step for each condition that you selected. After you configure all the conditions, click Next.
|
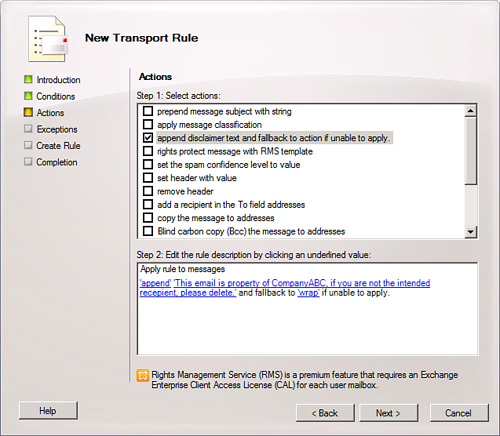
10. | In the Step 1. Select the Action(s) dialog box, click Append Disclaimer Text and Fallback to Action if Unable to Apply.
|
11. | In
the Step 2. Edit the rule description by clicking an underlined value
option, click each blue underlined word. Each word, except Disclaimer
Text, is the default value for each field. The fields are Append (or
Prepend), Disclaimer Text, and Fallback Action. Click Disclaimer Text
and enter the text of your disclaimer.
|
12. | When
you click a blue underlined word, a new window opens to prompt you to
select the items that you want to add or type values manually. When you
are finished, click OK to close the window.
|
13. | Repeat the previous step for each action that you selected. After you configure all the actions, as shown in Figure 3, click Next.
|
14. | In
the Step 1. Select the Exception(s) dialog box, select all the
exceptions that you want to be applied to this rule. You are not
required to select any exceptions.
|
15. | If
you selected exceptions in the previous step, in the Step 2. Edit the
rule description by clicking an underlined value option, click each blue
underlined word.
|
16. | After you configure any exceptions, click Next.
|
17. | Review
the Configuration Summary. If you are happy with the configuration of
the new rule, click New. The rule is tested and, if there are no errors,
the Completion screen shows 1 item, 1 succeeded, 0 failed. Click
Finish.
|
Standardizing Server Builds
One
other easily overlooked component of a secure messaging environment is
ensuring that all components are maintained regularly and consistently.
Maintaining server builds that are as identical as possible allows an
organization to save on administration, maintenance, and
troubleshooting.
With standardized systems, all servers can be maintained, patched, and upgraded in similar or identical manners.
Understandably,
most organizations cannot afford to standardize on a single hardware
platform and replace all of their systems with each and every upgrade.
Often, as servers are added to and removed from an environment,
different hardware platforms require different server builds to function
properly. However, keeping these systems as close as possible in
configuration by using automated and/or scripted installations,
automated update utilities, and regular monitoring can increase the
likelihood that each server added to the environment meets the
organization’s security requirements.
The Microsoft
System Center Configuration Manager product contains a tool called
Desired Configuration Management (DCM) that can assist in keeping the
configuration standardized across multiple servers. It enables
configuration management and standardization and can be enabled simply
by deploying SCCM agents to the Exchange servers.
