3.3.1. Creating and Configuring Resource Mailboxes
Resource mailboxes allow users
in your organization to book resources, such as conference rooms or
equipment, using Exchange’s calendaring functionality. For example, if a
user wants to book use of a specific conference room, a meeting request
is set up, including all relevant attendees, and then the address of
the room in which the meeting will be held in that request is included.
Depending on how the resource mailbox has been configured, the room will
automatically be booked for that meeting. The integration with Exchange
calendaring means that other users will be able to check the
availability of the room, with current room bookings being visible
through the calendar. Exchange Server 2010 supports two types of
resource mailbox:
Room mailboxes Room mailboxes represent meeting locations such as conference rooms or lecture theaters.
Equipment mailboxes Equipment mailboxes represent specific items, such as overhead projectors, scanners, or company hovercraft.
To create room or equipment mailbox, perform the following steps:
In the EMC, select the Mailbox node under the Recipient Configuration node.
In
the Actions pane, click on the New Mailbox item. This will open the New
Mailbox Wizard. Select Room (or Equipment) Mailbox and then click Next.
On
the User Type page, select New User. The room mailbox needs to be
associated with an Active Directory user account, even though that user
account will be disabled. Click Next.
On
the User Information page, enter the name of the room in the Name
field, repeat this in the User Logon Name fields, and then enter a
password. There is no need to select
the User Must Change Password At Next Logon option, and it is not
necessary to specify values in the First Name, Initials, and Last Name
fields. If necessary, you can specify an OU to host the disabled
resource mailbox account. Click Next.
On
the Mailbox Settings page, enter an alias for the mailbox. This can be
the same name that you specified as the user logon name in step 4. You
can specify a mailbox database to host the mailbox or accept the default
allocation.
Click Next on the Archive Settings page. Click New and then click Finish.
Except for the step where
you choose a Room or Equipment mailbox, the basic setup process is the
same. You create Room and Equipment mailboxes using the New-Mailbox
cmdlet. For example, to create a new room mailbox named Conference-Beta
that is hosted on mailbox database MBX-DB-ONE, issue the following
command:
New-Mailbox -UserPrincipalName [email protected] -Alias conference-beta -Name
Conference-Beta -Database MBX-DB-ONE -OrganizationalUnit Users -Room
The command for creating an equipment mailbox is the same except instead of using the Room parameter with the New-Mailbox
cmdlet, you use the Equipment parameter. For example, to create a new
equipment mailbox named Video-Camera that is hosted on mailbox database
MBX-DB-ONE, issue the following command:
New-Mailbox -UserPrincipalName [email protected] -Alias video-camera -Name video-
camera -Database MBX-DB-ONE -OrganizationalUnit Users -Equipment
Once you have created a resource
mailbox, it is necessary to configure the resource mailbox. Some
properties, such as Resource Capacity, which is configured on the
Resource General page of the resource mailbox properties, can also be
configured with the Set-Mailbox cmdlet. For example, to set the resource capacity of room mailbox Conference-Alpha to 40, issue the following command:
Set-Mailbox Conference-Alpha -ResourceCapacity 40
Note:
CUSTOM RESOURCE PROPERTIES FOR RESOURCE MAILBOXES
Exchange allows
administrators to add custom resource properties to room or equipment
mailboxes. For example, you could create a custom property for equipment
mailboxes called Vehicle to represent company vehicles. Doing this
requires modifying the resource configuration of the Exchange
organization. To learn more about this process, consult the following
TechNet article: http://technet.microsoft.com/en-us/library/bb201697.aspx.
The majority of other resource mailbox configuration tasks are performed from the EMS using the Set-CalendarProcessing cmdlet. You will learn about configuring additional resource mailbox properties throughout the rest of this lesson.
Note:
MANAGING RESOURCE MAILBOXES AND SCHEDULING
For more information on managing resource mailboxes and scheduling, consult the following TechNet article: http://technet.microsoft.com/en-us/library/bb124374.aspx.
1.1. Configuring Resource Policies
Resource
policies determine how a resource mailbox can be booked. You can use
resource policies to determine how far in advance a resource can be
booked, the maximum amount of time the resource can be booked for, and
which users are configured as delegates for the resource. You configure
resource policies in the Resource Policy tab of the resource mailbox’s
properties, shown in Figure 1.
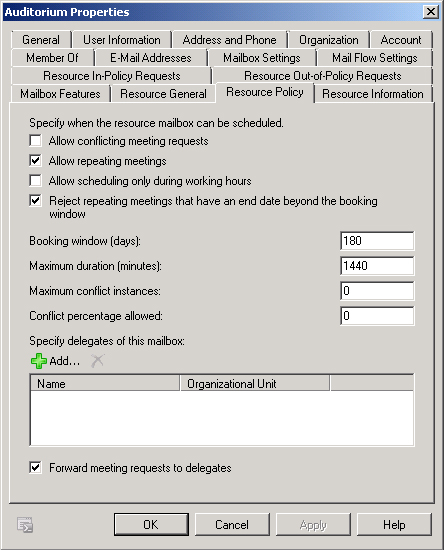
The settings on the Resource Policy tab have the following properties:
Allow Conflicting Meeting Requests Allows meeting requests that conflict with one another to be scheduled.
Allow Repeating Meetings
Allows recurring meetings to be scheduled, such as if a user wants to
use a particular resource every Wednesday morning at 11:00 AM.
Allow Scheduling Only During Working Hours Allows the resource to be booked only during working hours. Administrators configure working hours using the Set-MailboxCaldenarConfiguration cmdlet.
Reject Meetings That Have An End Date Beyond The Booking Window Enabling this option means that bookings that exceed the booking window are rejected.
Booking Window (Days) This figure specifies how far in advance the resource can be booked.
Maximum Duration (Minutes) The maximum amount of time the resource can be booked for.
Maximum Conflict Instances How many conflicts with other bookings can exist prior to a meeting request being automatically denied.
Conflict Percentage Allowed
If a booking is configured to be recurring and a certain percentage of
those recurrences conflict with existing bookings, the booking is
denied.
Specify Delegates Of This Mailbox Allows you to specify users who control scheduling options for the resource mailbox.
Forward Meeting Requests To Delegates Specifies whether meeting requests are forwarded to specified delegates.
You can configure the Resource Properties of a resource mailbox using the Set-CalendarProcessing
cmdlet. For example, to set a maximum booking window of 50 days and a
maximum booking duration of 2 hours for the Auditorium resource mailbox,
issue the following command:
Set-CalendarProcessing Auditorium -BookingWindowsInDays 50 -MaximumDurationInMinutes 120
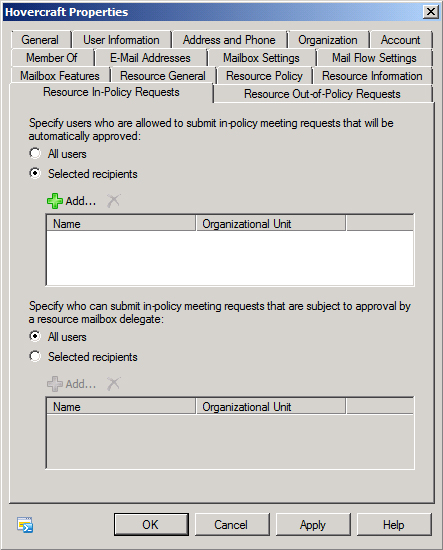
1.2. Managing In-Policy and Out-of-Policy Requests
Exchange processes requests to
use resources against the resource policy. In-policy request settings
apply when a request that meets the resource policy is made. The
in-policy request settings determine which users have their requests
automatically approved and which in-policy requests for the resource
will be subject to approval by the resource delegate. For example, if
the in-policy request settings were configured as shown in Figure 2,
where no users are set to have their in-policy requests automatically
approved, all requests for the resource would be forwarded to the
configured delegates for approval.
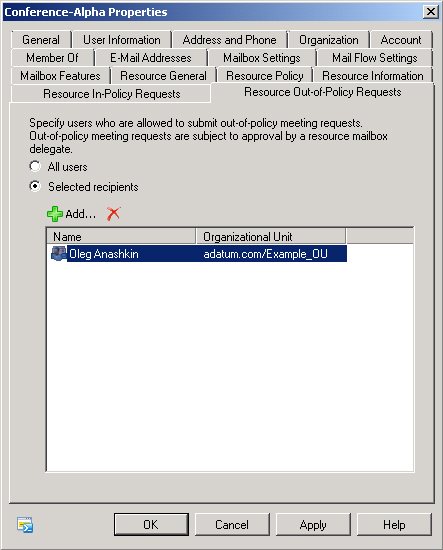
Out-of-policy
request settings determine which users are able to submit out-of-policy
requests that are subject to approval by a resource mailbox delegate.
If a user is not on the list of users who can submit out-of-policy
requests, the request will be automatically denied. In the case of the
Resource Out-of-Policy Requests tab shown in Figure 3,
Oleg Anaskhin is able to submit out-of-policy requests, though these
requests will still require approval from a delegate.
You can configure the Resource-In-Policy Requests and Resource Out-of-Policy Request settings using the Set-CalendarProcessing
cmdlet with the AllBookInPolicy, AllRequestInPolicy,
AllRequestOutOfPolicy, BookInPolicy, RequestInPolicy, and
RequestOutOfPolicy parameters.
Note:
CONFIGURING AUTOMATIC BOOKING POLICIES
To learn more about configuring automatic booking policies, consult the following link on TechNet: http://technet.microsoft.com/en-us/library/bb124542.aspx.
1.3. Configure Delegates on Resource Mailboxes
Delegates are able to
control the scheduling options for resource mailboxes. You can configure
a resource mailbox so that all requests for the resource that the
mailbox represents are forwarded to the delegate. As you learned
earlier, you can configure a delegate for a resource mailbox through the
EMC on the Resource Policy tab by specifying their mailboxes and
enabling the Forward Meeting Requests To Delegates option.
You can configure these properties through the EMS using the Set-CalendarProcessing
cmdlet. For example, to configure Kim Akers as a resource delegate for
the Auditorium resource mailbox and to ensure that all booking requests
for the resource are forwarded to her, issue the following command:
Set-CalendarProcessing Auditorium -ResourceDelegates "[email protected]"
-ForwardRequestsToDelegates $true
Note:
CONFIGURE DELEGATE ON A RESOURCE MAILBOX
For more information on configuring a delegate on a resource mailbox, consult the following link on TechNet: http://technet.microsoft.com/en-us/library/bb124973.aspx.
1.4. Configuring Automatic Booking
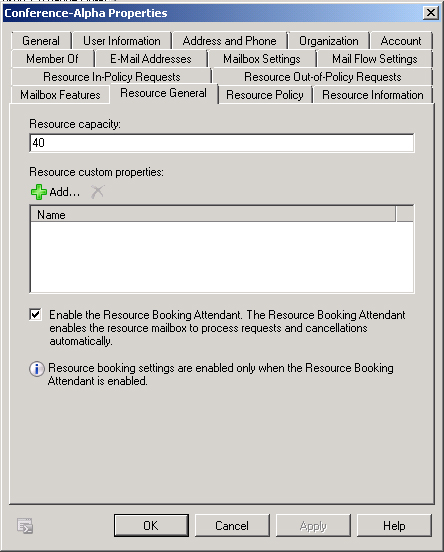
Once you have
configured resource booking policies, you need to enable the Resource
Booking Attendant. The Resource Booking Attendant enables automatic
booking of resources functionality on a resource mailbox. If the
Resource Booking Attendant is not enabled, the configured resource
mailbox delegate must approve or decline all booking requests. The
Resource Booking Attendant is enabled by selecting the Enable The
Resource Booking Attendant check box on the Resource General tab of the
Conference-Alpha Properties, as shown in Figure 4.
To enable the resource booking attendant from the EMS, use the Set-CalendarProcessing
cmdlet with the AutomateProcessing parameter. For example, to enable
automatic booking on the Conference-Alpha room mailbox, issue the
following command:
Set-CalendarProcessing Conference-Alpha -AutomateProcessing AutoAccept
Note:
ENABLE AUTOMATIC BOOKING ON A RESOURCE MAILBOX
To learn more about enabling automatic booking on a resource mailbox, consult the following TechNet article: http://technet.microsoft.com/en-us/library/bb123495.aspx.
2. Shared Mailboxes
A shared mailbox is a mailbox
accessed by multiple users that is not associated with an enabled
Active Directory user account. Although it is possible to share access
to normal user mailboxes through delegation, Exchange provides shared
mailboxes specifically for the shared role. This special type of mailbox
appears in the recipients list with an icon different from that of
other mailbox types. The Active Directory account associated with a
shared mailbox is always disabled. All users that need access to the
shared mailbox are delegated Full Access and Send As permissions after
mailbox creation.
It is possible to create shared mailboxes only from the EMS. You create shared mailboxes using the New-Mailbox
cmdlet with the Shared parameter. The following EMS command creates a
shared mailbox named Shared-MBX on the MBX-DB-ONE mailbox database:
New-Mailbox -UserPrincipalName [email protected] -Alias Shared-MBX -Name Shared-MBX
-Database MBX-DB-ONE -OrganizationalUnit Users -Shared
Once the mailbox has been
created, you can delegate Full Access and Send As permissions through
either the EMS or EMC.
3. Converting Mailboxes
You can use the Set-Mailbox
command to convert one type of mailbox to another type. One reason that
you might want to convert mailboxes is when transitioning from an
Exchange 2003 environment to an Exchange 2010 environment. In Exchange
2003, you can use shared mailboxes to represent resources. If you
migrate these mailboxes to Exchange 2010, you will want to convert them
to resource mailboxes. Although it is not possible to perform a mailbox
conversion using the EMC, you can perform the following types of mailbox
conversion using the Set-Mailbox command in the EMS:
User mailbox to shared mailbox
User mailbox to resource mailbox
Shared mailbox to user mailbox
Shared mailbox to resource mailbox
Resource mailbox to user mailbox
Resource mailbox to shared mailbox
For example, to convert the mailbox named Hovercraft from an Equipment mailbox to a Room mailbox, issue the following command:
Set-Mailbox Hovercraft -Type Room
Note:
CONVERTING MAILBOXES
For more information about converting mailboxes, consult the following page on TechNet: http://technet.microsoft.com/en-us/library/bb201749.aspx.
Note:
Understand the difference between a user mailbox, a shared mailbox, a resource mailbox, and a linked mailbox.
