1. Mail Contacts
Mail contacts allow an
external user’s email address to be present in Exchange address books
without giving that user logon rights in the organizational forest. For
example, several users at Contoso might regularly email Don Hall, a
purchasing officer at a client firm but someone who never needs to log
on to the Contoso network. Don Hall could be configured as an Exchange
mail contact, allowing all users at Contoso to locate his address
details automatically in Exchange address books or even add Don to
distribution groups.
To create a mail contact using the EMC, perform the following general steps:
Navigate to the Recipient Configuration node. In the Actions pane, click New Mail Contact.
You can choose to mail-enable an existing contact or create a new contact.
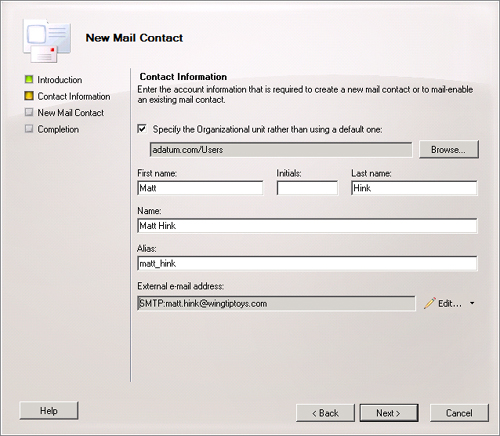
On the Contact Information page, shown in Figure 1,
provide information about the contact, including an alias; where the
contact will be stored within Active Directory; and the associated
external email address. When these details have been entered, click
Next, New, and then Finish.
You can create a mail contact from the Exchange Management Shell (EMS) using the New-MailContact
cmdlet. For example, to create a new mail contact for Julian Price with
the address [email protected] that will be stored in the
Users container in the adatum.com domain, issue the following command:
New-MailContact -Name "Julian Price" -ExternalEmailAddress [email protected]
-OrganizationalUnit adatum.com/users
Note:
CREATING MAIL CONTACTS
To learn more about mail contacts, consult the following article on TechNet: http://technet.microsoft.com/en-us/library/aa998858.aspx.
2. Mail-Enabled Users
Mail-enabled users have
user accounts in the Active Directory forest that hosts Exchange but
have their mailboxes hosted by an eternal organization. Mail-enabled
users are also known by the term “mail user.” The external email address
is associated with the user account.
For example, Jim Hance is a contractor working at Contoso. To perform
his job, Jim needs to be able to log on to the Contoso domain. Jim’s
organization does not have an Active Directory trust relationship with
Contoso, so allowing local logon requires that Jim have an Active
Directory user account. Rather than have a local mailbox, Jim prefers to
have his email delivered to an email account that is separate from the
Contoso Exchange organization. As a mail-enabled user, Jim can appear in
Exchange address books, contact lists, and distribution groups even
though he does not have a mailbox hosted on one of the organization’s
Exchange mailbox servers.
To create a mail-enabled user
when no user account already exists using the Exchange Management
Console (EMC), perform the following steps:
Click
on New Mail User in the Actions Pane when the Recipient Configuration
node is active in the EMC. Select New User and click Next.
Provide
the details of the new user account, including the organizational unit
(OU) that will host the user account in Active Directory and then click
Next.
Provide an alias and the details of the external email address. Click Next, New, and then Finish.
To create a mail-enabled user using the EMS, use the New-MailUser
cmdlet. For example, to create a mail-enabled user named Oksana with
the email address [email protected] and with the account hosted in the
Users container of the adatum.com domain, issue the following command:
New-MailUser -Name Oksana -ExternalEmailAddress [email protected] -UserPrincipalName
[email protected]
When issuing this command,
the EMS will prompt you to provide a password for the new user account.
You can mail-enable an existing user account that is not associated
with an Exchange mailbox using the EMC or the Enable-MailUser cmdlet in the EMS. To mail-enable an existing user account using the EMC, perform the following steps:
Click on New Mail User in the Actions Pane when the Recipient Configuration node is active in the EMC.
Select
Existing User on the Introduction page. Click Browse and then select
the user account that you wish to mail-enable and then click Next.
Provide
an Exchange alias. Click Edit and then enter the external address to
which Exchange will route email. Click Next, New, and then Finish.
To mail-enable an existing
user account with the logon name Barry with the email address
[email protected], issue the following command:
Enable-Mailuser -Identity Barry -ExternalEmailAddress [email protected]
Note:
CREATE MAIL-ENABLED USER
To learn more about creating mail-enabled user, consult the following article on TechNet: http://technet.microsoft.com/en-us/library/bb124381.aspx.
