3. Distribution Groups
Distribution
groups are collections of recipients. A user sends a message to the
distribution group address, and Exchange forwards that message to all
members of the distribution group. Exchange supports three types of
distribution groups: distribution groups, mail-enabled security groups,
and dynamic distribution groups.
You manage the
membership of distribution groups and mail-enabled security groups
manually. Exchange adds members to dynamic distribution groups
automatically. For example, you would add and remove members of a
distribution group as necessary using the EMC or EMS. Exchange populates
a dynamic distribution group based on its initial configuration. For
example, you might define the dynamic distribution group membership as
all users with an Exchange mailbox whose Active Directory properties
list them as a member of the Research Department. The membership of this
group is calculated automatically when a message is sent to the group,
so people who are added and removed from the Research Department will
automatically be added and removed from the dynamic distribution group
that Exchange populates based on that attribute.
Note:
MANAGING DISTRIBUTION GROUPS
To learn more about managing distribution groups, consult the following article on TechNet: http://technet.microsoft.com/en-us/library/bb125256.aspx.
To create a distribution
group using the EMC that you will use only to distribute messages and
that you cannot use to assign security permissions and where the
membership of the group is not generated dynamically, perform the
following general steps:
In the EMC, select the Recipient Configuration node and then in the Actions pane click on the New Distribution Group item.
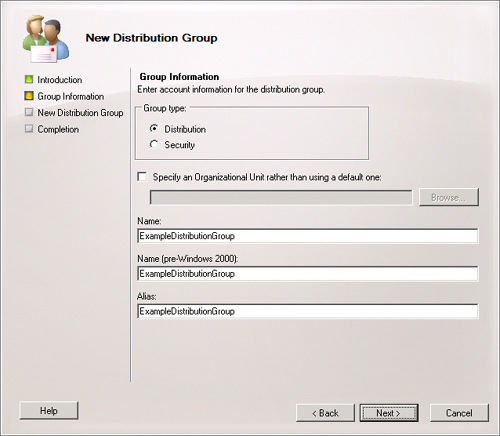
On the Introduction page, choose New Group. On the Group Information page, shown in Figure 2,
specify the OU that will host the group, the group name, and the
Exchange alias for the group. Click Next, New, and then Finish.
You can create a new distribution group from the EMS with the New-DistributionGroup cmdlet. For example, to create a new distribution group named ExemplarDG, issue the following command:
New-DistributionGroup -Name 'ExemplarDG' -Type 'Distribution' -SamAccountName
'ExemplarDG' -Alias 'ExemplarDG'
Note:
CREATE DISTRIBUTION GROUPS
To learn more about creating groups, consult the following article on TechNet: http://technet.microsoft.com/en-us/library/bb124513.aspx.
3.1. Mail-Enabled Security Groups
You
use security groups to assign permissions to resources, such as
configuring shared folder permissions. Mail-enabling a security group
simply allows Exchange users to send email to the members of a security
group. For example, it may be necessary to take several shared folders
offline to move them to another volume or host. If the security groups
assigned permissions to those folders are mail-enabled, you can send
messages to the users alerting them of the downtime during this change.
This is more efficient than sending a message to everyone in the
organization, as mail-enabled security groups allow you to target only
those people who have access to a resource.
Exchange mail-enabled
security groups use universal scope. Universal groups can contain user
accounts, global groups, and universal groups from any domain in the
forest that hosts the Exchange organization. It is possible to
mail-enable an existing security group only if the scope is already set
to universal. If you want to mail-enable an existing domain local or
global security group, you will need to convert the scope of that group
so that it is set to universal. It is possible to convert group scopes
to universal only under specific conditions. If the group is a global
group, you can convert to universal only if the group you want to
convert is not a member of another group that has the global scope. If
the group you want to convert is domain local, it is possible to convert
to the universal scope only if the group that you are converting does
not have a domain local group as a member.
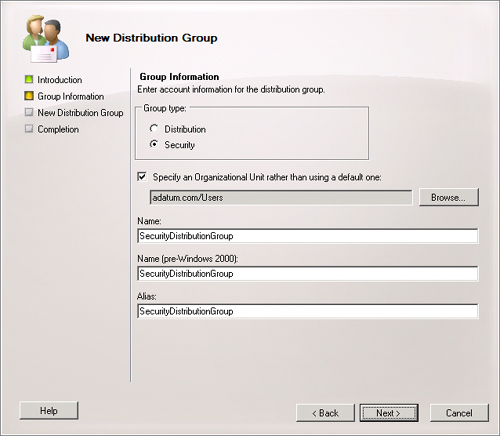
To create a new mail-enabled security group from the EMC, perform the following general steps:
Click on the Recipient Configuration node in the EMC and then click on New Distribution Group in the Actions pane.
Select New Group on the New Distribution Group page.
Select Security in the Group Type option and specify the Name, Alias, and OU that will host the group, as shown in Figure 3. Click Next, New, and then Finish to create the group.
To create a new mail-enabled security group from the EMS, use the New-DistributionGroup
cmdlet with the –Type Security parameter. For example, to create a new
mail-enabled security group named SecDistGroup in the Users container of
the Adatum.com domain, issue the following command:
New-DistributionGroup -Name SecDistGroup -OrganizationalUnit "adatum.com/Users"
-SAMAccountName SecDistGroup -Type Security
To mail-enable an
existing security group using the EMC, run the New Distribution Group
Wizard from the Actions pane when you select the Recipient Configuration
node and then select the Existing Group option and browse to select the
target universal security group. Enter an alias for the group and then
click Next, New, and then Finish. To mail-enable an existing security
group from the EMS, use the Enable-DistributionGroup cmdlet. For example, to mail-enable the SecGroup universal security group, issue the following command:
Enable-DistributionGroup -Identity SecGroup
Note:
MAIL-ENABLE A SECURITY GROUP
To learn more about mail-enabling a security group, consult the following article on TechNet: http://technet.microsoft.com/en-us/library/bb123805.aspx.
4.2.3.2. Creating Dynamic Distribution Groups
Unlike a normal distribution
group, where membership is managed manually, recipient filters determine
the membership of a dynamic distribution group. For example, if the
Development distribution group was a normal distribution group, someone
would need to update the group membership as people joined and left the
development team. With a dynamic distribution group, you could define
group membership through a recipient filter that queries Active
Directory for mailboxes, contacts, and mail users related to the
development team. Group membership is updated automatically, so when a
new mailbox user is associated with the development team, that mailbox
user is included as a recipient for the dynamic distribution group.
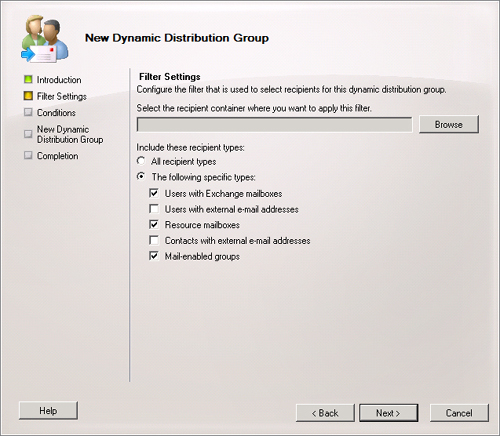
There are several steps
involved in configuring a recipient filter, the first of which is
deciding which recipient types to include. The recipient types that can
be included in a recipient filter are the following:
Users with Exchange mailboxes
Users with external email addresses
Resource mailboxes
Contacts with external email addresses
Mail-enabled groups
As Figure 4 shows, you can choose one, some, or all of these types when creating a recipient filter.
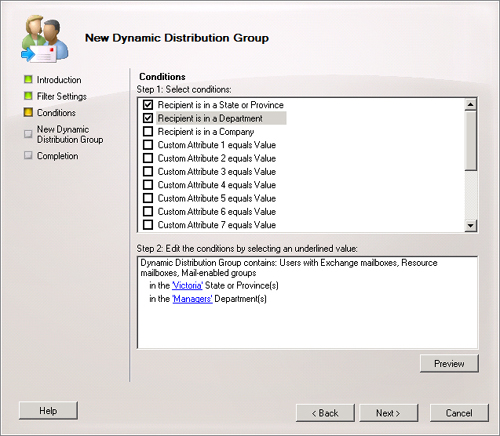
The
next step in creating a recipient filter is to specify the conditions
the filter uses to populate the group. The default conditions that you
can use are that the Recipient object is associated with a state or
province, a department, or a company. Figure 5
shows a new dynamic distribution group where the recipient filter
targets mailboxes, resource mailboxes, and mail-enabled groups that are
associated with the Victoria state or province and the Managers
Department. You can configure the State or Province setting on the
Address page of a user’s account properties and the Department or
Company attribute on the Organization tab. It is also possible to
specify custom attributes in the event that you have populated those
attributes. Custom Attributes allow you to store additional information
in Active Directory without having to extend the Active Directory
Schema. For example, you could use the EMS to configure Custom Attribute
1 to store employee identification numbers.
Note:
CUSTOM ATTRIBUTES
To learn more about custom attributes and managing them in the EMS, consult the following article on TechNet: http://technet.microsoft.com/en-us/library/ee423541.aspx.
You use the New-DynamicDistributionGroup
cmdlet to create a Dynamic Distribution Group in the EMS. For example,
to create a new dynamic distribution group for all mailbox users that
have accounts associated with the Sales Department called SalesDDG,
issue the following command:
New-DynamicDistributionGroup -IncludedRecipients MailboxUsers -Name 'SalesDDG'
-ConditionalDepartment 'Sales' -Alias 'SalesDDG'
Note:
CREATING FILTERS IN RECIPIENT COMMANDS
To learn more about creating filters in recipient commands, consult the following article on TechNet: http://technet.microsoft.com/en-us/library/bb124268.aspx.
3.3. Configuring Moderation for Distribution Groups
The moderator for a
distribution group is able to approve or block messages sent to that
distribution group. For example, your organization might have a
distribution group that includes all recipients in the company. Rather
than allow all messages sent to the distribution group to be forwarded
to all recipients, moderators would review messages before they were
passed on to everyone else. Moderation settings can be configured so
that specific authorized users are able to bypass the moderation process
and send messages directly to the group. Moderators perform moderation
using Outlook or Outlook Web App (OWA).
To configure moderation of an existing distribution group from the EMC, carry out the following general steps:
Navigate
to the Recipient Configuration\Distribution Group node in the EMC,
right-click the distribution group that you wish to configure moderation
for, and then click Properties.
Navigate to the Mail Flow Settings tab, click on Message Moderation, and then click Properties.
On
the Message Moderation tab, enable the Messages Sent To This Group Have
To Be Approved By A Moderator option. Click Add to specify group
moderators.
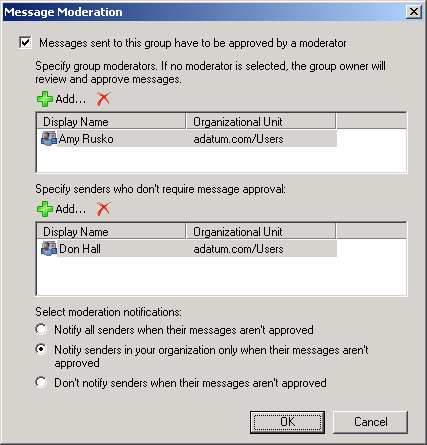
Figure 6
shows Amy Rusko configured as a moderator and Don Hall as a user who
can post to the group without requiring message approval. The moderation
notification settings determine which people are notified when the
moderator does not approve their messages. Groups are not moderated by
default. When you enable moderation for a group, the default moderator
is the user who created the group.
To configure message moderation from the EMS, use the Set-DistributionGroup
cmdlet with the ModeratedBy, ModerationEnabled, and
SendModerationNotifications parameters. For example, to configure
moderation for the Customer_Inquiries distribution group where Amy Rusko
will function as the moderator and where only senders within the
organization will receive a nonapproval notification, use the following
command:
Set-DistributionGroup -Identity "Customer_Inquiries" -ModeratedBy "Amy Rusko"
-ModerationEnabled $true -SendModerationNotifications 'Internal'
3.4. Configuring Distribution Group Ownership
By configuring distribution
group permissions, you can grant ordinary users the ability to manage
the membership of a distribution group. For example, Amy is interested
in running the company charity drive. To assist her in this endeavor,
you configure a new distribution group named Company_Charity and set Amy
as the manager of that group. This allows Amy to add and remove people
from the group as necessary.
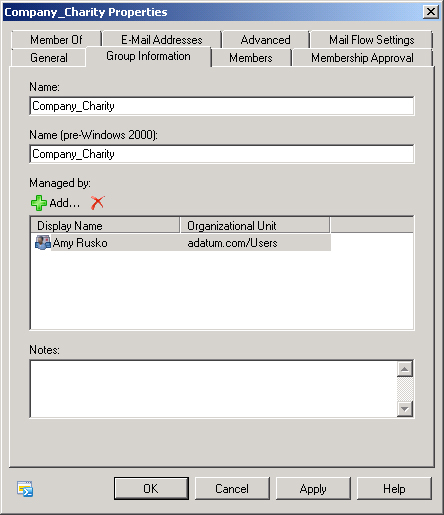
The default manager of a
distribution group is the user who created the group. Users who are
managers of a distribution group are able to add and remove users from
the distribution group. You can configure the manager of a distribution
group on the Group Information tab of the group properties page, as
shown in Figure 7.
You configure ownership of a group in the EMS using the Set-DistributionGroup
cmdlet with the ManagedBy parameter. For example, to configure the
Company_Charity group so that Amy Rusko is the group owner, issue the
following command:
Set-DistributionGroup -Identity Company_Charity -ManagedBy 'Amy Rusko'
A
person delegating group ownership who did not originally create the
group but has the appropriate privileges will need to use the
BypassSecurityGroupManagerCheck parameter with the Set-DistributionGroup
command. This is necessary only when delegating group management
permissions from the EMS and occurs automatically when using the EMC.
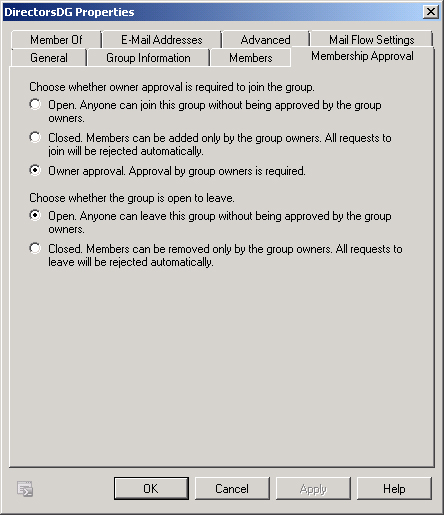
You can configure whether
approval is required for joining a group on the Membership Approval tab
of a distribution group’s properties, as shown in Figure 8.
The options are open membership, which allows anyone to join without
approval; closed, which requires group owners to add members manually;
and owner approval, where a person can join subject to approval from a
group owner. It is also possible to configure whether a recipient can
leave the group without approval from the group owner.
Membership approval settings for distribution groups can be configured using the Set-DistributionGroup
cmdlet with the MemberJoinRestriction and MemberDepartRestriction
parameters. For example, to configure the DirectorsDG distribution group
so that recipients can join subject to group owner approval but can
leave if they choose to without approval, the group owner should issue
the following EMS command:
Set-DistributionGroup -MemberJoinRestriction 'ApprovalRequired' -MemberDepartRestriction
'Open' -Identity 'DirectorsDG'
Note:
CHANGE THE OWNERSHIP OF A DISTRIBUTION GROUP
To learn more about distribution group permissions, consult the following article on TechNet: http://technet.microsoft.com/en-us/library/dd638201.aspx.
3.5. Configuring Send As Permissions
When
you grant users the Send As permission for another mailbox, they are
able to send messages as that user from OWA or Outlook. When you grant a
mail-enabled security group Send As permission for a mailbox, members
of the mail-enabled security group are able to send messages on behalf
of the mailbox from OWA or Outlook.
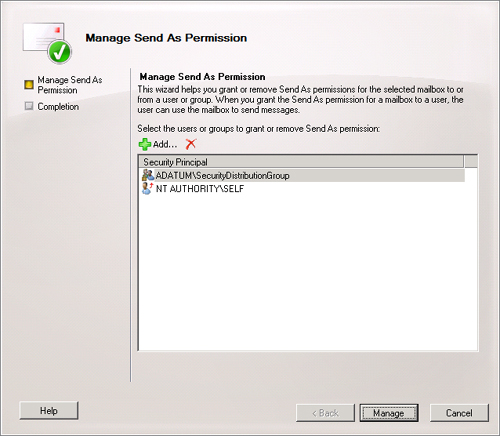
You can configure the Send As permission through the EMC by clicking on
the target mailbox under the Recipient Configuration node and then
clicking on Manage Send As Permission item in the Actions pane. This
will bring up the Manage Send As Permission dialog box, shown in Figure 9.
You can click Add to add mail-enabled security groups to which you want
to grant this permission. You cannot grant the Send As permission to a
distribution group or to a dynamic distribution group, only to a
mail-enabled security group.
To assign Send As permission using the EMS, use the Add-ADPermission
cmdlet with the –Extendedrights “Send As” parameter. For example, to
grant the SecurityDistributionGroup group the Send As permission on Amy
Rusko’s mailbox, issue the following command:
Add-ADPermission "Amy Rusko" -User "SecurityDistributionGroup" -Extendedrights "Send As"
Note:
MANAGING SEND AS PERMISSIONS FOR A MAILBOX
To learn more about managing Send As permissions for a mailbox, consult the following article on TechNet: http://technet.microsoft.com/en-us/library/bb676368.aspx.
3.6. Advanced Dynamic Distribution Group Properties
Through the Advanced tab of a dynamic distribution group’s properties, shown in Figure 10,
you can configure settings such as the simple display name, expansion
server, out-of-office message settings from group members, and
non-delivery report options. You can configure advanced dynamic
distribution group properties using the Set-DynamicDistributionGroup cmdlet from the EMS.
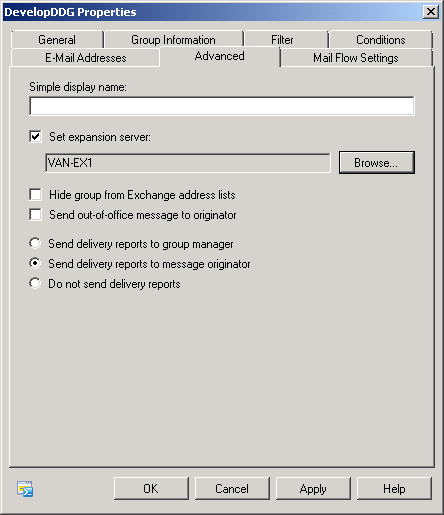
The simple display name
option allows you to provide a simplified group name for older
applications that may not be able to understand dynamic distribution
group names that contain some Unicode characters. The expansion server
setting allows you to specify a Hub Transport server to perform
distribution group expansion. Expansion is the process where Exchange
routes messages to all recipients specified by the recipient filter.
Expansion usually occurs
on the closest available Hub Transport server. As expansion for very
large groups is a resource-intensive process, you may wish to designate a
specific Hub Transport server to minimize the impact on mail flow. The
out-of-office setting determines whether out-of-office messages, where
set, are forwarded back to the original message sender. For large
groups, you may wish to stop this from occurring, as otherwise each
person who sends a message to the group is likely to find one’s Inbox
filled with out-of-office messages, as there is always a number of
people on any mailing list who are not present for one reason or
another.
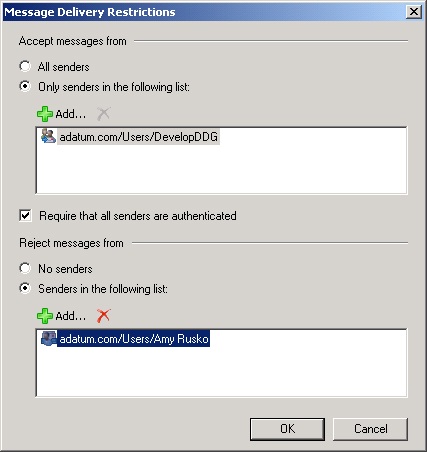
You can use the Message
Size Restrictions item on the Mail Flow Settings tab to control the
maximum size of messages that can be sent to the distribution group. You
can use the Message Delivery Restrictions item on the Mail Flow
Settings tab to control which users are able to send messages to the
group. You can also configure Message Delivery Restrictions to block
messages from specific senders. Figure 11
shows a group that will accept only messages from members of the
DevelopDDG group and will not accept messages from Amy Rusko. As is the
case with the advanced options, message size restrictions and message
delivery restrictions can be configured from the EMS using the Set-DynamicDistributionGroup cmdlet.
Note:
CONFIGURING ADVANCED DYNAMIC DISTRIBUTION GROUP PROPERTIES
To learn more about configuring advanced dynamic distribution group properties, consult the following article on TechNet: http://technet.microsoft.com/en-us/library/bb124560.aspx.
3.7. Distribution Group Proxy Addresses
You can configure additional addresses, also known as proxy addresses,
for both distribution groups and dynamic distribution groups on the
E-Mail Addresses tab. Figure 12 shows the address [email protected] assigned to the DevelopDDG dynamic distribution group. Use the Set-DistributionGroup cmdlet with the EmailAddresses parameter to configure proxy addresses for distribution groups. Use the Set-DynamicDistributionGroup cmdlet with the EmailAddresses parameter to configure proxy addresses for a dynamic distribution group.

Note:
Know which EMS commands allow you to modify the properties of different types of recipients.
