The majority of the functions
you need to access for managing the cluster are available in the
Cluster Administrator snap-in. Those functions are also available from
the command line, which allows clever administrators to easily automate
common functions.
Managing the Cluster from the Command Line
Most any cluster management function that can be
done from the graphical user interface (GUI) can be done from the
command line. This can be quite useful when deploying multiple clusters
because it allows you to write a batch file that contains all the
necessary commands to create and configure the cluster. This is
beneficial because it guarantees that the clusters will be created
identically.
These commands all stem from cluster.exe.
For example, the command
Cluster /cluster:ClusterOne /create /ipaddr:10.1.1.1,255.255.255.0,publicnic /pass:Password /user:Companyabc.com\Clusteracccount /node:NodeA /verb
creates a new cluster called ClusterOne. It
assigns the IP address of 10.1.1.1 to the cluster resource with a subnet
mask of 255.255.255.0. The cluster service is configured to run with
the Companyabc.com\Clusteraccount account and the password is set to Password. The node is NodeA and the output of the process is logged to the cluster log.
Other useful commands are as follows:
Cluster /cluster:Clustername node Nodename /start
Cluster /cluster:Clustername node Nodename /stop
These commands can be used to start and stop the
cluster service on a particular node of a given cluster. These commands
can be run from any system that has the cluster.exe file present and where the user running it has sufficient rights to start and stop the services on the cluster.
Some more commonly used commands include the following:
Cluster /cluster:Clustername group Groupname /ren:NewGroupName
This command renames an existing group on the cluster specified:
Cluster /cluster:Clustername group Groupname /move:Nodename
This command moves the resources in a particular group on the specified cluster to the node you choose.
Cluster /cluster:Clustername group Groupname /on:Nodename
Cluster /cluster:Clustername group Groupname /off:Nodename
These
commands allow an administrator to take a group offline on a given node
or to bring it online. This is very useful for remote maintenance.
By combining these types of commands, a clever
administrator can write simple batch scripts that will create clusters,
define resources, organize the resources into groups, and even allow
them to remotely move the resource groups between nodes. This enables an
administrator to easily deploy Windows Server 2003, x64 Enterprise
Edition clusters for use with Exchange Server 2007 without having to
worry about inconsistent configurations of the clusters in the
environment.
Managing the Cluster from the GUI
Some administrators feel more comfortable having
a GUI for managing their applications. For this purpose, Microsoft
provides the Cluster Administrator for managing Windows Server 2003, x64
Enterprise Edition clusters. This tool is accessed by clicking Start,
Programs, Administrative Tools, Cluster Administrator.
This tool allows the administrator to perform all the necessary functions of managing the cluster.
Moving Resources Between Groups
To move a resource to a different group, perform these steps:
1. | Open the Cluster Administrator.
|
2. | Expand the cluster name.
|
3. | Click Resources in the left pane, and highlight the resource you want to move in the right pane.
|
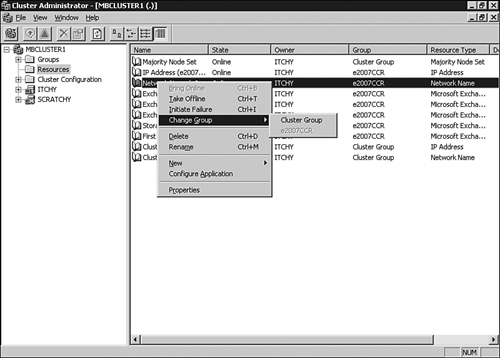
4. | Right-click the resource in the right pane, and choose Change Group, as shown in Figure 1, and then choose the group to which you want to move the resource.
|
Creating New Resources
To create a resource for a cluster, perform these steps:
1. | Open the Cluster Administrator.
|
2. | Right-click the cluster name, choose New, and click Resource.
|
3. | Enter
the Name and Description of the resource. Choose the appropriate
Resource Type in the drop-down, and choose the group that should own the
resource. Click Next.
|
4. | Verify the possible owners; add any that are missing that you want to be possible owners of the new resource. Click Next.
|
5. | Add any dependencies that the resource needs. In most cases, the wizard tells you that you needed one when you click Next.
|
6. | Enter any additional resource-specific information (some resource types require additional dialog boxes).
|
7. | Click Finish.
|
Moving Groups Between Nodes
To move a group between nodes for a cluster, perform these steps:
1. | Open the Cluster Administrator.
|
2. | Expand the cluster name.
|
3. | Expand Groups.
|
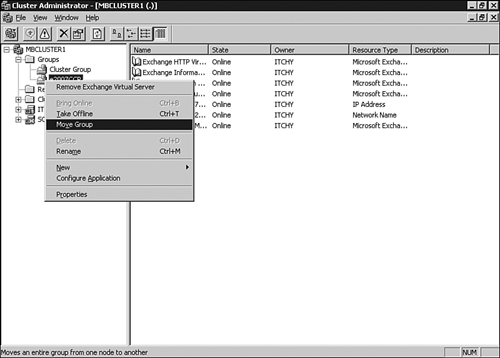
4. | Right-click the group you want to move, and select Move Group, as shown in Figure 2.
|
Adding New Nodes to a Cluster
To add new nodes to a cluster, perform these steps:
1. | Open the Cluster Administrator.
|
2. | Right-click the cluster name, choose New, and then click Node.
|
3. | The Add Nodes Wizard launches. Click Next.
|
4. | Enter the name of the system that will be added to the cluster, and click Add. Click Next.
|
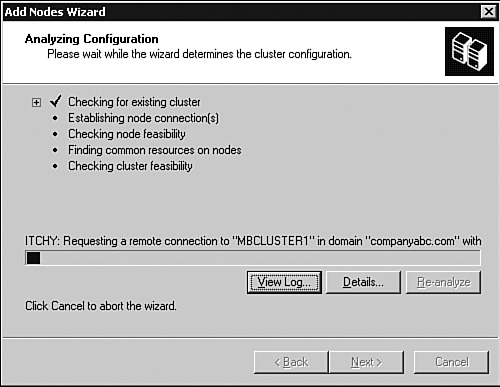
5. | The Analyzing Configuration screen launches, as shown in Figure 3. When it completes successfully, click Next.
|
6. | When the node has been added, click Finish.
|
Renaming Resources
To rename a resource in a cluster, perform these steps:
1. | Open the Cluster Administrator.
|
2. | Expand the cluster name.
|
3. | Click Resources in the left pane.
|
4. | Right-click a resource in the right pane, and choose Rename.
|
5. | The name of the resource can now be retyped. Type the new name of the resource, and press Enter.
|
Renaming Groups
To rename a group in a cluster, perform these steps:
1. | Open the Cluster Administrator.
|
2. | Expand the cluster name.
|
3. | Expand the Groups container.
|
4. | Right-click a group in the left pane, and select Rename.
|
5. | The name of the group can now be retyped. Type the new name of the group, and press Enter.
|
Taking Resources Offline
To take a resource offline, perform these steps:
1. | Open the Cluster Administrator.
|
2. | Expand the cluster name.
|
3. | Click Resources in the left pane.
|
4. | Right-click a resource in the right pane, and choose Take Offline.
|
Backing Up the Cluster
Backing up a clustered Mailbox server pair is
very similar to backing up a normal Exchange Server 2007 Mailbox server.
The main thing to keep in mind is that you will be backing up the
clustered mailbox name, not either of the node names, when backing up
the Exchange data. The individual nodes don’t necessarily need to be
backed up because a restore of the cluster pair would likely use the setup /recoverserver option and, therefore, the System State would be unnecessary.
For example, if you had
two CCR nodes named Itchy and Scratchy, the cluster was called
ExchangeCCR, and the mailbox cluster was called E2007CCR, you would
point your backup software at E2007CCR and select your storage groups to
back up. Be aware that in the
event of a geographically separated CCR pair, if the remote node holds
the cluster resources, your backup occurs over the WAN rather than on
the local server.
