Before we discuss how to create
mail-enabled users, groups, or contacts, we'll first discuss how these
objects get their email addresses. Those of you who are familiar with
Exchange 2000/2003 probably remember that email addresses were defined
by a recipient policy. Once the recipient policy was defined, the
Microsoft Exchange System Attendant's Recipient Update Service (RUS)
would establish email addresses for any mail-enabled recipient at some
point in the future (hopefully just a minute or two).
This process is just a bit different in Exchange
2007 and Exchange 2010. Email addresses are generated for the object at
the time the mail-enabled recipient is created, and they are generated
by an Exchange Management Shell (EMS) task or the Exchange Management
Console (EMC)—still with a background EMS task, though. Recipient
policies from Exchange 2000/2003 have been broken up into two separate
concepts:
For addresses that will be assigned to mailboxes on
your Exchange 2010 servers, you define both an accepted domain and an
email address policy.
1. Accepted Domains
An accepted domain is an SMTP domain name (aka SMTP
namespace) for which your Exchange 2010 servers will accept mail. The
servers will either deliver the mail to Exchange 2010 mailboxes or
relay it on to internal or external SMTP mail servers. If you are in
the middle of a migration from Exchange 2000/2003, the accepted domains
list will include the SMTP domains for your Exchange 2000/2003
mailboxes. Accepted domains must be defined for all email addresses
that will be routed into your organization by your Hub Transport
servers.
Most small and medium-sized organizations will have only a single accepted domain.
1.1. Setting Up an Accepted Domain Using the EMC
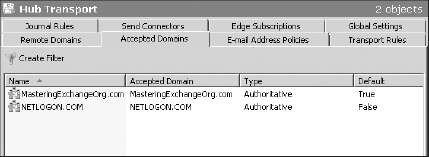
Accepted domains are found within the Organization
Configuration work center under the Hub Transport subcontainer. When
you choose the Accepted Domains tab in the Results pane, you will see a
list of the accepted domains that have been defined for your
organization, such as those shown in Figure 1.

When you create an Exchange organization, a single
accepted domain is automatically created and given a name. This is the
name of the Active Directory forest root domain; for many organizations
this will not be correct because the naming convention for Active
Directory domain names and SMTP domain names may be different. For
example, your Active Directory name may be Netlogon.local whereas your public domain name for email is Netlogon.com.
Accepted domains are simple to create and require
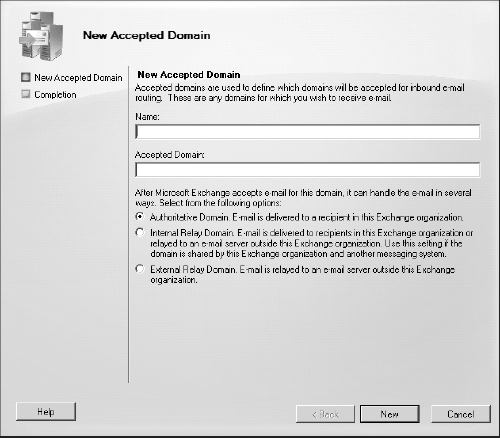
little input. To create a new accepted domain using the EMC, click the
New Accepted Domain task in the Actions pane to launch the New Accepted
Domain Wizard (shown in Figure 2).
You only need to provide a descriptive name for the accepted domain,
the SMTP domain name, and how messages for this domain should be
treated when messages are accepted by Exchange 2010.
Keep in mind that you cannot change the domain name
of an accepted domain once it is created. (You can change the domain
type, however.)
1.2. Setting Up an Accepted Domain Using the EMS
You can also manage accepted domains using the following EMS cmdlets:
New-AcceptedDomain
Set-AcceptedDomain
Get-AcceptedDomain
Remove-AcceptedDomain

For example, to create a new accepted domain for a Canadian division of Leigh Enterprises, use the following EMS command:
New-AcceptedDomain -Name "Leigh Enterprises Canada" -DomainName "leigh-inc.ca"
-DomainType "Authoritative"
1.2.1. About Domain Types
One tricky thing about defining an accepted domain
is that you must define how Exchange is to treat a message for it. You
can choose from three types of domains when creating an accepted domain:
Authoritative Domains
These are SMTP domains for which you accept the
inbound message and deliver it to an internal mailbox within your
Exchange organization.
Internal Relay Domains
These are SMTP domains for which your Exchange
server will accept inbound SMTP mail. The Exchange server must have
mail-enabled contacts or mail-enabled users who specify forwarding
addresses for users in those domains. The Exchange server then relays
the message on to another internal mail system. Internal relay domains
are used when two Exchange organizations are doing global address list
synchronization.
External Relay Domains
These are SMTP domains for which your
Exchange organization will accept inbound SMTP mail and then relay that
mail on to an external SMTP mail server, usually one that is outside of
the organization's boundaries. If Edge Transport servers are used, the
Edge Transport server handles external relay domains.