2. Email Address Policies
Exchange email address policies are the
configuration objects used by Exchange management tasks when new mail
objects are created. Each policy's conditions are examined to see if
the policy's conditions apply to the object that is being created; if
they do, the new mail-enabled object's email address policies are
generated based on the email address generation rules.
Using the EMC, email address policies are found in
the Organization Configuration work center under the Hub Transport
subcontainer. Once you have highlighted the Hub Transport subcontainer,
select the Email Address Policies tab to see a list of the email
address policies in the organization. In Figure 3, we only have the default policy assigned by the Exchange Server 2010 installation.
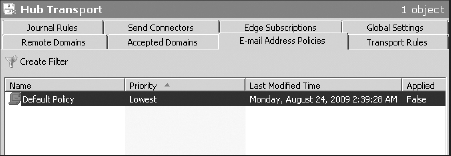
The default policy is the lowest-priority policy and
applies if no other policies above it apply. This is just like having
multiple recipient policies in Exchange 2000/2003.
2.1. Changing an Existing Policy
The default email address generation rule uses the
object's Exchange alias and the domain name of the Active Directory
forest root. Suppose you want to make two changes to the email address
policy:
You want to change the SMTP domain name that is on the default policy to something else.
For
example, this is relevant when the default domain name for the Active
Directory forest root is different from the public domain name used for
SMTP and you need to fix this.
You want
all email addresses to be generated using the first name, followed by a
period, then the last name, and then the domain name.
To perform those tasks, follow these steps:
Define
an accepted domain. If the default accepted domain is not correct for
your organization, you need to create a new accepted domain because
Exchange 2007 does not allow you to change an accepted domain. Let's
say that your Active Directory forest root is called fourthcoffee.com but your public SMTP domain is volcanocoffee.com.
First, under the Accepted Domains tab of the Organization Configuration
work center's Hub Transport subcontainer, create a new authoritative
accepted domain for volcanocoffee.com.
Change the default email address policy so that it uses the new domain name and generates an address using the firstname.lastname format, such as [email protected].
Locate the default policy in the Organization Configuration work center
(found under the Hub Transport subcontainer by clicking the Email
Address Policies tab), highlight the default policy, and click the Edit
task in the Actions pane. Click Next until you reach the Email
Addresses page. In the Email Addresses page, you see the list of all
domain names used to generate Email addresses. On the page you would
then click on the domain name you want to modify, in this case @fourthcoffee.com, and then click the Edit button to see the SMTP Email Address dialog box (shown in Figure 4).
When you first see this box, the Email Address Local Part check box is
not checked. This means that the object's Exchange alias will be used
when creating the SMTP address. You want to change that, so enable the
Email Address Local Part check box; once it's selected, you will be
able to enable the First Name.Last Name (John.Smith) radio button. We
selected that check box in Figure 4 so that you can easily see the available choices.
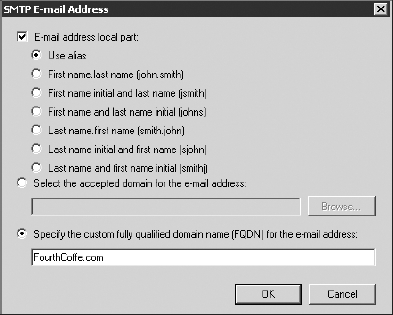
Next,
you can either click the Browse button to select from the list of
available accepted domains or type in the SMTP domain you want to use
to generate email addresses. To better illustrate the options, we typed
the VolcanoCoffee.com domain in the dialog box. When you are done here, you would then click OK.
You have now modified the default policy; just click Next on the Email Addresses page to finish the modification.
Next you will see the Schedule page of the wizard (see Figure 5).
This might be a bit confusing at first because on the surface it
doesn't seem as if there is anything to schedule. However, remember
that in Exchange 2000/2003, the Exchange Recipient Update Service (RUS)
took care of adding SMTP addresses to mail-enabled objects. There is no
equivalent for Exchange 2007mail-enabled recipients. Thus, some process
or task has to be kicked off that will do this. If you choose
Immediately, this will kick off the Update-EmailAddressPolicy cmdlet with the -Identity:'Default Policy' option and immediately update any email addresses.
If you don't choose Immediately, you have additional options:
Do Not Apply skips the Update-EmailAddressPolicy cmdlet phase altogether. If you have just updated the default policy, you can always run the Update-EmailAddressPolicy "Default Policy" command from the EMS at a later point.
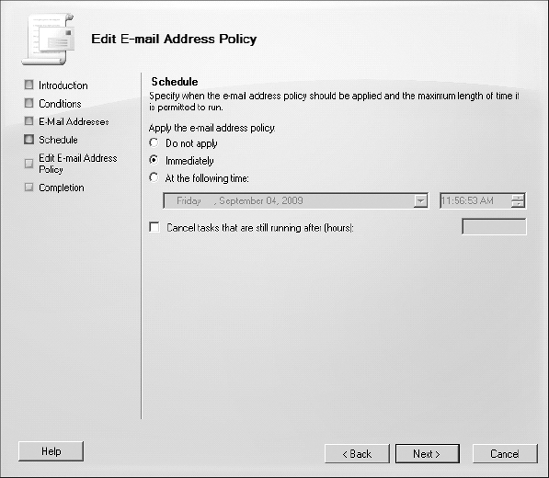
At The Following Time allows you to schedule the Update-EmailAddressPolicy
cmdlet to run later. This is useful if you know that it will have to
update thousands of mail-enabled objects in your Active Directory and
you don't want it affecting usage during the business day. This option,
when selected, allows you to specify that the task be canceled if it is
still running after a certain number of hours.
Of course, you can also create email address
policies using the EMS; the following is an example of an EMS command
that would create an email address policy for the domain Kalleo.ca:
New-EmailAddressPolicy -Name 'Kalleo Solutions' -IncludedRecipients
'MailboxUsers' -ConditionalCustomAttribute1 'test' -Priority '1'
-EnabledEmailAddressTemplates 'SMTP:%g.%[email protected]'
So getting back to our example of VolcanoCoffee.com, one thing we want to point out is what happens to existing email addresses once you change to a new default address. Figure 6
shows the Email Addresses property page for the mailbox of a user whose
address was updated; notice that this user has three email addresses
now. He has the old email addresses [email protected] and [email protected] and his newly created SMTP address [email protected].
The process of updating email addresses never removes existing
addresses; it creates the new address and makes it the Reply To address.
Although this example was done entirely in the
graphical user interface, you could use the EMS to perform the same
steps. The EMS cmdlets you would use to create, delete, modify, and
update email address policies are shown in Table 2.
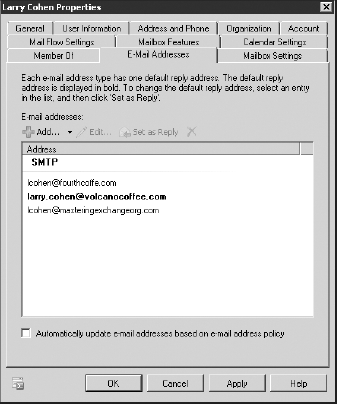
Table 2. EMS Cmdlets Used to Manipulate Email Address Policies
| EMS Cmdlet | Description |
|---|
| New-EmailAddressPolicy | Creates a new email address policy |
| Set-EmailAddressPolicy | Changes properties of the email address policy specified |
| Update-EmailAddressPolicy | Updates mail-enabled objects in the Active Directory if the conditions of the policy specified apply to those objects |
| Get-EmailAddressPolicy | Retrieves a list of email address policies and their properties |
| Remove-EmailAddressPolicy | Deletes the specified email address policy |
Finally, of course, if you want to see the email
addresses that have been applied to a mail-enabled object, you can also
use an EMS cmdlet to retrieve that information. You would use Get-Mailbox, Get-MailContact, or Get-DistributionGroup. To retrieve the email addresses for a mailbox whose alias is Julie.Samante, you could type the following command and see output similar to this:
Get-Mailbox "julie.samante" | Format-List DisplayName,EmailAddresses
DisplayName    : Julie Samante
EmailAddresses : {smtp:[email protected],
SMTP:[email protected]}
