2.2. Creating a New Email Address Policy
If you have a small or medium-sized organization,
you probably support only a single SMTP domain for your users. However,
even companies with a handful of mailboxes can sometimes require two or
three SMTP domain names. Let's take as an example an organization that
has two divisions, each of which requires its own unique SMTP addresses.
Previously, you changed the default policy for an organization so that all users would get an SMTP address of @volcanocoffee.com.
Let's extend that example a bit further. Let's say that this
organization has another division called Volcano Surfboards and its
SMTP domain is @volcanosurfboards.com. Anyone whose company attribute in the Active Directory contains Volcano Surfboards should have an SMTP address of [email protected] and that address should be set as its default reply address.
The first thing you need to do is define volcanosurfboards.com
as an authoritative accepted domain. If you don't define the accepted
domain, you can still define the email address policy, but your
organization will reject any emails sent to the @volcanosurfboards.com addresses.
Next, you want to create the email address policy.
In the EMC, select the Hub Transport subcontainer of the Organization
Configuration work center, and then select the Email Address Policies
tab in the Results pane.
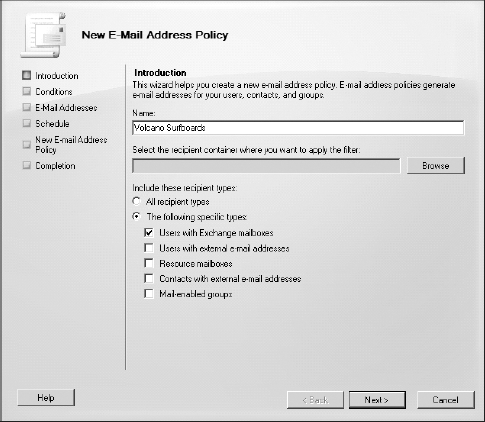
To create a new email address policy, click the New Email Address Policy task in the Actions pane. On the first page (see Figure 7)
of the New Email Address Policy wizard, you will be prompted for the
name of the policy and what type of objects this policy applies to.
In this example, the policy is being created for the
Volcano Surfboards company users and you want the policy to apply only
to mailboxes, so you will provide that information on the screen shown
in Figure 7. When you have provided this information, click Next to move on through the wizard.
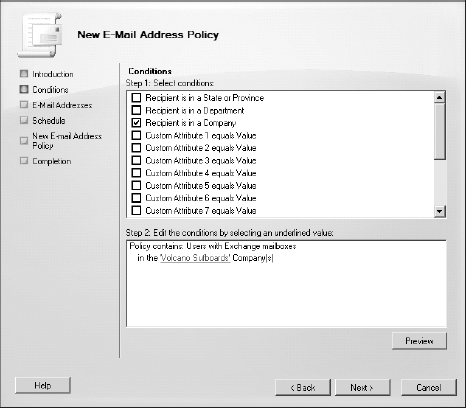
The next screen, Conditions, is where you define the
conditions under which this policy will be applied. There are two steps
to the Conditions page. First, you need to narrow the scope to a
specific condition, such as the State or Province attribute, Department
attribute, or Company Name attribute of the object. Second, you need to
provide values for the attributes you have selected.
In this example, you want this policy to apply to anyone whose company name attribute contains Volcano Surfboards. Figure 8 shows the Conditions page after filling in the necessary information.
Once you select the condition Recipient Is In A
Company, that option shows up in the Step 2 portion of the dialog box
as Users With Exchange Mailboxes In The specified Company(s). The word specified
appears very much like a hyperlink; it is blue and underlined. If you
click that link, a dialog box appears that allows you to edit or
specify one or more company names. (See Figure 8.)
When you have entered the necessary company
information (in this case, just a single company called Volcano
Surfboards), you click OK to close the Specify Company dialog box. You
can verify that the conditions are defined correctly by clicking the
Preview button on the Conditions page of the wizard. The Preview button
displays the Email Address Policy Preview dialog box; you should see
users with mailboxes and whose company name is Volcano Surfboards.
The Preview button is also helpful in confirming
that attributes are being entered correctly in Active Directory.
Administrators may not recognize if everyone in a 10,000-user company
exists in the Preview window, but hopefully it will give them an idea
that the information is being entered correctly. In this case, if a
user's company name does not contain exactly Volcano Surfboards, the policy conditions will not be met and the user's mailbox will have the email addresses from the default policy.
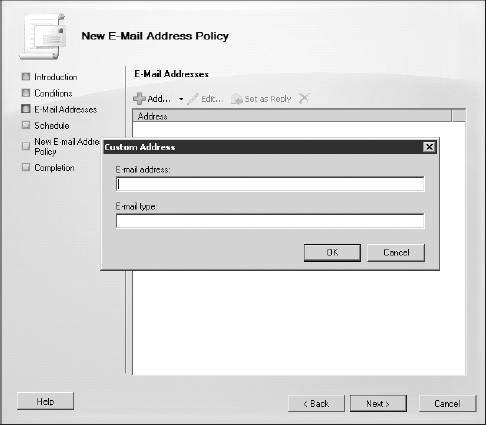
The next step is to define the SMTP address or
addresses that will be generated when the conditions of this policy
apply. The default action for the Add button is to create a new SMTP
address, but if you need to create a custom address, click the
drop-down arrow to the right of the Add button to see a list that
provides an option to create a Custom Address type. (See Figure 9.)
On the Email Addresses page, you need to click the
Add button to create a new SMTP address. You will then type the SMTP
Email Address domain name (in this example, volcanocoffee.com) in the Email Address Domain dialog box and click the First Name.Last Name (John.Smith) radio button option. (See Figure 10.)
If you have created an accepted domain for volcanosurfboards.com, you can also select it by clicking the Browse button.
The next page of the New Email Address Policy wizard
is the Schedule page; if you want the addresses to appear immediately,
you must click the Immediately radio button and click Next. If there
are many thousands of addresses to be created, you may want to schedule
the task to run during off-hours. Once you click Next on the Schedule
page, you will see the Summary page. Here you can see the tasks that
will be performed once you click the New button.

The final phase of email address policy creation is
the Completion page. Though no actual operations or input are required
here (other than clicking the Finish button), this page is useful
because it provides you with the cmdlets and commands that were used to
perform this particular task. In the case of creating a new email
address policy, the task used two cmdlets (New-EmailAddressPolicy and Update-EmailAddressPolicy). The Completion page is shown in Figure 11.

