Dynamics GP provides a great feature to tie web page
links to specific values in Dynamics GP. For example, when a bank
account is selected a link is made available to that bank's website. The
link is contextual, meaning that it is tied to the value in the field.
In this recipe, we'll look at setting up and using the Custom Link
feature.
Getting ready
Before users can benefit from this recipe, an administrator needs to set up the custom links. To set up the links:
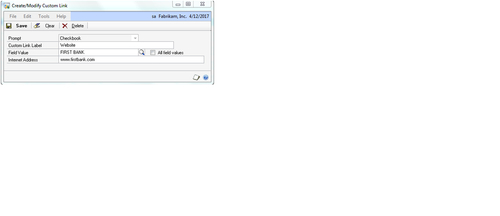
1. Select Administration from the Navigation Pane on the left. Then click on Custom Link under the Company heading.
2. Click on New on the bottom left.
3. In the Prompt field select Checkbook. In the Custom Link Label field type Website.
4. In the Field Value box click on the lookup button (indicated by a magnifying glass) and select the FIRST BANK checkbook.
5. Type www.firstbank.com into the Internet Address field as the bank's website and then click on Save to save the record.

Congratulations, that's all there is to setting up a custom link.
How to do it...
Now we'll see how to use a custom link by completing the following steps:
1. To demonstrate how the custom link works for users, click on Financial on the Navigation Pane. Select Bank Deposits from the Financial Area Page under Transactions.
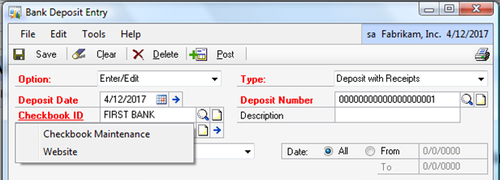
2. In the Checkbook ID
field use the lookup button (indicated by a magnifying glass) to select
the checkbook used in the previous setup. Once the checkbook shows in
the Checkbook ID field click on the Checkbook ID label.
3. A field will drop down with two options. One, marked Checkbook Maintenance, leads back to the Checkbook Maintenance window. This is the typical behavior if Custom Links have not been set up:

4. Select the second link, Website, to open up a web browser and navigate to the website set up in the link.
How it works...
This process associates
website links with values in specific fields. This allows contextual
drill through to web pages for more information. Custom links can be
created for Checkbooks, Credit cards, Currency, Customers, Employees,
Exchange Rates, Items, Salespeople, Tracking Numbers, and Vendors
providing plenty of options to link to more information on the
Internet.
There's more...
A single site can be made available for all of the choices or multiple choices can be applied to a single value.
All field values
Selecting the All field values
checkbox means that the website entered will be used for all values in
this field. For example, if a single currency website is used for all
currencies, selecting the All field values checkbox points all currency values to that one website. This option is available for prompts named:
Checkbook
Credit Card
Currency
Exchange Rate
Tracking Number
Multiple values
For Custom Links the Prompt
field is the key identifier. There can be multiple prompts for a single
value, creating more than one link for a value. For example, a bank
might have a website used to check balances and a completely different
one for processing ACH transactions. By creating two links, one named
Balances and one named ACH, both links can be available for a single
checkbook.