Installing Hyper-V on
Windows Server 2008 R2 uses the native Windows Server 2008 R2
tools—either the graphical Server Manager or, from the command line,
ServerManagerCmd.exe or Windows PowerShell’s Add-WindowsFeature cmdlet. When installing on Windows Server 2008 R2 Core, use the sconfig utility or the Add-WindowsFeature cmdlet.
|
Choosing the source of your Hyper-V
virtualization is a balance among convenience, cost, features, and
security, and it isn’t always an easy choice. The three basic options
are
Windows Server 2008 R2 Full installation Windows Server 2008 R2 Core installation Microsoft Hyper-V Server 2008 R2
If you bought the Premium Add-on
for SBS, you already have a license for Windows Server 2008 R2
Standard. This license gives you the right to install one copy of
Windows Server 2008 R2 on the physical server and one copy as a virtual
machine, if you use the copy on the physical server only to support virtualization.
That’s an important limitation, and one that is often misunderstood. In
practice, if you’re using Hyper-V as your virtualization solution, it
means you can install only the Hyper-V role on the physical server. No additional roles
can be installed or you lose the right to install a second copy of
Windows Server 2008 R2 Standard as a virtual machine. And here the
distinction between a server role and a server feature
is critical. You can’t install Active Directory Domain Services or DNS
or DHCP or even Fax Server. They’re all roles, and by installing them
you’d lose your right to install an additional copy of Windows Server.
But you can
install features such as Windows Server Backup, the Windows PowerShell
Integrated Scripting Environment (ISE), or the Remote Server
Administration Tools (RSAT).
Choosing between the
Full installation and the Core installation with the Premium Add-on
server is really about your comfort level with the command line for the
initial setup. But if you’re willing to consider the command line, we
think the best bet is the stand-alone Microsoft Hyper-V Server 2008 R2. It’s completely free, you don’t have any issues with licensing because Hyper-V
Server doesn’t include any additional roles, and it supports 8 physical
processors, 1 terabyte of RAM, and even clustering.
|
1. Installing on Microsoft Hyper-V Server R2
To instal the Microsoft Hyper-V Server R2, you follow many of the same steps as you would when installing
Windows Server, but you don’t need to make any choices about which
version you’re installing because there is only the one version. You’ll
then perform basic initial configuration of the operating system,
including setting the IP addresses, setting the server name, and
configuring the Windows Firewall, as detailed in the following section.
You will not be
joining the Hyper-V Server to the domain because the domain will be a
child of the parent partition. You will need to enable remote administration as
part of the installation because there is no graphical way to directly
manage or create virtual machines on the Hyper-V Server—the Hyper-V
Manager console won’t run on Server Core or Hyper-V Server.
1.1. Initial Configuration
The initial configuration steps for a basic Hyper-V Server installation are
Table 1 contains the settings we’ll be using during this install scenario.
Table 1. Settings for the initial Hyper-V Server configuration (example)
| SETTING | VALUE |
|---|
| IP Address (Management NIC) | 192.168.0.4 |
| Gateway | 192.168.0.1 |
| DNS Server | 192.168.0.2 |
| IP Address (Child Partition NIC) | DHCP |
| Gateway | 192.168.0.1 |
| DNS Server | 192.168.0.2 |
| Server Name | Hp160-hyperv |
| Default Desktop Resolution | 1024x768 |
| Remote Management | Enable for All Profiles |
Warning:
IMPORTANT
Normally, servers used for SBS 2011 are equipped with only a single
network card because SBS 2011 supports only a single NIC configuration.
However, if you are using Hyper-V
virtualization, you’ll want a second NIC to ensure that you maintain
management access to the physical computer even if there are problems
with the virtualized SBS. That second NIC can be connected to the same
subnet (range of IP addresses) as the primary NIC, or it can be on a
completely separate network.
To configure the initial settings of a Hyper-V Server installation, follow these steps:
Log on to the newly installed Microsoft Hyper-V Server R2 computer. You’ll be prompted to change your initial password.
After
your password change has been accepted, you’ll be logged in to the main
Hyper-V Server desktop. An uninspiring pair of command windows appears,
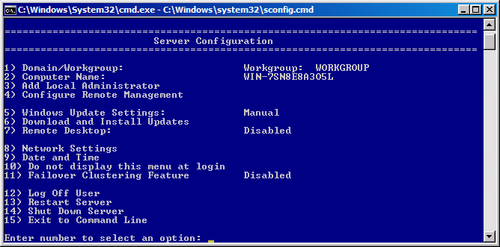
one running Sconfig.cmd as shown in Figure 1.

Use the Sconfig.cmd menus to configure the initial settings of the Hyper-V Server. Do not join it to a domain—leave the server in a workgroup. The settings we used on our test setup are shown in Table 6-1.
In addition, you’ll likely want to select Download And Install Updates
and enable Remote Desktop, at a minimum. The initial configuration will
take at least one reboot, and possibly two.
After
you’ve finished configuring the Hyper-V Server, you should select
option 10 on the main Sconfig menu. This will disable the automatic
launching of Sconfig every time you log on to the server. You can always
get it back by typing Start Sconfig from the main Cmd window. This will
launch Sconfig and also re-enable the automatic launching.
Select option 15 to exit Sconfig and return to a simple Cmd window.
2. Installing on Full Windows Server 2008 R2
To install the Hyper-V
role on full Windows Server 2008 R2, first complete the normal
installation and configuration of Windows Server 2008 R2. When initial configuration has completed, you can install the Hyper-V role using the following steps:
Open the Server Manager console if it isn’t open already.
Select Add Roles from the Action menu to open the Before You Begin page of the Add Roles Wizard.
Read
the advice on the Before You Begin page. It’s actually good advice and a
useful reminder. If you’ve read the page, understand all its
implications, and don’t ever want to see the page again, select the Skip
This Page By Default check box. We leave it unchecked, personally.
Note:
If you’ve already run the Add
Roles Wizard and selected Skip This Page By Default, you won’t see the
Before You Begin page of the Add Roles Wizard.
Click Next to open the Select Server Roles page of the Add Roles Wizard.
Select Hyper-V from the list of roles.
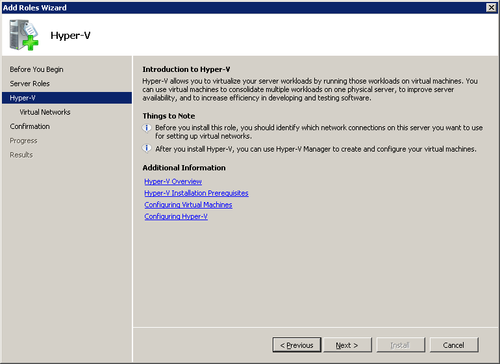
Click Next to open the Hyper-V page, as shown in Figure 2.
This page describes the Hyper-V role and includes a Things To Note
section that has cautions and advisories specific to the Hyper-V role.
The page also has a link to several Additional Information pages with
up-to-date information on Hyper-V.

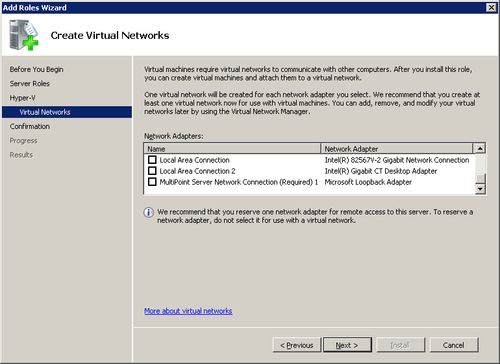
After you’ve read the Things To Note section, click Next to open the Create Virtual Networks page shown in Figure 3.

Select
the ethernet cards you want to create virtual networks for. The general
rule is to leave at least one network card not used for virtual
networks to ensure that you maintain full remote connectivity to the
server.
When
the Add Roles Wizard has all the information necessary to proceed, it
will open the Confirm Installation Selections page. If everything looks
correct, click Install to begin the installation.
When the installation completes, you’ll see the Installation Results page. The Hyper-V installation will require a reboot. Click Close to complete the wizard. Click Yes to reboot right away.
After the server reboots, log back on with the same account you used to add the Hyper-V
role. The Resume Configuration Wizard will open, and when the
configuration is complete, you’ll see the final Installation Results
page.
Click Close to exit the wizard.