Marketing and service organizations often utilize direct
mail as a critical communication strategy with their customers and
prospects. They might send a special offer letter to all prospects,
encouraging them to purchase a product; or they might distribute a
customer service notification to all existing customers. The mail
merge capabilities of Microsoft Dynamics CRM provide a convenient way
to quickly generate these documents with personalized data directly from
a marketing list.
In this exercise, you will create a mail merge letter with data from a marketing list.
Note:
To complete this
exercise, you must have access to the Reconnect With Contacts template
for Microsoft Word that is included in every Microsoft Dynamics CRM
installation. To verify that you have access to this template, in the
Settings area, click Templates, and then click Mail
Merge Templates. Change the view to Active Mail Merge Templates, and
check to see if the Reconnect With Contacts template appears in the
list. If the template does not appear, you can select another template
or contact your system administrator.
Note:
SET UP
Use the Internet Explorer web browser to navigate to your Microsoft
Dynamics CRM website, if necessary, before beginning this exercise. You
need a user account that has the Marketing Manager security role or
another role with privileges to manage marketing lists and mail merge
templates.
In the Marketing area, click Marketing Lists.
Double-click the Illinois Seminar Invites marketing list created earlier in this article.
 On the ribbon, click the Add tab, and then click the Mail Merge on List Members button.
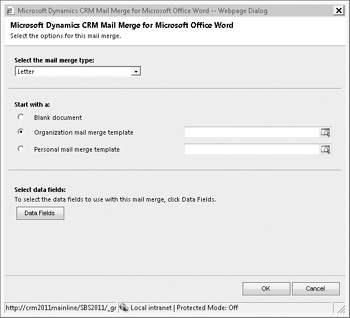
 In the Microsoft Dynamics CRM Mail Merge for Microsoft Office Word dialog box, select Letter for the mail merge type. Then choose Organization mail merge template, and click the now-available Look Up button.

In the Look Up Records dialog box that opens, displaying the available mail merge templates, select the Reconnect with Contacts template, and then click OK.
Tip:
Microsoft Dynamics CRM includes numerous mail merge templates. You can edit these templates or create your own.
Back in the Microsoft Dynamics CRM Mail Merge for Microsoft Office Word dialog box, click OK.
In the File Download dialog box, click Open to view the file in Word. If you want, you can click Save instead to save the mail merge to your computer.
Note:
The next steps assume that
you are using Word 2007 or Word 2010 and have the Microsoft Dynamics CRM
for Outlook client installed. The CRM button on the Add-Ins tab will appear only if the Microsoft Dynamics CRM for Outlook client is installed on your computer.
 In Word, click the Add-Ins tab, and then click the CRM button.

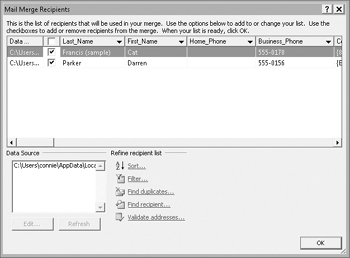
The Mail Merge Recipients dialog box opens. This lists all of the recipients that will be used in your mail merge. Click OK to include all of the recipients.

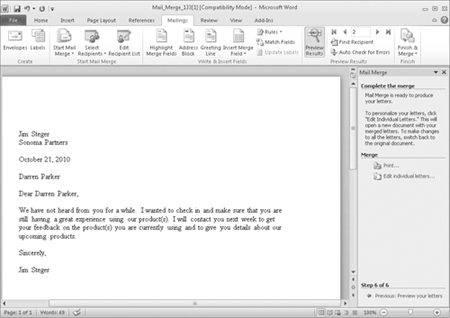
At this point, you can update the text of the letter and add information. After you have completed your edits, click Next: Preview your letters in the Mail Merge pane.
Preview the final information for each recipient and update the recipient list as necessary. Then click Next: Complete the merge when you are finished.
In the final step, you can print the resulting letters or edit each individual letter.
