7. Use Group Policy to Configure Automatic Updates
Automatic updates are
great because you really don't want to go from server to server checking
for updates and then installing those updates manually. You probably
would much rather have the server take care of that. In addition, you
don't need to go to each server in your network to enable the automatic
updates on that server in the first place. Group Policy is a great
resource for administrators to enforce configurations for automatic
updates not only on a single server but on groups of servers and clients
in your network.
To configure Group Policy to enable automatic updates, you will need to do the following:
Open the Group Policy Management console.
Select the policy you will edit (or create a new one).
Right-click the policy, and choose Edit.
Expand Computer Configuration.
Expand Administrative Templates.
Expand Windows Components.
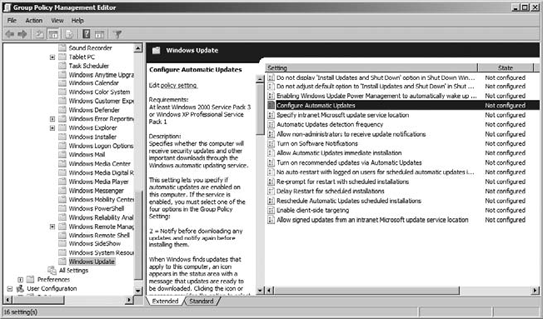
Select Windows Update, as shown in Figure 8.
You
will notice that there are 16 options in this policy container having
to do with Windows Update. When working with policies, remember that
policies have three possible states: enabled, disabled, and not
configured. To configure automatic updates using Group Policy, you will
need to select the policy called Configure Automatic Updates, as shown
in Figure 8. Double-click the policy, and then choose Enabled.
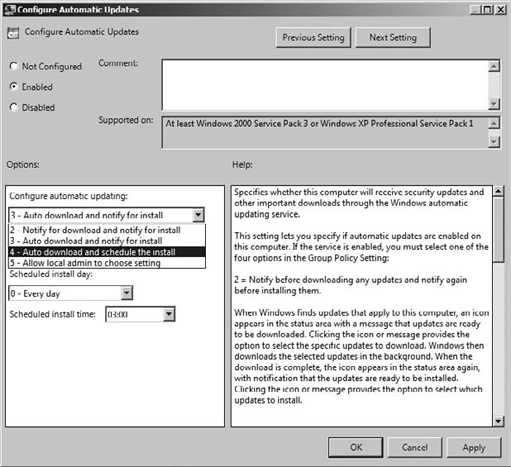
The Configure Automatic
Updates policy setting has four different values that you will need to
choose from when you enable this policy. They are numbered from 2
through 5, as shown in Figure 9:
2 This notifies you before downloading any updates and notifies you again before installing any updates.
3
This is the default setting. This downloads the updates automatically
and then notifies you when they are ready to be installed.
4
This automatically downloads the updates and then automatically
installs them based on a time scheduled in the Configure Automatic
Updates policy setting.
5
This allows local administrators to select the configuration mode for
automatic updates. This means the local administrators can choose when
the updates will be installed by using their local Windows Update;
however, they cannot turn off automatic updates.
Once you have selected one of
the four options, you will likely need to establish the scheduled
install day and time. There are eight options labeled 0 through 8. Don't
ask us where the crazy numbering comes from—first 2 through 5, and now 0
through 8. Just smile and configure the settings.
If you want the updates to
install every day, choose option 0. If you want the updates to be
installed only once a week on a given day, then choose the number
representation for the day you want the updates to install:
0 = Every day
1 = Sunday
2 = Monday
3 = Tuesday
4 = Wednesday
5 = Thursday
6 = Friday
7 = Saturday
You will also need to establish
a time for the updates to be installed on the scheduled day. The
default here is 3 a.m. This setting is made using a 24-hour time
setting, so if you wanted to have updates installed in the late evening
hours, say at 11 p.m., you would select 23:00. Once this policy is set,
you can apply it to servers in your network's sites, domains, or
organizational units.
There is an
additional setting here that will make automatic updates immediately
install. When this setting is configured, it will allow an update to
install immediately if the update does not require a restart of the
Windows operating system or the interruption of Windows services.
Windows Server 2008 R2 will
check for updates using an automatic update detection frequency of 22
hours by default. If you want to change that frequency, you can do so
using the policy setting entitled Automatic Updates Detection Frequency.
This setting when enabled will specify the number of hours between
automatic update checks. The setting is interesting because the server
will actually choose a value located somewhere between the actual
setting in hours and 20 percent less than its value. This means that if
you use a value of 20 hours, the server will check for automatic updates
every 16 to 20 hours. This policy works in direct conjunction with
Configure Automatic Updates and with Specify Intranet Microsoft Update
Service Location.
The policy called
Specify Intranet Microsoft Update Service Location is used to enable
Windows Update from a server within your corporate network. This means
you can provide a central network location to provide updates to your
server and client computers inside your network. This can be very
desirable in many cases because your server and clients are not getting
their updates from an Internet property but rather from an internal
network location that can be tightly monitored and controlled.
The desire to move to
an even more automated system of updating servers located inside the
corporate network and to provide as much automation as possible for
Windows Updates will eventually lead you to a group of resources called
Windows Server Update Services.
