1. Planning
1.1. Planning Partitions
One thing that the
installation wizard does not explicitly ask is how to partition your
hard disk space. The default installation will put everything on a
single partition that takes up all the space on your first hard disk.
SBS 2011 makes it easy to move data such as user shares and Microsoft
Exchange data to new locations whenever you want, so careful planning
up front isn’t critical, especially if some of your hard disk space
won’t be visible until the operating system is fully installed and you
can install drivers for the space.
Our recommendation is to at
least create a partition for the initial installation, and to size it
appropriately for the system drive of SBS. We recommend that you create a
partition during the initial installation screens for Small Business
Server 2011 that is at least 120 gigabytes (GB) in size. (200 GB is a more realistic minimum.)
|
Although you can have a
single large partition and put everything on it, there are compelling
reasons to divide hard-drive space into at least three different
partitions, even if you are using hardware RAID. The three partitions
are
The primary operating system partition. A
partition for static storage. Use this primarily for read-intensive
storage, such as company-wide shared folders, application installations,
and installation sources. A
partition for data, logs, and other volatile information. This will be
the most active partition and should have a storage technology optimized
accordingly.
Dividing your storage
space into logical partitions in this way makes backups and disaster
recovery easier and allows you to focus your efforts on the critical
data partition.
|
1.2. Planning Location and Networking
The other planning step you should take prior to installing SBS 2011 is to decide your physical layout and networking layout. The main areas of concern for the physical layout are
Server security Is the server secure from unauthorized physical access?
Network device security Are the main network devices secure from unauthorized physical access?
Ease of access Is it easy to get to the server, and the connections to it, for maintenance?
Expandability Is there room to add servers as the business grows?
Your SBS server should be
physically protected, and access to it should be controlled and
monitored. Although not every small business has the luxury of an
air-conditioned server room with high-security access control, there are
still basic security steps you can and should take.
The server
(and main networking equipment) should be in a separate room that can
be locked. In a pinch, using a lockable cage in a multipurpose room can
work, but then choose your servers for their noise level. A keycode lock
is a good choice because it can be easily changed if an employee
leaves, and most keycode locks allow for separate keys for individuals and for determining who has been in the room.
Planning the logical
networking is another important step to make sure you’ve done before
starting the actual install. We like to use a simple spreadsheet that
shows the necessary information we’ll need for the installation. Details
on the spreadsheet include
Internet services provider (ISP) information, including account names, IP addresses, support phone number, and so on.
Internal
network details, including IP address range, router IP address, number
and names of clients, and number and names of servers.
DNS and NetBIOS names that will be used for the new network.
Router
configuration, including any updates that are required to the router,
what its default settings are if you have to reset it, what settings
you’ve changed on the router to configure it for SBS, and so on. If your
router is enabled for Universal Plug and Play (UPnP), SBS can make at
least some of the changes for you automatically.
Note:
Many routers default to
either 192.168.0.1, 192.168.1.1, or 10.0.0.1 for their IP address. If
you have to reset the router, make sure you have a well-documented way
to upload a configuration file to return it to the configuration you’ve
chosen for your network. Leaving the router at one of these common
defaults can create issues when setting up virtual private networks, so
it’s not recommended.
2. Preparing the Server
Finally, there are a few last steps to take before launching the installation:
Make sure the server
is sized appropriately for the load under which you plan to place it.
If you’re installing on an existing server, back up all data and record any important settings.
Remove the uninterruptible power supply (UPS) management cable from the server (even if it’s USB).
Upgrade the system BIOS to the latest version available.
Set the boot order in the BIOS to boot from the DVD before the hard disk.
Locate any mass storage drivers necessary for the system.
Configure the firewall or router as required.
3. Installation
The actual installation of Windows Small Business Server 2011 is simple compared to earlier versions of SBS.
The initial installation of the operating system asks fewer questions,
and the installation of the SBS portion also asks far fewer questions.
Plus both can be automated or semi-automated using answer files. We’ll
walk through a basic installation first, and then address
customizations, advanced settings, and automation.
3.1. Installation Process
The installation process
for Windows Small Business Server 2011 is in two stages. The first
stage installs 64-bit Windows Server 2008 R2 Standard, and the second
stage installs SBS itself. The important thing here is that the
underlying operating system is Windows Server 2008 R2 Standard. There
are only three limitations placed on Windows Server 2008 R2 by SBS:
SBS can only be in a single domain environment—no trust relationships are possible.
The SBS server must hold all of the Flexible Single Master Operation (FSMO) roles. Additional domain controllers can be installed in the SBS network, but none of the FSMO roles can be moved.
A maximum of 75 users or device Client Access Licenses (CALs) are allowed.
3.1.1. Installing the Base Operating System
Installing
the underlying Windows Server 2008 R2 Standard operating system can be
done using any of the deployment methods supported by Windows Server
2008 R2, but you will usually do it by booting from the Windows Small
Business Server 2011 Standard Disk1 and following these steps:
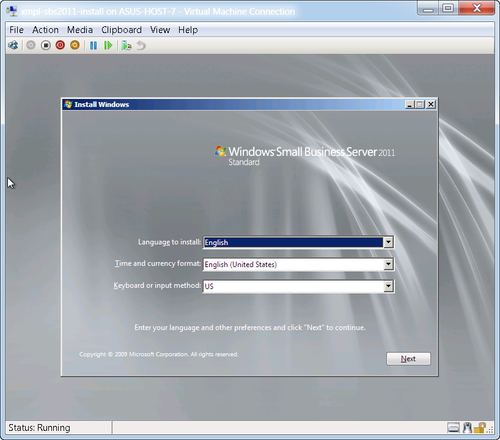
At the initial screen of the Install Windows Wizard, shown in Figure 1, set the localization information for this installation of SBS.
Click Next to open the Install page of the Install Windows Wizard, as shown in Figure 2.
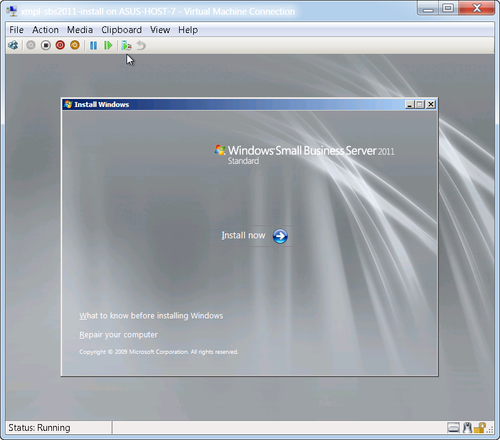
Click
Install Now to start Set Up. The next screen presents the licensing
terms. Read the terms, select the box to accept the licensing terms, and
then click Next.
On the next screen, you are asked if you want an Upgrade or a Custom Installation. Select Custom Installation.
Note:
You can choose the Upgrade
option, but because upgrades to SBS 2011 aren’t possible, this option
will lead you in a merry circle, accomplishing nothing.
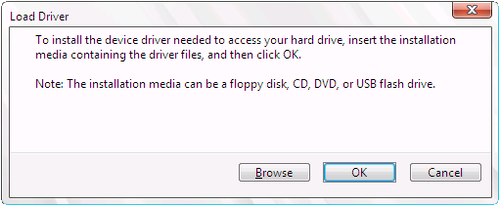
Click Custom (Advanced) to open the Where Do You Want To Install Windows page. You’ll see a list of drives and partitions available for installing SBS. If the drive you want to use isn’t listed, click Load Driver to open the Load Driver dialog box shown in Figure 3. Drivers can be loaded from floppy disk, CD, DVD, or a USB flash drive.
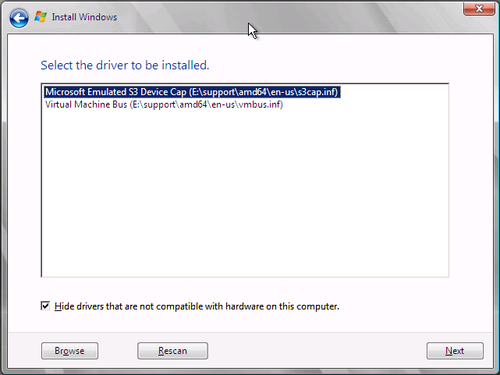
Click
OK to have Windows search attached removable media and display the
results on the Select The Driver To Be Installed page, shown in Figure 4. If the driver isn’t displayed, click Browse and navigate to the device and folder where the driver is located.
Click
Next to load the selected driver and return to the Where Do You Want To
Install Windows page. Select the partition where you want to install
Windows.
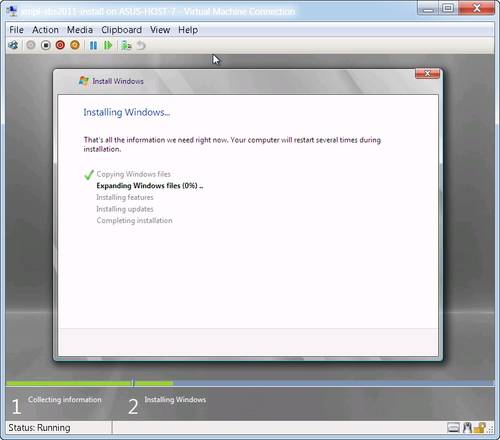
Click Next to begin the actual installation of Windows Server 2008 R2 Standard. (See Figure 5.) No further questions will be asked until the SBS portion of the installation begins.
3.1.2. Installing the SBS Portion
After the underlying
operating system is installed, Windows will log on and the SBS
installation will automatically start. This installation will configure
your time zone, your networking, and your server and Windows domain
names; configure your business information; and set your administrator
account and password for the SBS domain.
Also during this process,
you’ll have a chance to install any required networking drivers, if
Windows doesn’t have a built-in driver for your network card, and
download the latest updates to protect your server.
Note:
Windows Small Business Server
2011 Standard installation requires that a functioning network card be
detected prior to installation. If your network card is not
automatically detected by Windows Server 2008 R2, you’ll need to
download the driver and have it available before the installation of SBS
can proceed.
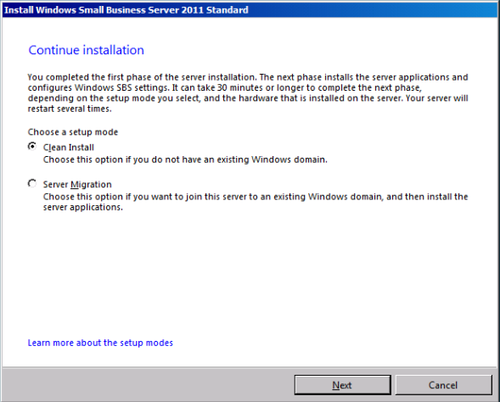
The next screen (see Figure 6)
asks you to specify a setup mode: a clean install or a migration.
Select Clean Install, and click Next to continue the installation.
Continue the installation by following these steps:
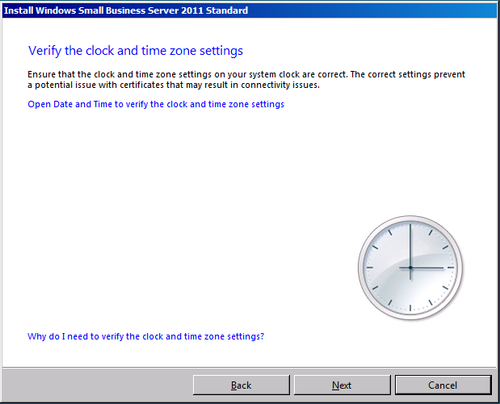
The Verify The Clock And Time Zone Settings page shown in Figure 7
opens. Click the Open Date And Time To Verify The Clock And Time Zone
Settings link to the standard Windows Date And Time dialog box. Set the
time zone and current date and time if they aren’t correct, and click OK
to return to the Verify The Clock And Time Zone Settings page. Click
Next.
On
the Server Network Configuration screen, select how you want the server
to detect network settings. Chose Automatic, or you can specify the IP
address for your network adapter and server. Click Next.
Click
Go Online And Get The Most Recent Installation Updates (Recommended).
This will download only critical updates that are directly related to
installation issues.
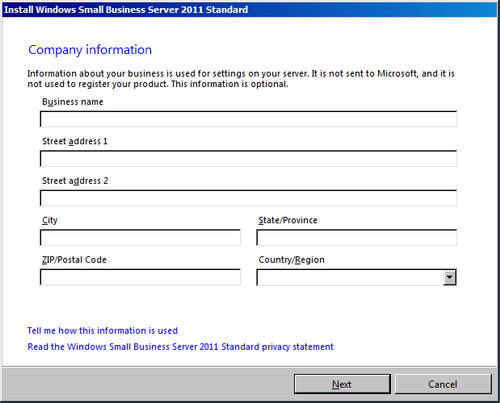
When the update check is complete, click Next to open the Company Information page shown in Figure 8. This information will be used to customize various other areas of SBS. Nothing is required here, but there’s no good reason not to enter the information, either—none of it is sent to Microsoft.
Click Next to open the Personalize Your Server And Your Network screen, supply a name for your server and the name for your internal network, as shown in Figure 9. Click Next.
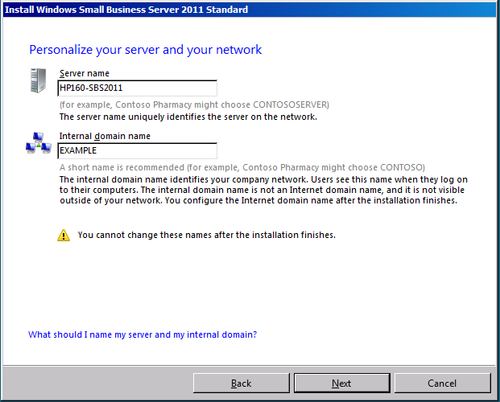
|
The temptation is to choose a
simple domain name that somehow reflects the name of the company that
will be using the SBS server. This makes perfect sense, and no one will
question it. In fact, this is what we used to do when we set up networks
for our customers. And it seemed to work fine. Until the first time one
of them merged with another small company and changed their name to
reflect the new company. And we had to tell them that there wasn’t any
way to change the domain name.
The only solution was to rebuild the network
from scratch—with all the pain and risk that involved. We learned an
important lesson, however. Although it’s important to choose a name that
makes sense to users—because they’ll see it every time they log on to
their workstations—make it a generic name that reflects function, not
the specific company name.
|
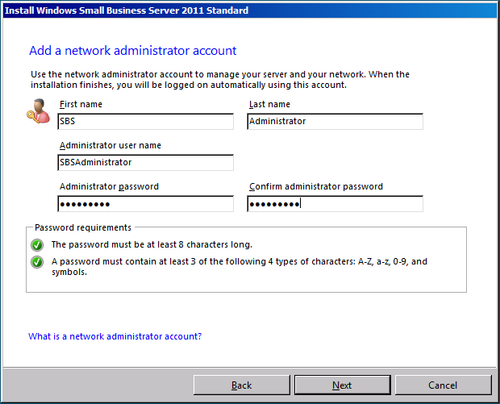
Click Next to add an administrator account, as shown in Figure 10. Enter a name for the administrator and an account name (user name) for the account. SBS 2011 does not allow the main administrator account to be named “Administrator”. See the Administrator 500 Account sidebar for more details on the Administrator account.
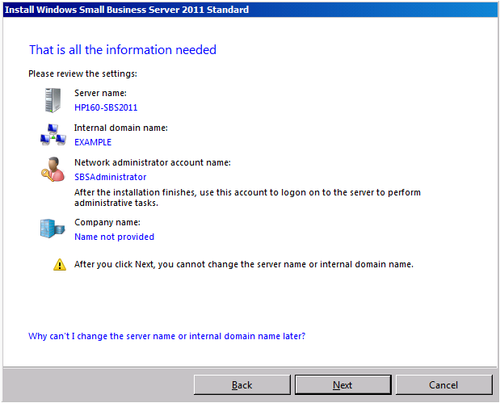
Click Next to open the confirmation page shown in Figure 11. If everything looks correct, click Next to install SBS.
|
SBS requires you to create a new administrator account during a new installation. (We called this account “SBSAdministrator” in the previous examples.) This administrator account is used for all future administration of SBS, and the original Administrator account—often referred to as the 500 account from an easily recognizable portion of the account’s globally unique identifier (GUID)—is disabled.
The new administrator account
password is synchronized with the Directory Service Restore Mode (DSRM)
Administrator account password, which is used to recover Active
Directory if there’s a problem. So far, so good.
But when the password changes for the new administrator account, the underlying DSRM Administrator account is not
updated. This means that the DSRM Administrator password is tied to
that original password and you’ll need to keep a permanent record of it
in case you need to recover from a problem with Active Directory.
We understand the reasons why Microsoft developers disable the Administrator
account, but we think it’s unfortunate that there isn’t a solution in
place that would allow the passwords to remain synchronized. However,
because SBS 2011 is built on Windows Server 2008 R2, you can use the Restartable AD DS feature, combined with appropriate registry changes, to enable other recovery scenarios. See http://technet.microsoft.com/en-us/library/cc732714.aspx for more information on using Restartable AD DS.
|
3.2. Using the SBS Answer File Generator
New in Windows Small Business Server 2008 and still in force in SBS 2011 is the ability to simplify the SBS portion of the installation using an answer file. The answer file is required for doing a migration from an existing domain environment, but it’s optional for a clean
new installation. It does, however, have some advantages because it
allows you to customize some portions of the install that aren’t
available in the normal install.
Disc1 of Windows Small Business Server 2011 Standard includes a tool called the SBS Answer File Generator (SBSAfg.exe) to create an answer file. SBSAfg.exe is located in the \Tools directory. To use SBSAfg.exe, follow these steps:
Copy
the file SBSAfg.exe from the SBS 2011 Disc1 to your local hard disk.
Where you copy it isn’t important as long as you can find it.
From Windows Explorer, double-click SBSAfg to start the SBS Answer File Tool, shown in Figure 12.
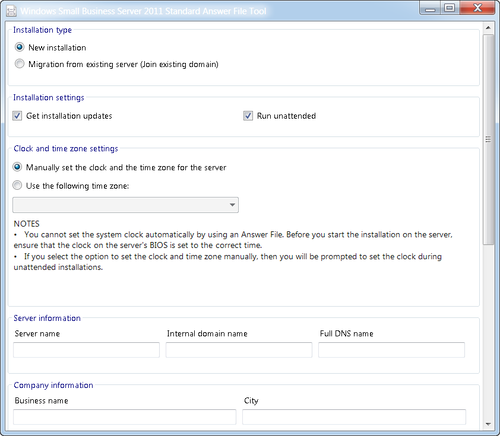
Fill in the fields of the Answer File Tool to configure your installation of SBS. If you leave a required field blank, you’ll be prompted for that value during the installation.
When you’ve filled in the fields of the Answer File Tool, click Save As to save the answer file. The file name should be SBSAnswerFile.xml.
To
use the answer file, copy it to removable media such as a USB flash
drive or USB hard drive and connect the USB drive to the SBS server prior to the initial SBS installation screen (shown earlier in Figure 5-5);
SBS will automatically load the answer file and proceed to use it
during the installation. You can also copy it to the root of any hard
disk attached to the SBS server.
Note:
If you create an empty XML
file with the name SBSAnswerFile.xml and make it available to the SBS
installation process, as described in step 5, you will have additional
options available during the installation process.
Note:
If you’re installing
on a Hyper-V child partition, where there is no USB available, you can
use a virtual floppy drive (VFD) with the SBSAnswerFile.xml on it.
Floppy disks work just as well for automating the installation.
Using the answer file is the
only way you can specify a different internal root DNS domain name other
than “.local”. If you use the standard SBS installation, it will
automatically add a .local to the internal domain name. But when using
an answer file, you can specify any root DNS domain to add.
