Microsoft Dynamics GP provides great functionality
for analyzing and reviewing individual accounts and sequential groups of
accounts. Many users don't know that it also provides impressive
functionality for analyzing non-sequential groups of accounts via a
feature known as Account Rollup.
Account Rollups are
inquiries built to allow users to see different GP accounts rolled up
together and to provide drill back capability to the details.
Additionally, these queries can include calculations for things such as
budget versus actual comparisons and calculations.
FRx Reporter
provides similar functionality and Account Rollup allows users to access
this functionality without the wait time of starting up FRx. Let's see
how to mix up some account rollups in this recipe.
Getting ready
Before using Account Rollups it's important to understand how to set them up.
1. To set up Account Rollups, select Financial from the Navigation Pane. Then select Account Rollup in the Inquiry section to open the Account Rollup Inquiry Options window.
2. In the Option ID field enter the name Actual vs. Budget and press Tab. Select Yes to add the option. On the right, set the number of columns to 3.
3. In the first row type Actual in the Column Heading field and set the Type to Actuals.
4. In the second row type Budget in the Column Heading field and set the Type to Budget. In the Selection column click on the lookup button (indicated by a magnifying glass) and select BUDGET 2008.
5. In the third row type Difference in the Column Heading field. Set the Type to Calculated. Click on the blue arrow next to Selection to open up the Account Rollup Inquiry Calculated Column window.
6. In the Column field select Actual and click on the double arrow (>>). Then click on the minus (-) button. Back in the Column field select Budget and click on the double arrow (>>). Click on OK.
7. Back on the Account Rollup Inquiry Options window, select the Segment field, and then select Segment2. Use the lookup buttons (indicated by a magnifying glass) in the From and To fields to add account 4130 and click on Insert. Repeat this process to insert 4120 and then 4100 into the Restrictions box below. Click on Save and close the window:
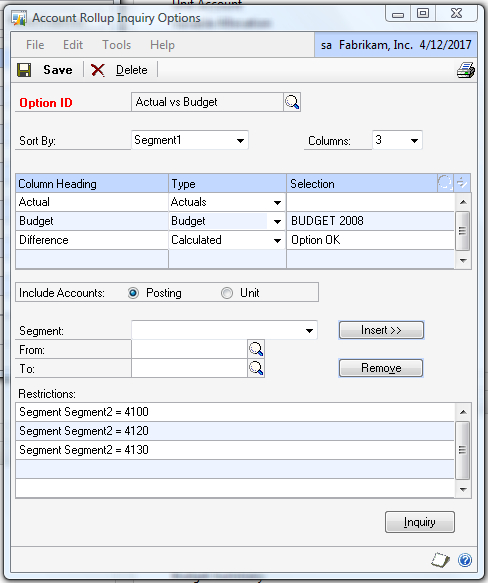
Notice when looking up
these accounts for selection that these numbers are not sequential;
there are a number of accounts in between.
How to do it...
Now that we've built an account rollup let's see how to make it work:
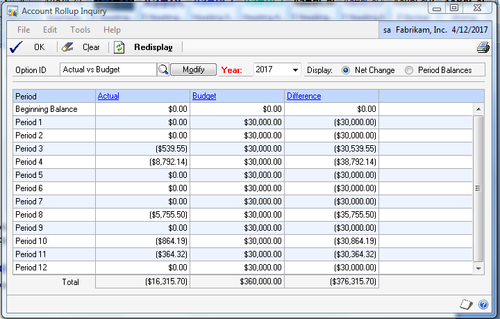
1. Select Account Rollup under Inquiry on the Financial Area Page.
2. In the Option ID field look up Actual vs. Budget with the help of the lookup button (indicated by a magnifying glass).
3. The screen will show Actual, Budget, and Difference for each period in this year. The year can be changed at the top and the Display can be changed to show either Net Change or the Period Balance for each period in the year along with a Total at the bottom, using the controls next to the Year. The Difference field is the Actual minus Budget calculation that we created when setting up the rollup:
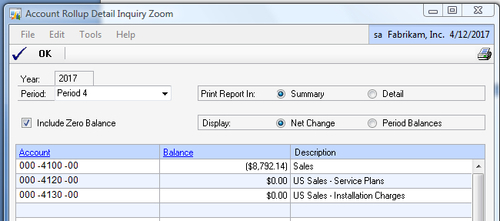
4. Click on a period with an amount in the Actual column and select the blue Actual link at the top. A new window will open with the included accounts and the actual amounts for each account.
5. On drilling down to the Account Rollup Detail Inquiry Zoom
window, Dynamics GP provides a checkbox option to show accounts even if
these have zero balance. Additionally, an option at the top controls
the printing of Account Rollup information. The rollup can be printed in Summary or in Detail.
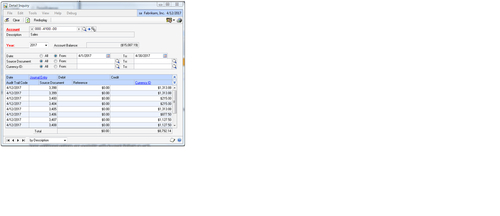
6. Selecting a line and clicking on Balance from the Account Rollup Detail Inquiry Zoom window drills back to the detailed transactions behind the balance:
How it works...
Account Rollups combine
the account totals from disparate accounts for reporting. This is great
for tying back multiple accounts that roll up into a single line on the
financial statements. Account Rollups also work well for analyzing a
single segment, such as a department, across multiple accounts. In the
past, I've used this for easy comparisons of Fixed Asset general ledger
accounts to the subledger and for rolling up full-time equivalent of
unit accounts to get the number of employees across the company with
drill back to the employees in each department.
