Improving financial reporting clarity by splitting purchasing accounts
By default, in Dynamics GP,
when a payables invoice is fully or partially paid, the payment portion
of the transaction doesn't flow through the payables account. This can
make it more difficult to trace a transaction as the transaction could
skip the payables account altogether by crediting cash and debiting an
expense.
GP provides an
optional setting to force transactions to flow through the payables
account and that's what we'll look at in this recipe.
How to do it...
Setting up GP to pass voucher payments through payables is as easy as following these steps:
1. Select the Administration button from the Navigation Pane on the left. In the Administration Area Page click on Company under the Setup and Company headers.
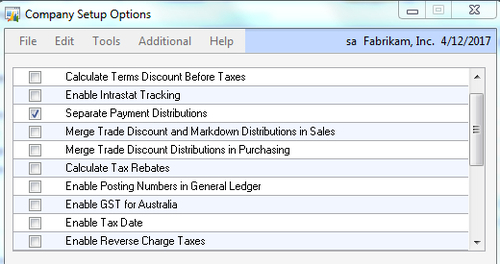
2. Click on the Options button. In the Company Setup Options window scroll down to the setting marked Separate Payment Distributions and select the checkbox next to it:
3. Click on OK to close the window and accept the changes.
How it works...
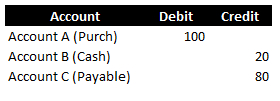
Let's assume a $100 purchase
transaction where $20 is paid in cash and the remaining $80 would go to
accounts payable. By default, GP will create a transaction distribution
that looks similar to the following screenshot:
After the Separate Payment Distributions checkbox is selected, GP will create a transaction that looks similar to the following screenshot:
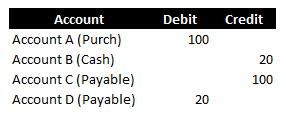
Notice that the full $100 is
credited to payables and then the $20 payment is debited to reduce
accounts payable to the amount due.
Speeding up lookups with Advanced Lookups
Dynamics GP provides a very
robust functionality in lookup windows for finding data such as
accounts, vendors, customers, items, and more. Various fields can be
used for sorting or searching and some additional fields are always
provided by default. However, if all of that is not enough, Dynamics GP
provides an option for administrators to add additional fields to
lookups. This recipe demonstrates how to accomplish that.
Getting ready
Before using Advanced
Lookups they need to be set up. Up to four custom lookups can be created
for each type in the system. We will do this as follows:
1. Select Administration on the Navigation Pane, and under the Company heading select Advanced Lookups.
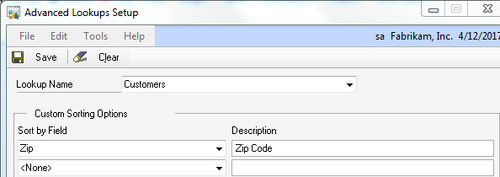
2. On the Advanced Lookups Setup window use the drop-down menu to select a Lookup Name.
3. For our example, select Customers. In the first Sort by Field drop-down menu scroll down and select Zip.
4. Change the Description to Zip Code.
5. Click on Save to save the lookup and close the window.
These setup steps add a lookup based on zip code to any place where Customers are selected in the system:
How to do it...
Once an advanced lookup has been set up, let's look at how to use it by completing the following steps:
1. Select Sales from the Navigation Pane on the left. Select Customer on the Sales Area Page.
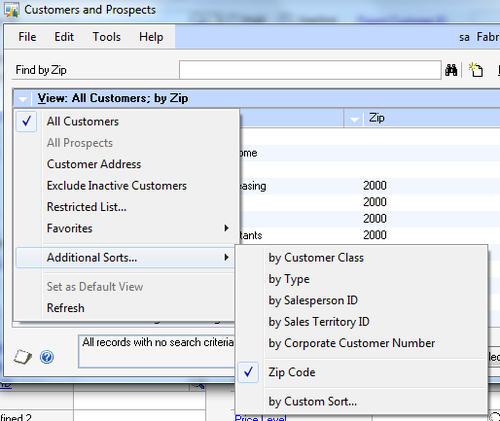
2. In the Customer ID field click on the lookup button (indicated by a magnifying glass) and click on the arrow next to Additional Sorts.
A predefined set of lookups is shown at the top of the drop-down menu
and customer lookups are at the bottom. In the middle is the Zip Code lookup created previously.
3. Click on Zip Code
and the Zip codes will appear on the right-hand side of the window. The
search box at the top also changes to allow searching by selected
lookup. In this case, will be Zip code:
How it works...
Administrators get the chance to set up four extra lookups for each of the lookup options. Lookup options include:
Accounts
Addresses
Customers
Employees
Items
Open documents
Open Payables documents
Prospects
Purchase orders
Sales Document Numbers
Sales documents
Vendor addresses
Vendors
Vouchers
This provides users
with more opportunities to ensure that they are selecting the right
information with a minimum amount of work.