One of the nicest features of OSD in
Configuration Manager 2007 is the driver catalog, which stores all
applicable drivers for all identified hardware in an organization. The
deployment process uses this catalog to identify which drivers to copy
to a system. Entries are made to the unattended setup file in use, which
effectively adds the drivers to the internal Windows driver catalog.
When added to the internal driver catalog, the drivers copied
to the system are available for the setup or mini-setup plug-and-play
device detection, driver installation processes, and any new hardware
additions made to the system.
Adding drivers to the catalog is a matter of
right-clicking the Drivers node and selecting Import from the context
menu, which launches the Import Driver Wizard that guides you through
the process. As you must import drivers from a UNC path, it is a good
idea to create a driver repository somewhere on your network to store
all the driver files. ConfigMgr 2007 searches all subdirectories of the
specified path for valid drivers; the list, displayed by the Import New
Driver Wizard, allows you to choose the drivers to import. Figure 1 shows the Driver Details page of the wizard.
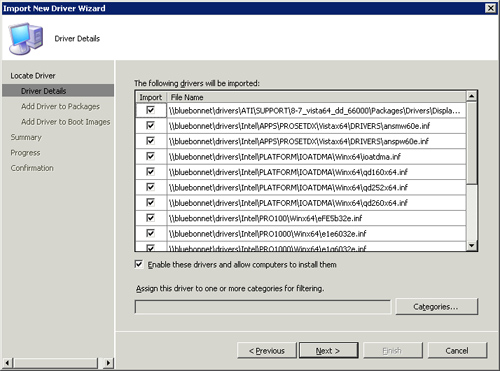
The Driver Details page of the wizard also allows
you to assign the drivers to a specific category. Although you are free
to create categories as you want, categories are an optional
classification tool because drivers might be members of multiple
categories. Categories can be used to version drivers or separate and
classify them in some other logical way that makes sense for your
organization. You can use categories in the Auto Apply Drivers task to
filter those drivers considered for installation but without any other
specific function within ConfigMgr.
All drivers must be stored in a driver package,
regardless of the task type used to deploy them to a target system. You
can create a new package during the Import New Driver Wizard or specify
an existing one. These packages are identical to normal software
distribution packages—they are containers for files that you must
install onto a distribution point
for use. One potentially confusing point is that you must specify a
source folder when creating the driver package. Although this is
equivalent to the source folder of a software distribution package, you
do not populate the folder with source files because the Import Drivers
Wizard does this. You can also add drivers to a driver package after
importing drivers into the catalog by dragging and dropping them from
the catalog to a specific package.
Tip: Check Share Permissions
ConfigMgr uses the Local System account of the
system hosting the SMS provider to copy driver files to the source
folder during the driver import process. Because you must specify a UNC
path for the source files when creating the package with the wizard,
ensure the share permissions allow the Local System account access if
the share is local or the Computer account of the site system has access
when the share is remote.
You can organize driver packages in any way that
makes sense for your deployments. A recommended approach is to create a
package for each PC model to which you deploy a system. Using separate
packages allows you to use the Apply Driver Package task to force the
use of all drivers for a specific model. Additionally, you should create
a package for your Windows XP mass-storage (SATA) drivers and packages
for any devices existing in your organization but not necessarily
connected to the system during deployment. This includes
direct-connected printers, biometric readers, card readers, or scanners.
Here are the two task types used to add drivers to a system during OSD deployment:
Auto Apply Drivers—
Smartly deploy drivers to a target system using a plug-and-play device
detection. This plug-and-play detection is separate from the Windows
plug-and-play device detection and enables the deployment process to
inject only drivers that are applicable to the target system.
Apply Driver Package—
Inject drivers without any detection. The main uses for this task type
are to force certain drivers onto a system because the OSD plug-and-play
process is not properly detecting devices when you want to add drivers
for devices either not connected to the system during deployment, or for
Windows XP mass-storage device drivers.
Tip: Drivers Not Installing
A recent issue plaguing Windows XP SP 3
deployments involves drivers properly identified and copied to the
destination system but not installed by the Windows XP minisetup
process. To overcome this issue, add a custom Run Command Line task to
the Deployment task sequence after the Setup Windows and ConfigMgr task
with the following command line:
rundll32.exe Syssetup.dll,UpdatePnpDeviceDrivers
This command initiates a full Windows
plug-and-play detection cycle that installs drivers for unknown devices
if they are available.
Note
that just because you added a driver into a deployment does not mean
that Windows will use it. Windows goes through its own plug-and-play
process to identify devices and then uses suitable drivers from its
internal catalog; the internal catalog includes drivers you injected
using one of the two task types. Insiders have described the Windows
plug-and-play process as a black art. OSD attempts to replicate it as
closely as possible, but there are many complicating factors, including
parent-child relationships that hide child devices until the parent
drivers are installed. Although the Auto Apply Drivers task works well
most of the time, there are times where it simply will not identify and
inject the proper driver. In these cases, you can add the problem driver
to a driver package of its own and use a separate Apply Driver Package
task to inject the driver for use by Windows.
Acquiring device drivers is typically a
straightforward process: You visit the hardware vendor’s website and
download those drivers listed for the hardware models of interest.
Occasionally you will find the drivers are packaged in an installation
program. Here are two options for these cases:
- Extract the
driver files for the installation program. This is the best option but
not always available because extracting them may be an undocumented or
unsupported process.
- Create a software distribution
package and install the drivers using a Software Install task. If you
resort to this technique to install drivers, ensure you use the proper
switches to install the drivers silently. You may also want to verify
the drivers installed in this fashion are installed only on specific
hardware models: Use a WMI query conditional on the task, such as the
following example:
SELECT * FROM Win32_ComputerSystem WHERE Model like "%760%"
Use the ROOT\CIMV2 WMI namespace for this query and replace the
text in the quotes with the appropriate model number. Note that the
percent sign indicates the wildcard in WMI Query Language (WQL) and
represents zero or more of any character.
To quickly determine what the model attribute is on any system, run the following from a command prompt:
wmic computersystem get model
Drivers in the Image
Because you want your image to be as generic as
possible and include only those items existing on every system in your
organization, you want to minimize additional third-party drivers in the
image itself. Minimizing drivers limits the size of the image; however,
it
is completely unavoidable to include some drivers—particularly those
distributed with the operating system and those required for the
reference system itself. This is quite acceptable, and you should not
worry too much about additional drivers; most drivers are relatively
small, and Windows does not use or load them if they are not for a
device currently installed.
There might be occasions when you want to force
certain drivers into every image; for example, when users use locally
attached devices such as printers, scanners, card readers, or biometric
devices not attached to the system during its deployment. If this is the
case, then you should make the same choice with these drivers as you do
with software. Is the device going to connect to all (or nearly all)
systems? If so, then it makes perfect sense to include it in the image.
If not, then it should be layered on after the image is deployed using
an Apply Driver Package task.
Another common concern voiced is that if you do
not include a driver in the image, it will not be available to systems
where you deploy the image. This particularly comes up as a concern for
the built-in drivers. This is a false assumption. All drivers that come
with Windows will still be part of the image unless you go through a lot
of pain and effort to remove them.
Drivers After the Image
Few, if any, organizations use the exact same
desktop and laptop hardware for all their users. Although this is a
desirable goal, it is unrealistic for most organizations because of many
factors—the ever-changing model lineup delivered by hardware vendors,
the diversity of user requirements, merges and acquisitions, hardware
refresh cycles, and so on. Because of this, you end up with a wide range
of hardware in your organization and many different drivers.
Auto Apply Drivers
Apply Driver Package
Driver management is an oft-discussed topic in
the various forums on the Internet, including the main Microsoft
Configuration Manager forums. Many different opinions exist on this
topic and can be placed on a spectrum with “Control Freak” at one end
and “Chaos” at the other:
Control Freaks only use the Apply Driver Package tasks in combination with the WQL conditional presented in the “Drivers” section to ensure only specific drivers are deployed to systems in a controlled manner.
Subscribers to the Chaos methodology use only an Auto Apply Drivers task and let chaos reign with driver deployment.
Although neither methodology is
necessarily wrong, the reality is that most OSD deployments fall
somewhere in the middle depending on the drivers and systems you are
deploying. As long as it works for you and enables you to deploy your
systems successfully, the methodology
you adopt cannot be wrong.
