A configuration file is generally a text
file that is edited by the administrator and parsed by a program. By
specifying a set of values, you define the behavior of the program. In
Linux-based operating systems, a large share of applications rely on
vast, complex configuration files, which often turn out to be a
nightmare to manage. Apache, PHP, MySQL, Qmail, and Bind all these names
bring up bad memories. The fact is that all these applications use
their own configuration file with different syntaxes and styles. PHP
works with a Windows-style .ini file, sendmail uses the M4 macro-processor to compile configuration files, Zabbix
pulls its configuration from a MySQL database, and so on. There is,
unfortunately, no well-established standard. The same applies to Nginx
you will be required to study a new syntax with its own particularities,
its own vocabulary.
On the other hand (and this is one of its
advantages), configuring Nginx turns out to be rather simple at least in
comparison to Apache or other mainstream web servers. There are only a
few mechanisms that need to be mastered directives, blocks, and the
overall logical structure. Most of the actual configuration process will
consist of writing values for directives.
Configuration Directives
The Nginx configuration file can be described as a
list of directives organized in a logical structure. The entire behavior
of the application is defined by the values that you give to those
directives.
By default, Nginx makes use of one main configuration file.If you did not edit the configuration file path and prefix options, it should be located at /usr/local/nginx/conf/nginx.conf. Now let's take a quick peek at the first few lines of this initial setup.
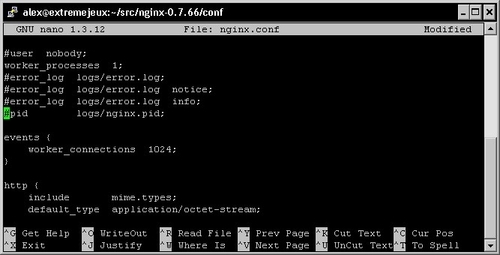
A closer look at the first two lines:
#user nobody;
    worker_processes 1;
As you can probably make out from the # character, the first line is a comment.
In other words, a piece of text that is not interpreted and has no
value whatsoever; its sole purpose is to be read by whoever opens the
file. You may use the # character at the beginning of a line or following a directive.
The second line is an actual statement a directive. The first bit (worker_processes) represents a setting key to which you append one or more values. In this case, the value is 1,
indicating that Nginx should function with a single worker process
(more information about this particular directive is given in further
sections).
Directives always end with a semicolon (';').
Each directive has a special meaning and defines a
particular feature of the application. It may also have a particular
syntax. For example, the worker_process directive only accepts one numeric value, whereas the user directive lets you specify up to two character strings one for the user account (the Nginx worker processes should run as) and a second one for the user group.
Nginx works in a modular way, and as such, each
module comes with a specific set of directives.
Organization and inclusions
In the preceding screenshot, you may have noticed a particular directive include.
As the name suggests, this directive will perform an
inclusion of the specified file. In other words, the contents of the
file will be inserted at this exact location. Here is a practical
example that will help you understand.
nginx.conf:
user nginx nginx;
    worker_processes 4;
    include other_settings.conf;
other_settings.conf:
error_log logs/error.log;
    pid logs/nginx.pid;
Final result, as interpreted by Nginx, is as follows:
user nginx nginx;
    worker_processes 4;
    error_log logs/error.log;
    pid logs/nginx.pid;
Inclusions are processed recursively. In this case, you have the possibility to use the include directive again in the other_settings.conf file in order to include yet another file.
In the initial configuration setup, there are two files at use nginx.conf and mime.types. However, in the case of a more advanced configuration, there may be five or more files, as described in the table below.
|
Standard name
|
Description
|
|---|
|
nginx.conf
|
Base configuration of the application
|
|
mime.types
|
A list of file extensions and their associated MIME types
|
|
fastcgi.conf
|
FastCGI-related configuration
|
|
proxy.conf
|
Proxy-related configuration
|
|
sites.conf
|
Configuration of the websites served by Nginx, also known as virtual
hosts. It's recommended to create separate files for each domain.
|
These filenames were defined conventionally; nothing
actually prevents you from regrouping your FastCGI and proxy settings
into a common file named proxy_and_fastcgi_config.conf.
Note that the include directive supports filename globbing, in other words, filenames with the * wildcard, where * may match zero, one, or more consecutive characters:
This will include all files with a name that ends with .conf in the sites folder. This mechanism allows you to create a separate file for each of your websites and include them all at once.
Be careful when including a file if the specified
file does not exist, the configuration checks will fail and Nginx will
not start:
[alex@example sbin]# ./nginx -t
    [emerg]: open() "/usr/local/nginx/conf/dummyfile.conf" failed (2: No such file or directory) in /usr/local/nginx/conf/nginx.conf:48
The previous statement is not true for inclusions with wildcards. Moreover, if you insert include dummy*.conf
in your configuration and test it (whether there is any file matching
this pattern on your system or not), here is what should happen:
[alex@example sbin]# ./nginx t
    the configuration file /usr/local/nginx/conf/nginx.conf syntax is ok configuration file /usr/local/nginx/conf/nginx.conf test is successful
Directive blocks
Directives are brought in by modules if you activate a
new module, a specific set of directives becomes available. Modules may
also enable directive blocks, which allow for a logical construction of the configuration.
events {
    worker_connections 1024;
    }
The events block that you can find in the default configuration file is brought in by the Events module. The directives that the module enables can only be used within that block in the preceding example, worker_connections will only make sense in the context of the events
block. There is one important exception though some directives may be
placed at the root of the configuration file because they have a global
effect on the server. The root of the configuration file is also known
as the main block.
Note that in some cases, blocks can be nested into each other, following a specific logic:
http {
    server {
    listen 80;
    server_name example.com;
    access_log /var/log/nginx/example.com.log;
    location ^~ /admin/ {
    index index.php;
    }
    }
    }
This example shows how to configure Nginx to serve a website, as you can tell from the http block (as opposed to, say, imap, if you want to make use of the mail server proxy features).
Within the http block, you may declare one or more server blocks. A server block allows you to configure a virtual host. The server block, in this example, contains some configuration that applies to all requests with a Host HTTP header exactly matching example.com.
Within this server block, you may insert one or more location
blocks. These allow you to enable settings only when the requested URI
matches the specified path.
Last but not least, configuration is inherited within children blocks. The access_log directive (defined at the server
block level in this example) specifies that all HTTP requests for this
server should be logged into a text file. This is still true within the location child block, although you have the possibility to disable it by reusing the access_log directive:
[…]
    location ^~ /admin/ {
    index index.php;
    access_log off;
    }
    […]
In this case, logging will be enabled everywhere on the website, except for the /admin/ location path. The value set for the access_log directive at the server block level is overridden by the one at the location block level.
Advanced language rules
There are a number of important observations
regarding the Nginx configuration file syntax. These will help you
understand certain syntax rules that may seem confusing if you have
never worked with Nginx before.
Directives accept specific syntaxes
You may indeed stumble upon complex syntaxes that can be confusing at first sight.
rewrite ^/(.*)\.(png|jpg|gif)$ /image.php? file=$1&format=$2 last;
Syntaxes are directive-specific. While the listen
directive may only accept a port number to open a listening socket, the
location block or the rewrite directive support complex expressions in
order to match particular patterns.
Later on, we will approach a module (the Rewrite module) that allows for a much more advanced logical structure through the if, set, break, and return
directives and the use of variables. With all these new elements,
configuration files will begin to look like programming scripts. Anyhow,
the more modules we discover, the richer the syntax becomes.
Diminutives in directive values
Finally, you may use the following diminutives for specifying a file size in the context of a directive value:
As a result, the following two syntaxes are correct and equal:
client_max_body_size 2M;
client_max_body_size 2048k;
Additionally, when specifying a time value, you may use the following shortcuts:
ms: Milliseconds
s: Seconds
m: Minutes
h: Hours
d: Days
w: Weeks
M: Months (30 days)
This becomes especially useful in the case of directives accepting a period of time as a value:
client_body_timeout 3m;
client_body_timeout 180s;
client_body_timeout 180;
Note that the default time unit is seconds; the last two lines above thus result in an identical behavior.
Variables
Modules also provide variables that can be used in
the definition of directive values. For example, the Nginx HTTP Core
module defines the $nginx_version variable. When setting the log_format directive, you may include all kinds of variables in the format string:
[…]
location ^~ /admin/ {
access_log logs/main.log;
log_format main '$pid - $nginx_version - $remote_addr';
}
[…]
Note that some directives do not allow you to use variables:
error_log logs/error-$nginx_version.log;
This is a valid configuration directive. However, it simply generates a file named error-$nginx_version.log, without parsing the variable.
String values
Character strings that you use as directive values can be written in three forms. First, you may enter the value without quotes:
root /home/example.com/www;
However, if you want to use a particular character, such as a blank space (" "), a semicolon (;), or curly brace ({ and }), you will need to enclose the value in single or double quotes:
root '/home/example.com/my web pages';
Nginx makes no difference whether you use single or double quotes.
