Delegating Zones
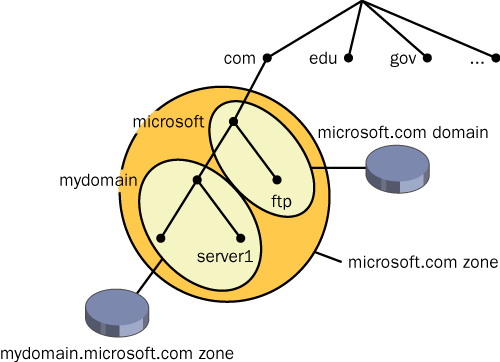
To delegate a zone means to assign authority over portions of your DNS namespace to subdomains within this namespace. A zone delegation occurs when the responsibility for the resource records of a subdomain is passed from the owner of the parent domain to the owner of the subdomain. For example, in
Figure 1
, the management of the microsoft.com domain is delegated across two zones: microsoft.com and mydomain.microsoft.com. In the example, the administrator of the mydomain.microsoft.com zone controls the resource records for that subdomain.

You should consider delegating a zone within your network whenever any of the following conditions are present:
When choosing how to structure zones, you should use a plan that reflects the structure of your organization.
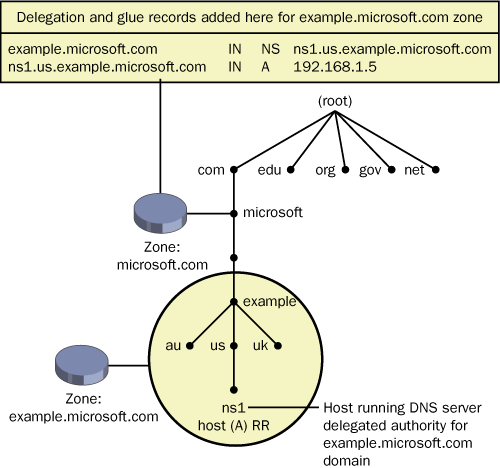
For a delegation to be implemented, the parent zone must contain both an A resource record and an NS resource record pointing to the authoritative server of the newly delegated domain. These records are necessary both to transfer authority to the new name servers and to provide referrals to clients performing iterative queries. In this section, you walk through an example of delegating a subdomain to a new zone.
In
Figure 2
, an authoritative DNS server computer for the newly delegated example.microsoft.com subdomain is given a name based on a derivative subdomain included in the new zone (ns1.us.example.microsoft.com). To make this server known to others outside the newly delegated zone, two resource records are needed in the microsoft.com zone to complete delegation to the new zone. These records are automatically created when you run the New Delegation Wizard in the DNS console.

These records include the following:
Suppose an external DNS server (acting as a client) wants to resolve the FQDN box.example.microsoft.com. When this computer queries a name server authoritative for the microsoft.com domain, this name server responds with the glue record, informing the querying client that a name server authoritative for the example.microsoft.com domain is ns1.us.example.microsoft.com, with an IP address of 192.168.1.5. The querying computer then performs another iterative query to the name server ns1.us.example.microsoft.com. This latter name server finally responds to the querying computer with the IP address of the host box.example.microsoft.com, for which the name server is authoritative.
Note
Creating a Zone
Delegation
To create a zone
delegation, first create the domain to be delegated on the server that
will be hosting the delegated zone. Then run the New Delegation Wizard
on the server hosting the parent zone by right-clicking the parent zone
node in the DNS console and selecting New Delegation.
To complete the New
Delegation Wizard, you need to specify the name of the delegated
subdomain and the name of at least one name server that will be
authoritative for the new zone. After you run the wizard, a node appears
in the DNS console tree representing the newly delegated subdomain, and
this node contains the delegation (NS) resource record of the
authoritative server you have just specified. The glue record appears in
the zone data but not in the DNS console.
To create a zone
delegation, complete the following steps:
1. | Open the DNS console.
|
2. | In the
console tree, right-click the applicable domain and select New
Delegation.
The New Delegation Wizard launches.
|
3. | Follow the
instructions provided in the New Delegation Wizard to finish creating
the newly delegated domain.
|
Practice: Creating
a Zone Delegation
In this practice, you create
a new zone on Computer2 that becomes a delegated sub-domain of the
domain1.local domain. You then create a delegation on Computer1 that is
linked to this new zone on Computer2. Finally, you verify the new
configuration.
Exercise 1:
Creating a Zone to Be Delegated
In this exercise, you
create a new zone on Computer2.
1. | From Computer2, log on to Domain1 as Administrator.
|
2. | Open the
DNS console.
|
3. | In the DNS
console tree, right-click the Forward Lookup Zones node, and select New
Zone.
The New Zone Wizard launches.
|
4. | Click
Next.
The Zone Type page appears.
|
5. | Click Next
to accept the default selection, Primary Zone.
The Zone Name page appears.
|
6. | In the
Name text box, type sub.domain1.local
and click Next.
The Zone File page appears.
|
7. | Click Next
to accept the default selection, Create A New File With This File Name.
The Dynamic Update page appears.
|
8. | Select
Allow Both Nonsecure And Secure Dynamic Updates, and click Next.
The Completing The New Zone Wizard page appears.
|
9. | Click
Finish.
|
Exercise 2:
Adding Host (A) Resource Records to the Zone
In this exercise, you
add records to the new zone that you will later use to verify the zone
delegation.
1. | From Computer2, while you are logged on to Domain1 as
Administrator, open the DNS console if it is not already open.
|
2. | In the DNS
console tree, select the Sub.domain1.local node. Next, right-click the
Sub.domain1.local node and select New Host (A).
The New Host dialog box appears.
|
3. | In the
Name text box, type computer1.
|
4. | In the IP
Address text box, type 192.168.0.1
(the IP address currently assigned to Computer1), and then click Add
Host.
A message box indicates that the host record was successfully
created.
|
5. | Click OK.
The New Host dialog box remains open, with the Name text box and IP
Address text box now empty.
|
6. | In
the Name text box, type computer2.
|
7. | In the IP
Address text box, type the IP address currently assigned to Computer2.
|
8. | Click Add Host.
A message box indicates that the host record was successfully
created.
|
9. | Click OK
and then click Done.
|
10. | Log off
Computer2.
|
Exercise 3:
Creating a Delegation
In this exercise, you
create a delegation on Computer1 that connects to the zone
sub.domain1.local on Computer2.
1. | From Computer1, log on to Domain1 as Administrator.
|
2. | Open the
DNS console.
|
3. | In the DNS
console tree, select the Domain1.local node. Next, right-click the
Domain1.local node and select New Delegation
The New Delegation Wizard launches.
|
4. | Click
Next.
The Delegated Domain Name page appears.
|
5. | In the
Delegated Domain text box, type sub,
and then click Next.
The Name Servers page appears.
|
6. | Click Add.
The New Resource Record dialog box appears.
|
7. | In the
Server Fully Qualified Domain Name text box, type computer2.sub. domain1.local.
|
8. | In the IP
Address text box, type the IP address currently assigned to Computer2.
|
9. | Click Add
and then click OK.
|
10. | On the
Name Servers page of the New Delegation Wizard, click Next.
The Completing The New Delegation Wizard page appears.
|
11. | Click
Finish.
In the DNS console tree, you will now see the Sub delegation
node under the domain1.local zone.
|
Exercise 4:
Testing the Configuration
In this exercise, you ping the hosts in the newly
delegated domain. You perform this exercise on Computer1, which uses the
local DNS server for name resolution.
1. | If you have not already done so, from Computer1, log on
to Domain1 as Administrator.
|
2. | Open a
command prompt and type ping
computer1.sub.domain1.local. Then press Enter.
An output indicates that the host computer1.sub.domain1.local is
responding from the IP address 192.168.0.1. If the ping is
unsuccessful, at the command prompt type ipconfig
/flushdns, wait 2 minutes, and then press Enter.
|
3. | After the
Ping output has completed, at the command prompt type ping computer2.sub.domain1.local, and then
press Enter.
An output indicates that computer2.sub.domain1.local is
responding from the IP address 192.168.0.2. If the ping is unsuccessful,
at the command prompt type ipconfig
/flushdns, wait 2 minutes, and then press Enter.
The new computer names are being resolved to IP addresses even
though the local computer, Computer1, conducts name resolution through
the local DNS server, which contains no host records for the
sub.domain1.local domain. The local DNS server is correctly forwarding
queries for hosts within the sub.domain1.local subdomain to the name
server authoritative for that domain, which is Computer2.
|
4. | Log off
Computer1. |