Troubleshooting Group Policy Applications
When policies are used
throughout an organization, sometimes the policy settings do not apply
to a user or computer as originally intended. To begin basic
troubleshooting of Group Policy application issues, you need to
understand the policy application hierarchy. First, any local server or
workstation policies are applied to the user or computer, followed by
site group policies, domain group policies, and, finally, the
organizational unit group policies. If nested OUs have group policies,
the parent OU policies are processed first, followed by the child OUs,
and, finally, the OU containing the Active Directory object (user or
computer). You might find it easier to remember “LSD-OU”—the acronym for
local, site, domain, and then OU.
Now that you know the order
in which policies are applied, you can proceed to use the Group Policy
testing and troubleshooting tools provided with Windows Server 2008
R2—namely the Group Policy Modeling tool in the Group Policy Management
Console and the command-line utility GPResult.exe, which is the command-line version of the RSoP snap-in.
The Group Policy Modeling Tool
The Group Policy Modeling
snap-in can be used to show the effective policy settings for a user who
logs on to a server or workstation after all the respective policies
have been applied. This tool is good for identifying which policies are
being applied and what the effective setting is.
To simulate the policies for a user, use the Group Policy Modeling snap-in as follows:
1. | Launch Server Manager on a domain controller.
|
2. | Expand the Features folder.
|
3. | Expand the Group Policy Management Console.
|
4. | Expand the Forest folder.
|
5. | Select the Group Policy Modeling snap-in.
|
6. | Select Action, Group Policy Modeling Wizard to launch the wizard.
|
7. | Click Next.
|
8. | Leave
the default domain controller selection, which chooses any available
domain controller. The domain controller must be running Windows Server
2003, Windows Server 2008, or Windows Server 2008 R2. Click Next.
|
9. | Select the User option button in the User Information box, and click Browse.
|
10. | Enter the name of a user to check, and click OK. Click Next to accept the user and computer selection.
Note
In
the Group Policy Modeling Wizard, the net effect of the group policies
can be modeled for specific users, computers, or entire containers for
either object. This enables an administrator to see the effects for
individual objects or for objects placed within the containers, making
the tool very flexible.
|
11. | Click
Next on the Advanced Simulation Options page. The advanced simulation
options enable you to model slow network connections or specific sites.
|
12. | Click Next to skip the Alternate AD Paths.
|
13. | The
User Security Groups page shows the groups that the user is a member
of. You can add additional groups to see the effects of changes. Leave
as is and click Next.
|
14. | Click Next to skip the WMI Filters for Users page.
|
15. | Click Next to run the simulation.
|
16. | Click Finish to view the results.
|
17. | Click the Show link next to Group Policy Objects.
|
18. | Click the Show link next to Denied GPOs.
|
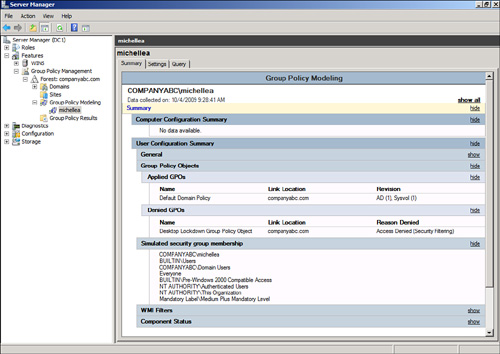
Within the console, you can
review each particular setting to see whether a setting was applied or
the desired setting was overwritten by a higher-level policy. The report
shows why specific GPOs were denied. Figure 3
shows that one GPO was denied to the user object “michellea.” The
Desktop Lockdown Group Policy Object was denied due to security
filtering. This is the GPO , which was
applied only to members of the Oakland Help Desk group. The user
michellea is not a member of this group and, hence, does not have the
GPO applied.
