5. Hiding Shared Resources
Hiding your valuables is a time-tested method of
securing them from prying eyes and would-be thieves. When you share a
resource on your network, however, you’re displaying that resource for
all to see. Sure, you can set up password-protected user accounts and
set the appropriate permissions for the resource, but others will still
be able to see that the resource is shared.
To prevent this situation, it’s possible to share a resource and hide it at the same time. It’s also extremely easy to do: When you set up the shared resource, add a dollar sign ($) to the end of the share name. For example, if you’re setting up drive F for sharing, you could use F$
as the share name. This prevents the resource from appearing in the
list of resources when you open a remote computer from the Network
window.
In Figure 3, for example, you see the properties sheet for drive F, which shows the drive is shared with the following path:
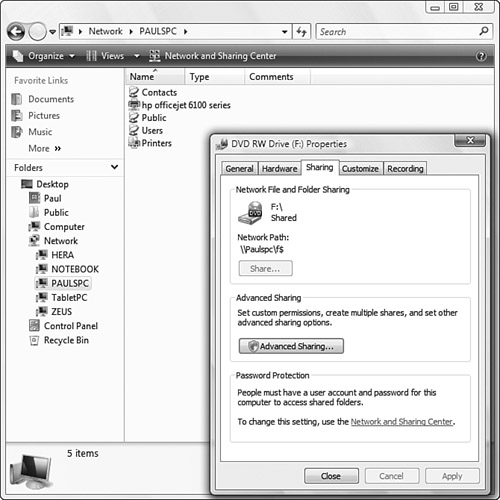
That is, the drive is shared on PaulsPC with the name F$. However, in the folder window, you can see that drive F doesn’t appear in the list of resources shared by PaulsPC.
Hidden Administration Shares
Hiding shares will work for the average user, but a savvy snoop will probably know about the $
trick. Therefore, you’ll probably want to set up your hidden shares
with nonobvious names. Note, however, that Windows Vista sets up certain
hidden shares for administrative purposes, including one for drive C (C$) and any other hard disk partitions you have on your system. Windows Vista also sets up the following hidden shares:
| Share Name | Shared Path | Purpose |
|---|
| ADMIN$ | %SystemRoot% | Remote administration |
| IPC$ | N/A | Remote interprocess communication |
| print$ | %SystemRoot%\System32\spool\drivers | Access to printer drivers |
You cannot delete or rename these administrative shares.
How do you connect to a hidden share? Well, you
need to know the name of the shared resource, of course. When you know
that, you can use any of the following techniques:
Select Windows Logo+R (or select Start,
All Programs, Accessories, Run) to open the Run dialog box, type the UNC
path for the hidden resource, and click OK. For example, to display the
hidden share F$ on PaulsPC, you would enter this:
In a Command Prompt session, type start,
a space, the UNC path, and then press the Enter key. For example, to
launch the hidden share F$ on PaulsPC, you would enter this:
Use
the Map Network Drive command. In
the Map Network Drive dialog box, type the UNC path for the hidden
share in the Folder text box.
For a hidden shared printer, when Vista begins searching for available
printers, click The Printer That I Want Isn’t Listed. In the Find a
Printer By Name or TCP/IP Address dialog box, type the UNC path to the
hidden printer in the Select a Shared Printer By Name text box.
