There’s a distinct advantage
to cropping your photo here in Camera Raw, rather than in Photoshop CS5
itself, and that is you can return to Camera Raw later and bring back
the uncropped version of the image. This even holds true for JPEG and
TIFF photos, as long as you haven’t overwritten the original JPEG or
TIFF file. To avoid overwriting, when you save the JPEG or TIFF in
Photoshop, just change the filename (that way the original stays
intact). With RAW images, you don’t have to worry about that, because it
doesn’t let you overwrite the original.
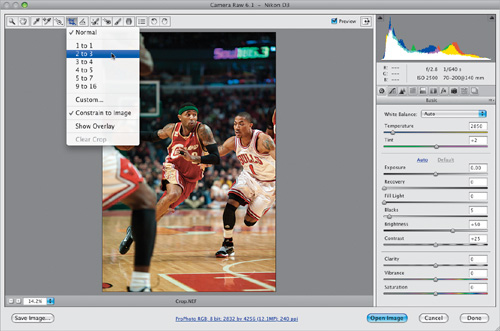
Step One. | The Crop tool (C)
is the sixth tool from the left in the toolbar. By default, it pretty
much works like Photoshop’s Crop tool (you click-and-drag it out around
the area you want to keep), but it does offer some features that
Photoshop doesn’t—like access to a list of preset cropping ratios. To
get them, click-and-hold on the Crop tool and a pop-up menu will appear
(as shown here). The Normal setting gives you the standard
drag-it-where-you-want-it cropping. However, if you choose one of the
cropping presets, then your cropping is constrained to a specific ratio.
For example, choose the 2 to 3 ratio, click-and-drag it out, and you’ll
see that it keeps the same aspect ratio as your original uncropped
photo
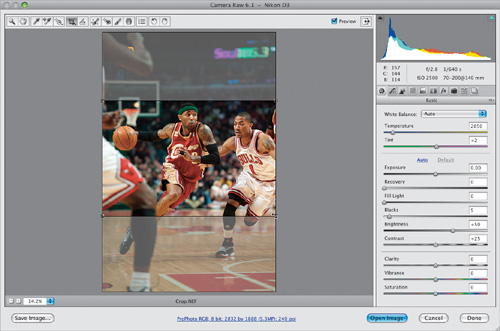
 | Step Two. | Here’s
the 2-to-3-ratio cropping border dragged out over my image. The area to
be cropped away appears dimmed, and the clear area inside the border is
how your final cropped photo will appear. If you want to see the
cropped version before you leave Camera Raw, just switch to another tool
in the toolbar. (Note: If you draw a
set size cropping border and want to switch orientation, click on the
bottom-right corner and drag down and to the left to switch from wide to
tall, or up and to the right to switch from tall to wide.)
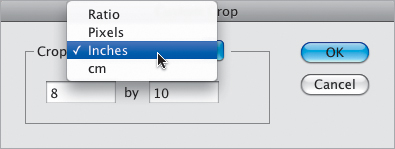
 | Step Three. | If
you reopen your cropped photo again in Camera Raw, you’ll see the
cropped version. To bring back the cropping border, just click on the
Crop tool. To remove the cropping altogether, press the Esc or Delete (PC: Backspace) key on your keyboard (or choose Clear Crop from the Crop tool’s pop-up menu). If you want your photo cropped to an exact size (like 8×10″, 13×19″, etc.), choose Custom from the Crop tool’s pop-up menu to bring up the dialog you see here. You can choose to crop by inches, pixels, or centimeters.
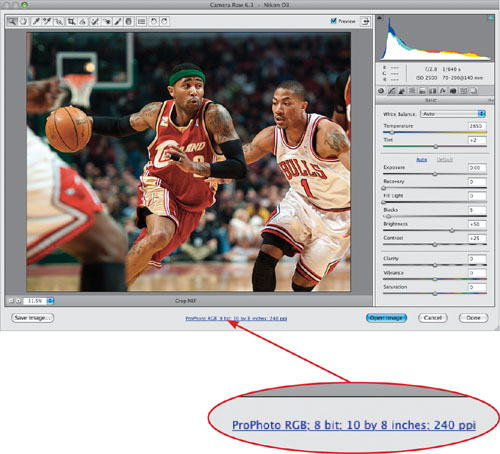
| Step Four. | Here,
we’re going to create a custom crop so our photo winds up being exactly
8×10″, so choose Inches from the Crop pop-up menu, then type in your
custom size. Click OK, click-and-drag out the cropping border, and the
area inside it will be exactly 8×10″. Click on any other tool in the
toolbar or press Return (PC: Enter),
and you’ll see the final cropped 8×10″ image (as seen here). If you
click the Open Image button, the image is cropped to your specs and
opened in Photoshop. If, instead, you click the Done button, Camera Raw
closes and your photo is untouched, but it keeps your cropping border in
place for the future.
Tip: Seeing Image Size
The size of your photo (and other information) is
displayed under the preview area of Camera Raw (in blue underlined text
that looks like a Web link). When you drag out a cropping border, the
size info for the photo automatically updates to display the dimensions
of the currently selected crop area.
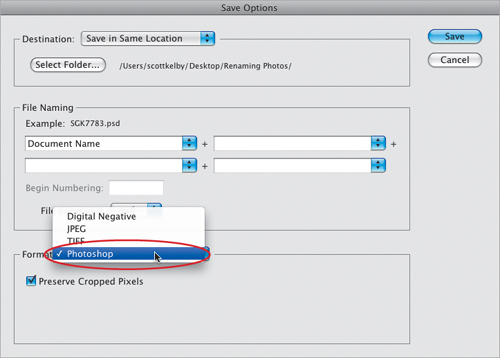
| Step Five. | If
you save a cropped JPEG or TIFF photo out of Camera Raw (by clicking
the Done button), the only way to bring back those cropped areas is to
reopen the photo in Camera Raw. However, if you click the Save Image
button and you choose Photoshop from
the Format popup menu (as shown), a new option will appear called
Preserve Cropped Pixels. If you turn on that checkbox before you click
Save, when you open this cropped photo in Photoshop, it will appear to
be cropped, but the photo will be on a separate layer (not flattened on
the Background layer). So the cropped area is still there—it just
extends off the visible image area. You can bring that cropped area back
by clicking-and-dragging your photo within the image area (try it—use
the Move tool [V] to click-and-drag your photo to the right or left and you’ll see what I mean).
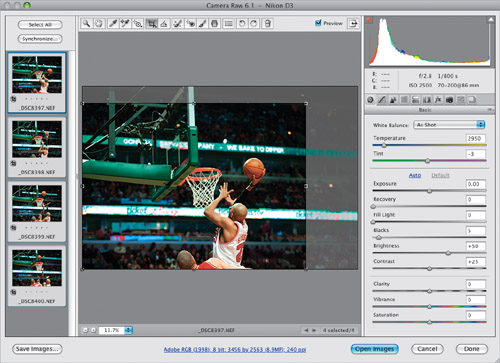
 | Step Six. | If
you have a number of similar photos you need to crop the same way,
you’re going to love this: First, select all the photos you want to crop
in Camera Raw (either in Mini Bridge or on your computer), then open
them all in Camera Raw. When you open multiple photos, they appear in a
vertical filmstrip along the left side of Camera Raw (as shown here).
Click on the Select All button (it’s above the filmstrip) and then crop
the currently selected photo as you’d like. As you apply your cropping,
look at the filmstrip and you’ll see all the thumbnails update with
their new cropping instructions. A tiny Crop icon will also appear in
the bottom-left corner of each thumbnail, letting you know that these
photos have been cropped in Camera Raw.
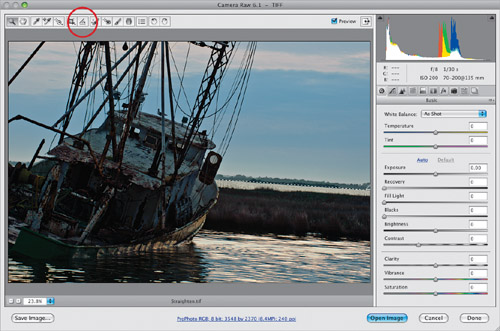
 | Step Seven. | Another
form of cropping is actually straightening your photos using the
Straighten tool. It’s a close cousin of the Crop tool because what it
does is essentially rotates your cropping border, so when you open the
photo, it’s straight. In the Camera Raw toolbar, choose the Straighten
tool (it’s immediately to the right of the Crop tool, and shown circled
here in red). Now, click-and-drag it along the horizon line in your
photo (as shown here). When you release the mouse button, a cropping
border appears and that border is automatically rotated to the exact
amount needed to straighten the photo (as shown in Step Eight).
 | Step Eight. | You won’t actually see the straightened photo until you switch tools, press Return (PC: Enter),
or open the photo in Photoshop (which means, if you click Save Image or
Done, Camera Raw closes, and the straightening information is saved
along with the file. So if you open this file again in Camera Raw,
you’ll see the straightened version, and you won’t really know it was
ever crooked). If you click Open Image instead, the straightened photo
opens in Photoshop. Again, if this is a RAW photo (or if it’s a JPEG or
TIFF and you clicked the Done button), you can always return to Camera
Raw and remove this cropping border to get the original uncropped photo
back.
 |
Tip: Canceling Your Straightening
If you want to cancel your straightening, just press the Esc key on your keyboard, and the straightening border will go away.
|
