Adding Packages
Packages include operating system updates and
language packs. The Windows Deployment Wizard automatically installs
operating system updates during deployment. Users can choose which
language packages to install during LTI deployment. You can configure
language pack installation for ZTI. The following sections include more information about updates and languages.
To add a package to the distribution share
1. | In
Deployment Workbench, right-click OS Packages, and then click New to
start the New Package Wizard. OS Packages is located under Distribution
Share.
|
2. | On
the Select The Location Of The Package Files page, type the path
containing the package files you want to add to the distribution share
or click Browse to open it, and then click Add. Deployment Workbench
adds all the packages it finds in the folder and all its subfolders.
|
After adding packages to the distribution
share, they appear in the OS Packages details pane. Also, the packages
appear in the distribution share in the Packages folder.
To disable a package and prevent its installation
1. | In the Deployment Workbench console tree, click OS Packages.
|
2. | In the details pane, right-click the package you want to disable, and then click Properties.
|
3. | Click the General tab, clear the Enable (Approve) This Package check box to disable the package, and then click OK.
|
To remove a package from the distribution share
1. | In the Deployment Workbench console tree, click OS Packages.
|
2. | In the details pane, right-click the package you want to remove, and then click Delete.
|
When a package is deleted from Deployment
Workbench, it is also removed from the Packages folder in the
distribution share. In other words, removing a package from Deployment
Workbench also removes it from the file system.
Adding Updates
When you are developing an image, take care to
ensure that all critical security updates are included in the image so
that computers deployed with the image are as up-to-date as possible. Table 2 describes different approaches to performing these updates. (When you use BDD 2007, the first method is recommended.)
Table 2. Updating Windows Vista Images
| Method | Benefits | Drawbacks |
|---|
| Download
the security updates from the Microsoft website and then install them
as part of the image-build process. You can look for updates in the
Knowledge Base and in the Download Center. | The process is very easy to perform; you can install updates by simply adding them to the distribution share. | The
image is vulnerable before the updates are installed and the computer
is restarted, providing an opportunity for exploitation; the application
process can also be time-consuming. However, building images in a
closed lab environment mitigates this risk. |
| Use
Microsoft Windows Server Update Services (WSUS) or Microsoft Systems
Management Server (SMS) 2003 to install the security update
post-deployment. | The process is easy to perform and picks up new updates as soon as they are approved. | The
image is vulnerable before the updates are installed and the computer
is restarted, providing an opportunity for exploitation; the application
process can also be time-consuming.
Depending on the SMS 2003 server configuration, it may take
an hour or more before all updates are applied; having the SMS 2003
client included in the image and communicating with a specific SMS site
may result in all computers built from the image communicating with only
that site.
|
| Download
the security updates from the Microsoft Web site and then integrate
them into the Windows installation source before beginning the
unattended build process. | The
image is protected at all times from known security exploits, and the
image-build process completes faster because all security updates are
installed before building the image. | Integrating
the security updates takes some effort. It may not be obvious which
updates you can integrate; you will need to install some as part of the
unattended build process. |
Note
Download
the required Windows security updates from the Microsoft Knowledge Base
or Download Center. In the future, you will be able to download updates
from the Microsoft Update Catalog, too. |
Adding Language Packs
Language packs make possible a multilingual
Windows environment. Windows Vista is language-neutral, and all language
and locale resources are added to Windows Vista through language packs
(Lp.cab files). By adding one or more language packs to Windows Vista,
you can enable those languages when installing the operating system. As a
result, you can deploy the same Windows Vista image to regions with
different language and locale settings, reducing development and
deployment time.
The following resources provide additional information about language packs in Windows Vista:
The Configuration Reference in BDD 2007 lists the properties you can configure to install language packs automatically.
The
topic “Manage Language Packs for Windows” in the Windows Automated
Installation Kit User’s Guide includes more information about Windows
Vista language packs.
Adding Out-of-Box Drivers
Depending on the type of computer in the
environment and the hardware it contains, you require software from the
hardware vendors to make computers in the production environment fully
functional. Some of this software is provided on a CD-ROM or DVD-ROM by
the hardware manufacturer, but you must download other software from the
Internet.
Deployment Workbench makes adding device drivers
to the distribution share an easy process. You simply specify a folder
containing one or more device drivers, and Deployment Workbench copies
them to the distribution share and organizes them into folders as
appropriate. However, you must make sure that you’ve extracted device
drivers from any compressed files containing them. In other words,
Deployment Workbench looks for each device driver’s .inf file and any
related files.
With BDD 2007, you can group device drivers.
When you add a device driver by using Deployment Workbench, you can
create groups and associate the device driver with any of those groups.
Then, you can associate a device driver group with each build you create
in the distribution share. You can also specify device driver groups
during deployment.
The most common reason to group device drivers is to group them by
computer model. By doing so, you can prevent scenarios that cause BDD
2007 to install device drivers on computers for which they are not
intended.
Note
No device drivers are
required to run Windows Vista in a Microsoft Virtual PC 2007 virtual
machine, but installing the latest version of the Microsoft Virtual PC
Additions improves performance. |
Adding device drivers to the distribution share
1. | In
Deployment Workbench, right-click Out-of-Box Drivers, and then click
New to start the New Driver Wizard. Out-of-Box Drivers is located under
Distribution Share.
|
2. | On
the Select The Location Of The Driver Files page, type the path
containing the device drivers you want to add to the distribution share
or click Browse to open it, and then click Finish. Deployment Workbench
adds all the device drivers it finds in the folder and its subfolders.
|
After adding device drivers to the distribution
share, they appear in the Out-of-Box Drivers details pane. Also, the
device drivers appear in the distribution share in the Out-of-Box
Drivers folder.
To disable a device driver
1. | In the Deployment Workbench console tree, click Out-of-Box Drivers.
|
2. | In the details pane, right-click the device driver you want to disable, and then click Properties.
|
3. | Click the General tab, clear the Enable This Driver check box, and then click OK.
|
To remove a device driver from the distribution share
1. | In the Deployment Workbench console tree, click Out-of-Box Drivers.
|
2. | In the details pane, right-click the device driver you want to remove, and then click Delete.
|
When a device driver is deleted from Deployment
Workbench, it is also removed from the Out-of-Box Drivers folder in the
distribution share. In other words, removing a device driver from
Deployment Workbench also removes it from the file system.
To assign a device driver to a group
1. | In the Deployment Workbench console tree, click Out-of-Box Drivers.
|
2. | In the details pane, right-click the device driver you want to edit, and then click Properties.
|
3. | On the Groups tab, select the device drivers group to include the device driver, and then click OK.
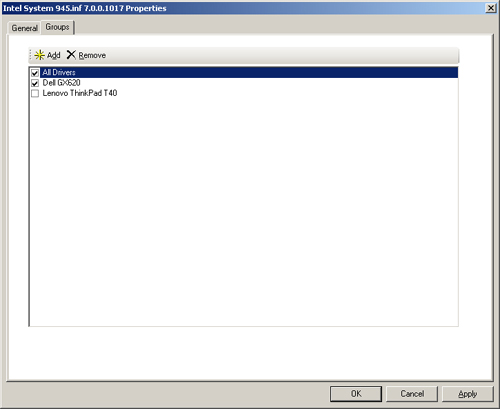 |
