One of the goals of mobile computers is to run off
the battery for as long as possible. Therefore, the mobile computers use
components that typically use less power than components that you would
find in a desktop computer. Consider the following:
Mobile computers use processors that run on a lower voltage and consume less power.
Mobile
processors, including Intel SpeedStep and AMD PowerNow, have the
ability to adjust voltage and the ability to throttle—temporarily run at
a slower clock speed—to use even less power when running off the
battery.
LCD monitor can be dimmed so that it consumes less power.
Hard drives can be spun down when not in use.
Power Plans
A power plan
(formerly known as power schemes in earlier versions of Windows) is a
collection of hardware and system settings that manages how your
computer uses and conserves power. You can use power plans to save
energy, maximize system performance, and balance energy conservation
with performance.
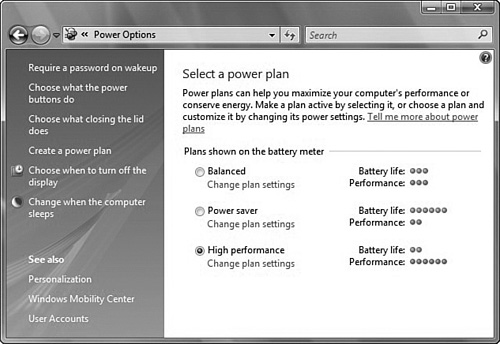
Windows Vista includes three default power plans (see Figure 1):
Balanced. Offers full performance when you need it and saves power during periods of inactivity.
Power saver. Saves power by reducing system performance. This plan can help mobile PC users get the most from a single battery charge.
High performance.
Maximizes system performance and responsiveness. Mobile PC users may
notice that their batteries don’t last as long when using this plan.
If a default plan
doesn’t meet your needs (even if you change some settings), you can
create your own plan by using a default plan as a starting point.
To change an existing plan, follow these steps:
1. | Open
Power Options by clicking the Start button, clicking Control Panel,
clicking System and Maintenance, and then clicking Power Options.
|
2. | On the Select a Power Plan page, click Change Plan Settings under the plan that you want to change.
|
3. | On
the Change Settings for the Plan page, choose the display and sleep
settings that you want to use when your computer is running off the
battery and when it’s plugged in.
|
4. | If
you don’t want to change any more settings, click Save Changes. To
change additional power settings, click Change Advanced Power Settings.
|
5. | On
the Advanced Settings tab, expand the category that you want to
customize, expand each setting that you want to change, and then choose
the values that you want to use when your computer is running on battery
and when it’s plugged in.
|
6. | Click OK to save the changes, and then click the Close button on the Change Settings for the Plan page.
|
To create your own plan, follow these steps:
1. | Open
Power Options by clicking the Start button, clicking Control Panel,
clicking System and Maintenance, and then clicking Power Options.
|
2. | On the Select a Power Plan page, in the task pane, click Create a Plan.
|
3. | On the Create a Power Plan page, select the plan that’s closest to the type of plan that you want to create.
|
4. | In the Plan Name box, enter a name for the plan, and then click Next.
|
5. | On
the Change Settings for the Plan page, choose the display and sleep
settings that you want to use when your computer is running on battery
and when it’s plugged in, and then click Create.
|
If you created power plans that you no longer use or need, you can delete them. To delete a plan, follow these steps:
1. | Open
Power Options by clicking the Start button, clicking Control Panel,
clicking System and Maintenance, and then clicking Power Options.
|
2. | If the active plan is the one that you want to delete, make a different plan the active plan.
|
3. | On the Select a Power Plan page, click Change Plan settings under the plan that you want to delete.
|
4. | On the Change Settings for the Plan page, click Delete this Plan.
|
5. | When prompted, click OK.
|
Note
You can’t delete any of the three default power plans (Balanced, Power saver, or High performance).
Battery Meter
Displayed in the notification area of the Windows taskbar, the battery meter
helps you manage your computer’s power consumption by indicating how
much charge is remaining on your battery and which power plan your
computer is using.
Windows continuously
monitors the power level of your battery and warns you when the battery
power reaches low and critical levels. When your battery charge gets
low, the battery icon on the Windows taskbar indicates a low-battery
power level. Make sure that you have sufficient time to install a fully
charged battery, find an AC power outlet, or save your work and turn off
the mobile PC. When your battery is almost out of power, the battery
icon changes to indicate a critical-battery level.
To choose low and critical power levels, follow these steps:
1. | Open
Power Options by clicking the Start button, clicking Control Panel,
clicking System and Maintenance, and then clicking Power Options.
|
2. | On the Select a power plan page, click Change plan settings under the selected plan.
|
3. | On the Change settings for the plan page, click Change Advanced Power Settings.
|
4. | On
the Advanced Settings tab, expand Battery, expand Low Battery Level and
Critical Battery Level, and then choose the percentage that you want
for each level.
|
5. | Click OK to save the changes, and then click the Close button on the Change Settings for the Plan page. |
Shutdown Options
When
you shut down your computer, all open files are saved to the hard disk,
the contents of the memory are saved to the hard disk or discarded as
appropriate, the page file is cleared, and all open applications are
closed. The active user is then logged out of Windows and the computer
is turned off. Of course, this may take a minute or two depending on the
computer and the applications that the computer was running at the time
of shutdown.
Windows Vista offers two other modes besides shutdown. When you hibernate
your computer, the system state, along with the contents of the system
memory, is saved to a file (Hiberfil.sys) on the hard disk and the
computer is shut down. The Hiberfil.sys file will be the same size as
the amount of physical memory (RAM). No power is required to maintain
this state because the data is stored on the hard disk. You can then
continue where you left off within a short time.
Sleep
is a power-saving state that saves work and open programs to memory. To
maintain the contents of memory while the computer is in Sleep mode,
the system still consumes a small amount of power. The advantage of
Sleep mode is that you can continue where you left off, typically within
a few seconds.
Hybrid Sleep,
a combination of Sleep and Hibernate, saves your work to your hard disk
and puts your mobile PC into a power-saving state. If you suffer a
power failure on a computer when it is in a Hybrid Sleep state, your
data will not be lost. Hybrid Sleep is turned off by default on mobile
PCs.
When you click the
power button on the Start menu, Windows Vista automatically goes into
Sleep mode. If your battery power is low, Windows Vista hibernates the
computer.
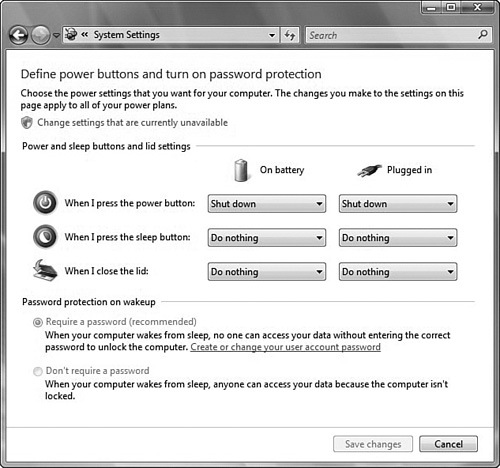
In addition to
power plans, you can configure what the computer does when you press the
power button or when you close the lid (on a laptop computer). You can
also tell Windows Vista whether to prompt for a user password when
returning to its power-on state. You can also control button actions
depending on whether the computer is plugged in or running on battery
power (see Figure 2).