With the deployment server in place and the
unattended answer file created, we are now ready to move on to building a
reference computer. This is the computer that will serve as the
baseline image to be deployed across your organization. To review, so
far you should have:
Selected an appropriate edition of Windows Vista
Decided how many images will be created and maintained and how thick to make each image
Built a deployment server
Installed the Windows Automated Installation Kit (WAIK) on the deployment server
Created an unattended answer file for installation
The next step in creating a successful deployment is to leverage the unattended answer file to begin creating a reference computer.
A reference computer is the computer used to create your customized
image for deployment. Although this can be a virtual machine, you will
need to test your image on all organizational hardware platforms before
mass deployment.
The reference computer is an
ideal computer of sorts. It includes not only Windows Vista with any
customizations for your organization but also the latest service packs
and updates for Windows. If you are implementing hybrid or thick images,
you will also include applications.
The reference computer
must be stable. One step to increase the stability of a reference
computer is to start with a clean and automated installation. A clean
installation ensures that you do not have any computer vendor software,
malware, or trial software and also ensures that you know exactly what
has been included and configured on the reference computer. Automating
the installation of the reference computer ensures that rebuilding the
image later can be done in a consistent fashion. If done correctly, the
file used to automate the installation of the reference computer can
also be used later in the process to automate the deployment of imaged
computers.
1. Implementing an answer file
You now have a
functioning Windows Vista answer file, but how do you actually use it to
build a reference computer? Answer files are typically implemented in
one of three ways. In the first, a generic Windows Vista installation
will scan all removable media for a file named autounattend.xml.
If the file is found, it will be copied to the local disk and read
during the various configuration passes. By copying the file to the
local hard drive, it is ensured that the file will be available during
each configuration pass even if the removable media is disconnected. In
this scenario, the windowsPE, specialize, and oobeSystem sections would
be read and used.
In the second, if
starting Windows Vista installation with the setup command, the answer
file can be specified as part of the setup command using the /unattend
command line option. In this case the file can be named any valid
windows filename. Just like when using autounattend.xml,
the file will be copied to the local hard drive and cached for future
configuration passes. This allows you to store your answer file on
network drives or other locations that may not be available during early
setup stages. In this scenario, the windowsPE, specialize, and
oobeSystem sections would be read and used.
The last way you can
implement an answer file is to embed it into a customized image. This
is done with the Sysprep tool. Again, the file is cached to the local drive so that it is
always available when needed. In this scenario, the generalize section
would be used when running Sysprep, and the specialize and oobeSystem
sections would typically be read and used unless the system was set to
start in audit mode. The windowsPE section would not be read because by
the time the custom image has been applied to a system, the Windows PE
portion of setup is already complete.
|
When autounattend.xml
is copied to the local drive, it is copied to
C:\windows\system32\panther and renamed unattend.xml. For security
reasons, passwords and other secure information will be removed from the
file after use.
|
|
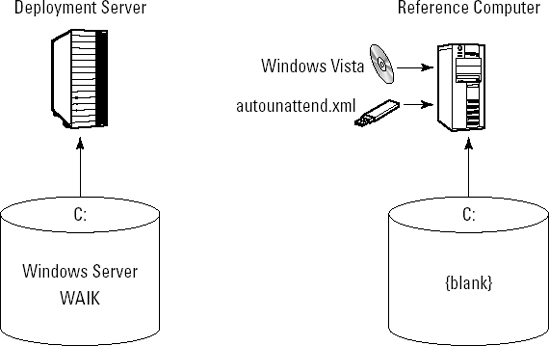
To start the process of
creating a custom image, you should use the first method to automate a
generic Windows Vista installation. This allows you to test your answer
file and provides a method to easily rebuild the custom image later, if
necessary. At this point in the deployment process, you should have at
least two computers, a deployment server and a reference computer, as
shown in Figure 1.
2. Walkthrough: Automating Windows Vista installation
In this
walkthrough, the steps necessary to perform an automated Windows Vista
installation will be covered. The computer having Vista installed will
be referred to as the reference computer since it will eventually become
the computer used to build your custom image. If you plan to use a
virtual machine for this, create a new virtual machine for this purpose
before proceeding.
To automate Windows Vista installation with your new answer file, follow these steps:
Copy your answer file to a blank floppy disk or USB flash drive. Although it is not critical that the floppy disk or flash drive be blank, using one avoids possible conflicts and boot issues.
NOTE
If you are using
an answer file on a virtual machine, it is best to make use of a floppy
disk image, as working with USB flash drives in this way can be
problematic. To create a virtual floppy image in VMware Server, just go
to the Virtual Machine Settings and select the Floppy device. Select Use
floppy image and click the Create button. You will be prompted to
browse to a path and filename where the file should be created. Then
within your virtual machine you can make use of it as you would a floppy
disk (format it and place the file on the disk). When you are done,
disconnect and specify this floppy image as the image for another
virtual machine to "insert the virtual floppy" elsewhere.
Rename your answer file to
autounattend.xml. Note that the proper spelling of this file name is critical.
Place the removable media with the answer file into the reference computer.
Configure the BIOS of the reference computer to boot from DVD first.
Boot the reference computer from the Vista DVD.
Installation should
proceed without any further interaction. If the setup stops and prompts
for information, review the related section of your answer file.
Although the steps listed here have been tested several times prior to
printing, it may be that your setup requires additional settings not
provided in the example. You can use the Unattended Windows Setup
Reference from the WAIK to help identify the necessary components which
may need to be included in your answer file.
3. Customizing the reference computer
After the reference
computer has Windows installed, you are ready to begin making
customizations. The customizations will involve the inclusion of
drivers, updates, applications, and configuration changes.
Providing device drivers
When building your master
image, you will need to take into account all hardware in your
environment. The most common reason that organizations choose to support
multiple images is that they must support varying hardware. This can be
easily overcome and is a poor excuse for supporting multiple images
when you consider the time and expense of maintaining many images. The
concern for supporting multiple hardware platforms from a single image
revolves around two areas: successfully applying the image and allowing
users to access approved hardware.
In the past, successfully
applying and starting an image on different hardware was quite a
challenge. Mass storage controller drivers and Hardware Abstraction
Layer (HAL) limitations drove many organizations into supporting
multiple images. Although these challenges could be overcome, it was
sometimes too difficult to implement or not documented well enough. The
most common problem was applying an image to a different hardware
platform and getting Stop Error 7B (Blue Screen of Death), which meant
inaccessible boot device. Windows Vista handles different hardware
platforms much more gracefully, including different drive controllers
and HALs with no additional effort on your part.
Providing drivers to
users can also be handled in a well-managed fashion. You may preload the
drivers in your image, provide a DevicePath in the registry to search
for drivers, or you may update the driver store to include drivers
approved by the computer support department. Each method has advantages
and drawbacks, depending upon the size of your organization and
management tools that you have in place.
Preloading drivers
Perhaps the most simple
and time consuming method of providing drivers for your users is to
preload them. To preload drivers you simply apply an image to a hardware
platform for which you want to include drivers. After the image
application is complete, you can manually add any drivers for devices
that require them. It's a bit laborious, but it works.
Preloading drivers
has the advantage of not requiring any special configuration file
changes. However, it does not allow for dynamic updating of drivers. If
additional drivers must be added later, you must apply the image to new
hardware, update the drivers, and then prepare and capture the image
again. This method also leaves many unused drivers loaded and could lead
to conflicts or instabilities if not carefully managed.
Updating the driver store
The cleaner method
of adding device drivers to the reference system is to update the local
driver store. When unrecognized devices are attached to a computer, the
Plug and Play service will first check the local driver store to see if a
driver can be found. To protect the integrity of the system, only
Administrators are allowed to update the local driver store. However,
once drivers are loaded into the local driver store, standard users can
leverage the drivers to support hardware if the computer policy has been
set to allow it.
You may add a driver
to the driver store using the PNPUtil command line tool which is
provided as part of Windows Vista and Server 2008. The —a argument is used to add a driver:
PNPUtil.exe —a mydriver.inf
Complicating things a
bit more, signing the driver with a public key infrastructure (PKI)
certificate trusted by your client systems is a common requirement.
Signing drivers also requires that you obtain a certificate and
configure your clients to trust it.
Although this method
does provide a cleaner answer than simply preloading the drivers, it
requires significant effort for each additional driver. In addition,
updating the driver store on the image requires applying the image to a
workstation, updating the driver store, and then again preparing and
capturing the image. This method also does not provide the flexibility
of being able to provide additional drivers to workstations that have
been previously deployed.
Providing a driver directory
The most flexible
method of providing drivers to users is by modifying a registry key that
instructs the computer which directories to search for drivers.
Providing a driver directory offers the advantage of being easy to
update without loading unnecessary drivers associated with preloading
drivers.
When building the
image you may set the registry key manually or by using the appropriate
component in the answer file. The driver directory may be a local
directory, but would typically be a network path where drivers can be
kept up to date more easily. When new devices are attached, the Plug and
Play service will search the local driver store and then any paths
listed in the following registry key:
HKEY_LOCAL_MACHINE\Software\Microsoft\Windows\CurrentVersion\DevicePath
If a driver is found in the DevicePath directory, then it is staged into the local driver store.
NOTE
Multiple DevicePath
directories should be separated by a semicolon. Also there is no
recursive search of these directories, which means that you must specify
each directory and not just the root. For example, specifying \\server\files\drivers includes only the drivers in that folder and not those in subfolders like \\server\files\drivers\network. Be careful to not remove the existing entry for %SystemRoot%\inf!
For drivers to
be successfully staged into the driver store they must either be
installed by an Administrator or signed by a trusted party. To have
users install the drivers you provide, you must make sure that the
drivers are signed by a trusted authority. All drivers included with
Windows in the local driver store have been signed and may be installed
by standard users. However, drivers obtained from third parties are
sometimes not signed by Microsoft or other trusted parties and may
require you digitally signing them yourself (as discussed in the
previous section).
NOTE
It is
increasingly common for vendors to provide digitally singed drivers. One
driving force for this movement is the fact that 64-bit editions of
Windows Vista and Server 2008 will not install kernel mode drivers
unless they are digitally signed.
Customizing the image
Install any Windows
service packs or updates to the reference computer. Even if you have an
enterprise patch management solution, keeping your image up to date on
the latest security updates will lessen your exposure to security
threats. It is very possible for your computer to become compromised
before a freshly imaged system has time to update itself.
After getting Windows up to
date, you may begin to install any applications. The applications you
install here will be dependent upon what image type you have chosen to
implement. If using a thin image, then no applications will need to be
installed. If using hybrid or thick images, remember that each computer
in your organization will need to be licensed for each application in
the image. After installing the applications, ensure that they also have
the latest patches and updates as necessary.
After installing
Windows and verifying the successful execution of any necessary
applications, you may proceed to make any special configuration changes.
However, it is recommended that you do not make too many configuration
changes at this stage of deployment — they can't be managed over time.
Although scripting such changes will go a long way to ensuring
reproducibility, it is a better solution to manage the settings and
configuration through a persistent management solution (such as with
Group Policy or using a desktop management solution, such as System
Center Configuration Manager).
NOTE
Although most
every aspect of the user profile can be dictated by Group Policy, Group
Policy enforces changes. To establish custom defaults, it is necessary
to configure the Default User Profile as desired. This is typically done
by logging on as a user, making the desired changes, and logging off.
With this user profile configured as desired, it can simply be copied
over that of the Default User Profile so that any new user profiles
created by the system will use this as a starting point.
