Importing Images
Once you have installed
and configured the Windows DS service, you can add additional Windows PE
boot images (boot.wim) and Windows Vista install images (install.wim).
This process is straightforward: Files Boot.wim and Install.wim from the
Windows Vista media are used for this purpose.
Importing Boot Images
To
prepare to service client computers, you must import a Windows PE boot
image. Although Windows DS includes the boot loader code, it does not
include the actual Windows PE boot image. You can import boot images
directly from the Windows Vista or Windows Server Code Name “Longhorn”
source files. You can also customize boot images with hooks into
services such as BDD 2007. For example, BDD 2007 builds custom Windows
PE boot images that connect to BDD 2007 deployment points to install
operating system builds. You can add these custom Windows PE boot images
to Windows DS to streamline the LTI deployment process.
To add a boot image using the Windows DS management console
1. | Insert
a Windows Vista DVD into the server’s DVD-ROM drive, or make an
installation source available to the server over the network.
|
2. | Right-click the Boot Images folder and then click Add Boot Image. Boot Images is located under Servers, server name, where server name is the name of the Windows DS server to which you’re adding the boot image.
|
3. | On
the Image File page, click Browse to select the boot image and then
click Open. For example, you can select the default boot image
Source\boot.wim on the Windows Vista media.
|
4. | On the Image File page, click Next.
|
5. | On
the Image Metadata page, type a name and description of the image and
then click Next. The default name and description is derived from the
contents of the boot image file.
|
6. | On the Summary page, click Next to add the image to Windows DS.
|
7. | When the import task is completed, click Finish.
|
Importing Install Images
Windows Vista
includes an installation image on the media. The installation image
(Install.wim) can include multiple editions of Windows Vista. You can
import one or more of these editions into Windows DS for deployment over
the network.
To import a Windows Vista Install image
1. | Insert
a Windows Vista DVD into the server’s DVD-ROM drive, or make an
installation source available to the server over the network.
|
2. | Right-click
the Install Images folder in the Windows DS management console and then
click Add Image Group. Install Images is under Servers, server name, where server name is the name of the Windows DS server to which you’re adding the installation image.
|
3. | Name
the Image Group and then click OK. This prepares a single instance
store location for image import. It also allows you to group similar
images together for optimal use of disk space and security.
|
4. | Right-click Install Images and then click Add Install Image.
|
5. | Click
Browse, choose the Install.wim file you’re adding to the server, and
then click Open. This file is located in the Sources folder of the
Windows Vista DVD. Click Next to continue.
|
6. | Choose the image(s) you want to import from the selections presented on the List Of Available Images page. Click Next.
|
7. | Click Next on the Summary page to begin the import process. The process can take several minutes to finish.
|
8. | When the import task is completed, click Finish.
|
Note
Copying
the source files to the local hard drive, and then importing the image
in to Windows from the local source files is faster than importing the
image from the DVD. |
Managing Image Security
It is important to properly
secure boot and installation images to prevent their unauthorized use. A
fully configured image might include corporate applications and data,
proprietary configurations, and even codes and keys required to activate
line of business (LOB) applications.
One way to
prevent unauthorized installations is by controlling the clients that
are allowed to receive images. You can accomplish this through
pre-staging, where clients are registered with Active Directory through
the use of a globally unique identification number (GUID). Another way
is to enable administrative approval for client installations.
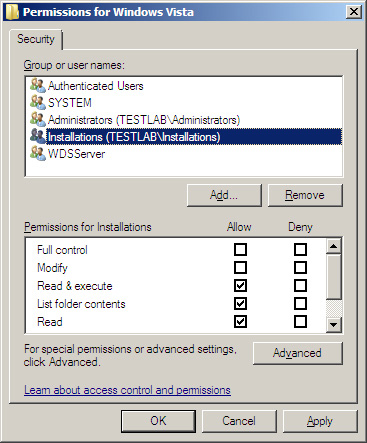
To configure an image file’s access control list
1. | Right-click the image and then click Properties.
|
2. | On
the Security tab, configure the access control list (ACL), and then
click OK. The image’s ACL must give a user Read and Execute permissions
in order for them to be able to install the image. In the following figure, members of the Installations group can install the image secured by this ACL.
|
Note
In
addition to securing individual images, you can secure image groups.
Right-click an image group, click Security, and then configure the
group’s ACL on the Security tab. By default, images in an image group
inherit the group’s permissions. |
Pre-Staging Client Computers
Pre-staging client
computer accounts allows you to restrict Windows DS to respond only to
known clients. You can also cause specific Windows DS servers to respond
to the pre-staged client, assign specific install images, and control
client provisioning automatically. You configured these settings when
you installed Windows DS.
To pre-stage a system,
you will need to know the system’s GUID. You can find this value in the
system’s BIOS, in the documentation delivered with the system, or on a
tag affixed to the system’s case. This value is entered into the Active
Directory computer account details for the system to pre-assign its
membership in the Active Directory infrastructure.
To pre-stage a client system
1. | In Active Directory Users and Computers, find the organizational unit (OU) where the computer will be staged.
|
2. | Rightclick the OU, click New, and then click Computer.
|
3. | Type a name for the computer, and then click Next.
|
4. | On the Managed page, select the check box next to This Is A Managed Computer. Type the computer’s GUID, and then click Next.
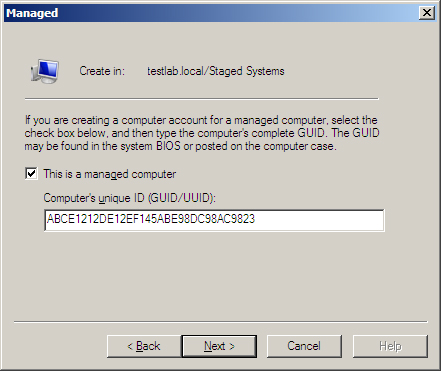
|
5. | On
the Host Server page, choose Any Available Remote Installation Server,
or select the Windows DS server that will serve this client. Click Next.
|
6. | Click Finish to complete the wizard.
|
Configuring Administrator Approval
An alternative to
pre-staging computers or allowing unrestricted access to Windows DS
images is to require administrator approval before allowing
installation. You accomplish this on the PXE Response Settings tab of
each server. You configured these settings when you installed Windows
DS.
To require administrative approval for unknown computers
1. | In the Windows DS management console, right-click the server, and then click Properties.
|
2. | On
the PXE Response Settings tab, click Respond to All (Known And Unknown)
Client Computers, and then select the For Unknown Clients, Notify
Administrator and Respond After Approval check box.
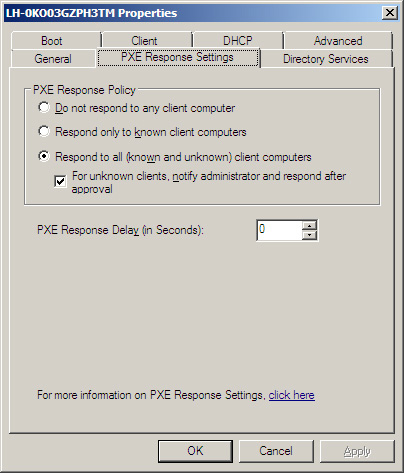
Systems booted to Windows PE will enter a
pending state until an administrator approves their installation. Find
systems in this state in the Pending Devices item of the Windows DS
management console. |
