Windows DS supports remote, on-demand deployment of
Windows Vista images located in a central image store. It is available
as an add-on to Windows Server 2003 systems running RIS and is the
native remote installation technology provided with Windows Server Code
Name “Longhorn.”
Windows DS images are collected from client master systems and stored in single instance storage
(SIS) on the server. Clients can be booted from PXEcompliant network
adapters or by using remote client boot disks. The Windows DS client
boots into a customized Windows PE image, and the user can select the
installation image from a list of images stored on the server. Windows
DS installations can also be scripted for unattended installation
support and to support Lite Touch Installation (LTI) and Zero Touch
Installation (ZTI) scenarios.
Service Architecture
The Windows DS architecture has three major categories of components:
Management components
Management components are a set of tools that you use to manage the
server, operating system images, and client computer accounts. The
Windows DS MMC snap-in is a management component, and the command-line
interface is another.
Service components
Server components include a PXE server for network booting a client to
load and install an operating system. Server components also include a
shared folder and image repository that contains boot images,
installation images, and files that you need specifically for network
boot.
Client components
Client components include a graphical user interface (GUI) that runs
within Windows PE and communicates with the server components to select
and install an operating system image.
Figure 1
illustrates the various components of Windows DS. The following
sections describe the image store, PXE server, management, and client
components in more detail.
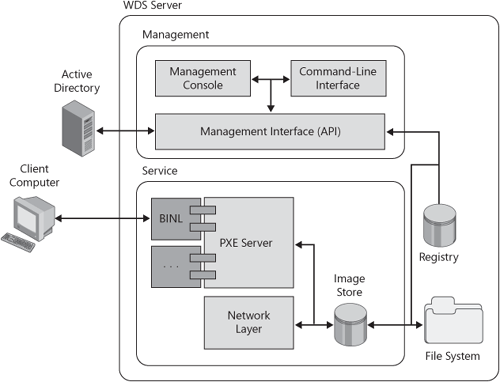
Image Store
Figure 2 describes how Windows DS organizes the image store.
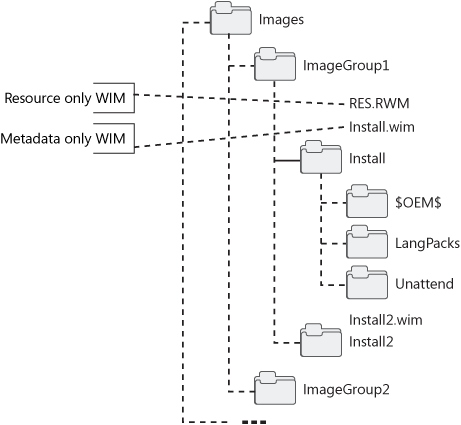
Organizing images into groups, as shown in Figure 2,
provides two benefits. First, image groups allow you to better manage
and organize images. For example, you can manage the security of an
entire image group, rather than managing the security of individual
images. Second, image groups provide units of single instancing. This
means that all of the images within an image group use SIS to
significantly compress their contents. The file Res.rwm contains all of
the file resources for the image group, and this file uses SIS. Each
image file (Install.wim and Install2.wim in Figure 2) only contain metadata that describes the image file contents based on the contents of Res.rwm.
Windows DS references
images by their group name and image file name. For example, the image
ImageGroup1\Install2.wim refers to the image file Install2.wim in the
group ImageGroup1.
PXE Services
The Windows DS PXE server is built on a unified and scalable architecture. As shown in Figure 3,
it uses plug-ins to provide access to the data store. The PXE server
supports one or more plug-ins, and each plug-in can use any data store.
Windows DS provides a default BINL plug-in, as shown earlier in Figure 10-1.
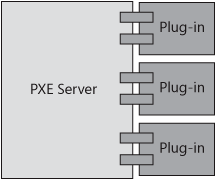
Developers
can use published APIs to create PXE server plug-ins. You can find
these APIs in the Windows Vista SDK. The SDK also includes samples that
developers can use to create their own plug-ins. For example, a
developer can create a PXE server plug-in that works without requiring
Active Directory and reads settings from a Microsoft SQL Server
database.
Management
Windows DS
provides two management tools that significantly simplify management
tasks. The first tool is an MMC console that provides a graphical user
interface for common management tasks. After installing Windows DS, you
start this console by clicking Windows Deployment Services in the
Administrative Tools folder of the Start menu (a second console, Windows
Deployment Services Legacy, is for configuring legacy RIS
installations). Examples of common tasks include adding images and
configuring server settings. The second tool is Wdsutil. Wdsutil
provides all of the management features that the console provides and
more. It has a command-line interface that you can use to script
management tasks. Both tools use the management API that Windows DS
provides, and both tools enable remote administration.
Other management utilities include:
Capture utility The Windows DS capture utility captures images to the .wim file format. It includes a light version of the ImageX /capture functionality and provides a GUI for it. You can use this to add the resulting .wim file to the image store.
Active Directory Users and Computers extension
You can use this extension to administer legacy RIS functionality and
configure settings on the Remote Install tab of computer accounts.
Risetup and Riprep Windows DS provides updated versions of Risetup and Riprep for upgrade scenarios (available for Windows Server 2003 only).
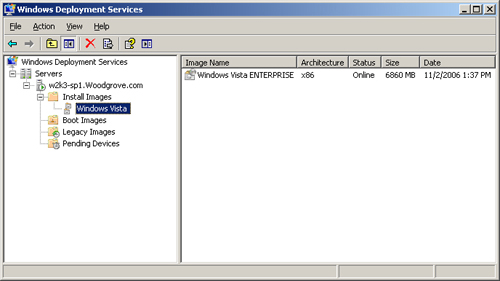
The Windows DS management console (Figure 4)
provides significant administrative control. You can add and remove
servers. You can configure a variety of options, including computer
naming rules, DHCP settings, PXE response settings, and so on. Of
course, you can add and remove installation and boot images. You can
also organize images into image groups. The Windows DS management
console gives you full control over the image groups and images
you add to it. You can configure permissions for each image group and
individual images, too. You can also associate an answer file with each
individual image. The Windows DS management console helps you better
manage images for different platforms. For example, you can associate
different boot programs and boot images with the x86, x64, and ia64
platforms. You can also associate a global answer file with each
platform.
Client
The Windows DS client
is a special version of Windows Setup that only runs within Windows PE.
In other words, when you deploy Windows Vista to the destination
computer using Windows DS, the Windows DS client runs within Windows PE
on the client computer. This approach allows deployment of Windows Vista
as well as mages for previous versions of Microsoft Windows.
The Windows DS client drives the setup experience as follows:
Language selection
For Windows Vista, the client prompts the user to choose a language.
This choice applies to the setup user interface and the operating system
installation. The user can also install additional language packs
(Windows Vista Enterprise, Windows Vista Business, and Windows Vista
Ultimate editions only).
Credentials gathering The client prompts the user for required credentials.
Image selection
The client displays a list of images available to the user, and then
allows the user to choose an image to install on the destination
computer.
Disk configuration
The client allows the user to partition and format the destination
computer’s hard disks. The client provides the same options as Windows
Setup.
However,
you can automate all of the settings that the client prompts for. To
automate these settings, you use Microsoft Windows System Image Manager
(Windows SIM) to create an Unattend.xml file.
Operating Modes
To provide a clear path between legacy RIS functionality and the new Windows DS functionality, Windows DS supports three modes:
Legacy mode
This mode uses OSChooser and RIPREP (sector-based) images. This mode is
compatible with RIS. Moving from RIS-only functionality to legacy mode
happens when you install the Windows DS update on a server running RIS.
Mixed mode
This mode supports both OSChooser and Windows PE for boot environments
and RIPREP and ImageX imaging. Moving from legacy mode to mixed mode
happens when you configure Windows DS and add .wim image files to it.
Native mode
This mode supports only the Windows PE boot environment and ImageX
image files. The final move to native mode occurs after you have
converted all legacy images to the .wim image file format and have
disabled the OSChooser functionality.
Your choice of
operating mode will depend on which client operating systems you are
deploying and what your investment has been into legacy RIPREP images.
You don’t need to abandon your current deployment images; operating in
mixed mode allows you to continue to deploy legacy RIS images from
OSChooser. It also allows you to deploy new .wim images of Windows Vista
using Windows PE.
The mode used by
Windows DS is not a simple selection in a dialog. Each mode is activated
in a specific way. The following sections describe each mode in more
detail and how to configure each mode.
Legacy Mode
In Windows DS, legacy
mode is functionally equivalent to that of RIS (Windows DS binaries with
RIS functionality). In legacy mode, only the Client Installation Wizard
(OSChooser) will be present as the boot operating system. Therefore,
only RISETUP and RIPREP images are supported. You will not be using the
new Windows DS management tools; rather, legacy RIS utilities will be
the only way to manage the server. Legacy mode is only available on
Windows Server 2003.
You configure
legacy mode by first installing RIS on Windows Server 2003 and
optionally adding legacy images to it. Then, you install the Windows DS
update. You do not configure Windows DS by using Wdsutil or the Windows DS management console.
To configure Windows DS in legacy mode
1. | Install
the RIS optional component on Windows Server 2003 with SP1, and then
configure it by running RISETUP. Optionally, you can add images to it.
|
2. | Install
the Windows DS update. (Windows Server 2003 SP2 installs the update by
default.) The Windows Automated Installation Kit (Windows AIK) includes
the Windows DS update for Windows Server 2003.
|
Mixed Mode
Mixed mode describes
a server state in which both OSChooser and Windows PE boot images are
available. In mixed mode, access to the old RISETUP and RIPREP images is
possible through OSChooser. Additionally, you can access the new .wim
image files via a Windows PE boot image. A boot menu allows users to
choose RIS or Windows PE. You will use legacy management tools to manage
RISETUP and RIPREP images and the new Windows DS management tools to
manage all facets of the server, including the .wim image files. WDS
mixed mode is only available on Windows Server 2003.
You configure mixed mode
by first installing RIS on Windows Server 2003 and adding legacy images
to it. Then, you install the Windows DS update. Last, you run Wdsutil or use the Windows DS
management console to configure Windows DS and then optionally add .wim
images to the image store.
To configure Windows DS in mixed mode
1. | Install
the RIS optional component on Windows Server 2003 with SP1, and then
configure it by running RISETUP. Optionally, you can add images to it.
|
2. | Install
the Windows DS update. (Windows Server 2003 SP2 installs the hotfix by
default.)
|
3. | Run wdsutil /initialize-server or configure the server in the Windows DS management console.
|
Native Mode
Native mode describes
a Windows DS server with only Windows PE boot images. In this mode,
OSChooser is not available, and Windows DS only deploys .wim image files
to client computers. You use the Windows DS management console or
Wdsutil to manage Windows DS in native mode. Native mode is available on
both Windows Server 2003 and Windows Server Code Name “Longhorn.”
Native mode is the only mode that Windows Server Code Name “Longhorn”
supports.
To configure Windows DS in native mode
1. | Install the RIS optional component on Windows Server 2003 with SP1. Do not configure the RIS service or add images to it.
|
2. | Install
the Windows DS update. (Windows Server 2003 SP2 installs the update by
default.)
|
3. | Run wdsutil /initialize-server or configure the server in the Windows DS management console.
|
Note
The
Windows DS server may be forced to native mode from any other mode.
This is a one-way operation and is accomplished by using Wdsutil
management utility. The command wdsutil /Set-Server /ForceNative changes the Windows DS server to native mode. |
