Installing MDT is quite simple as it is provided as a
basic Windows Installer setup. However, it does rely upon a number of
additional technologies and tools which must also be downloaded and
installed separately. The good news is that there is an interface
provided within the Deployment Workbench tool which facilitates the
downloading and installation of these additional components.
Start by downloading MDT
from the Microsoft Web site and run the simple setup. Like most any
setup, you must be an administrator to perform the installation and go
through a simple wizard interface for accepting the license agreement,
choosing a target directory, and initiating the actual installation.
Getting MDT set up can take a little while, but is a fairly straightforward process:
Install the required components and hotfixes.
Establish a distribution share including the WAIK and required OS source files.
In order to use
Deployment Workbench for anything other than simply reviewing the
documentation, it is necessary to do so using an account that is a
member of the local Administrators group. In Vista, this means using Run
as Administrator to launch the program.
|
Open only a single
instance of Deployment Workbench. Opening two or more instances of
Deployment Workbench can result in unpredictable behavior.
|
|
1. Installing components
Before you begin
installing the additional components, ensure you have the latest list of
available components by performing the following steps:
Right-click the Deployment Workbench shortcut and choose Run As Administrator.
Choose Deployment Workbench =>
Information Center =>
Components
From Window's main menu bar, choose Action and then click Check for Updates.
Choose Check the Internet as the source for locating updates.
If you are installing in an offline environment, you can perform this
step from a different Internet-attached computer and then copy the
downloaded files to removable media. To then make use of this removable
media as the source for locating updates, you can use the second option,
Check a local path, and specify the path to your locally staged source
files. Click the Check button to initiate the process.
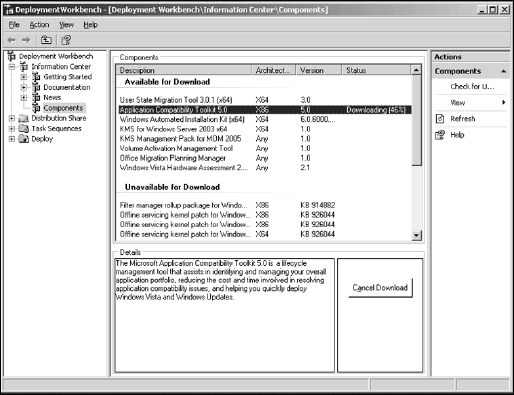
Now that you have the
latest manifest of available components, begin downloading and
installing each of the components you require (see Figure 1).
Choosing Download will change the selected components status to Queued
and the Download button itself will be updated to function as a Cancel
Download button. You can queue several components to download. How long
it takes will naturally depend upon your Internet connection. When a
download begins, you will see the percentage of completion reflected in
the status for the downloading component (it will complete the download
of one component before beginning the next queued download).
|
Within the Deployment
Workbench, click the News node under Information Center to see if there
are any new updates or changes for which you should be aware.
|
|
Once all the
required components have been downloaded, you can select each to see
either an Install or Browse button. The Browse button simply opens the
folder where the installation resides (a subdirectory of the
installation directory) using Windows Explorer where you may
double-click the setup to perform the installation.
As each item is
downloaded and installed, it will move between the labeled sections as
appropriate — Available for Download, Unavailable for Download,
Downloaded, and Installed.
|
Although some
hotfixes may be listed under Unavailable for Download, what is provided
is a button to view the knowledge base article online. Once online, you
may or may not find the update in question is available to be downloaded
(outside of the Deployment Workbench).
|
|
2. Establishing a distribution share
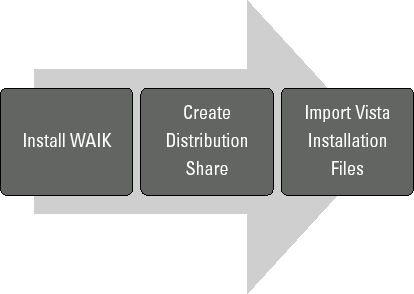
As shown in Figure 2,
in order to establish a distribution share, you must install the
Windows Automated Installation Kit (WAIK), create the share, and import
the necessary files. The following section details each of these steps.
Clicking the
Distribution Share node will provide checklist of steps you must perform
before an operating system may be deployed. Use this checklist as a
simple reference to track your progress:
Install the WAIK
Create a distribution share directory
Add operating system files
Add applications (optional)
Add OS packages (optional)
Add drivers (optional)
Installing the WAIK
The first step is to
install the Windows Automated Installation Kit. This is something that
should have been accomplished when downloading and installing the
required components as discussed previously. If you did not perform the
installations of listed components, this required component will prevent
you from continuing any further.
Select Deployment Workbench =>
Information Center =>
Components, choose Windows Automated Installation Kit from the Available for Download list, and then click the Download button.
Click the Install button to initiate the installation of the WAIK.
When
installed, you should see it listed in the Installed section of the
Components view, and the first item in the Distribution Share checklist
should reflect it has been completed.
Creating a distribution share directory
The next step is to
create a distribution share directory. This step establishes the
directory and share where MDT will store its configuration files and
source binaries to be used in creating builds.
Choose Deployment Workbench
 Distribution Share and click the Create distribution share action from the pane on the right.
In
the Create Distribution Share Wizard, you will see a Specify Directory
page. Click Create a new distribution share and enter the location for
the share on the local system.
Click Finish to complete the step and close the Create Distribution Share Wizard.
Adding operating system files
The last required step in
establishing a distribution share is to add operating system files. You
need only add those you wish to deploy, keeping in mind that with Vista,
the WIM file you specify will contain each of the editions, as they are
all present in the file-based image. The following steps walk you
through adding a Vista image to the Deployment Workbench:
Choose Deployment Workbench =>
Distribution Share =>
Operating Systems and click the New action from the pane on the right.
From the OS Type page, select Full set of source files and then click Next to continue.
On
the Source page, for Source Directory enter the root of the DVD drive
where you have inserted your Windows Vista setup DVD, or the root of the
folder where you have copied its contents and click Next to continue.
In
this process, the last page in the New OS Wizard is the Destination
page. Here you are prompted to provide a Destination directory name.
Enter
a unique and descriptive name (such as "Windows Vista") and click
Finish to initiate the copying of the required files to the distribution
share.
If you had already
created one, this wizard also allows you to easily specify a custom
captured image (a WIM file), or you can even choose to add a Windows
Deployment Services image from a WDS server.
|
Although you cannot
specify an ISO file for your image, you make use of an ISO image file by
mounting it with a tool such as the free DAEMON Tools (www.daemon-tools.cc) utility. You can also rely on WinImage from Gilles Volant Software (www.winimage.com/).
|
|
Optionally, Applications,
OS Packages (to include Windows), and Out of Box (OOB) drivers may also
be added using a similar wizard interface in this section.
Adding applications
To automate your build as
much as possible you need to include the installation of those
applications that apply to all client systems in your environment. To
add an application, follow these steps:
Expand
the Distribution Share node of the Workbench tree, right-click
Applications, and click New from the Actions pane on the left.
For
Application Type, choose either Application with source files or
Application without source files or elsewhere on the network.
If you specify that an application with source files is being
specified, the source files will be copied to the distribution share
during deployment. If you already have a share that contains your
prepared application installations, you may choose the latter option and
simply provide a UNC or DFS location to access them from their current
location. A third option, Application Bundle, is provided in the event
that there is no application installation command associated with the
application. This is for use in scenarios where you wish to install
application dependencies such as when applications must be installed as a
group.
On
the Details page, enter information such as Publisher, Application
Name, Version, and Languages and then click Next to continue.
On the Source page, type the path of the application to be added.
This step is shown only if Application Type specified an Application
with source files. If application source files are configured to be
copied to the distribution share, all data in the specified folder will
be copied. If the source files being specified are located on the local
system and not a centrally available network share, an option to Move
the files to the distribution share instead of copying them will be
enabled so the files may be moved to the distribution share where they
can be reliably accessible.
On
the Destination page, specify the name of the directory in your
distribution share where the application files will be copied or moved. Like the previous step, this too is shown only if Application Type specified an Application with source files.
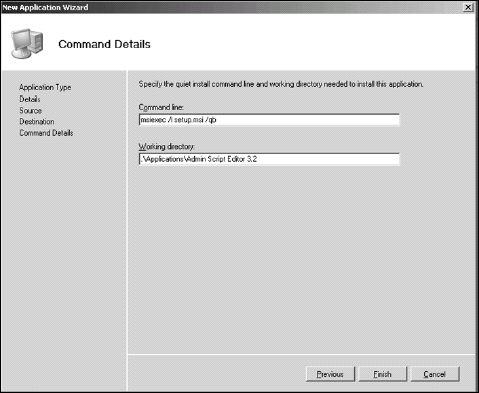
On
the Command Details page, you may specify the quiet install command
line and working directory needed to install the application.
The Command Line need not specify a path; the path is known to the
application entry by the value provided to the Working Directory field.
See Figure 3 for an example.
|
Be sure to specify a
unique and descriptive name for each application added. By default, the
label for an entry is created as Publisher + Application Name, Version.
|
|
You may also
specify dependencies for an application by right-clicking it from the
list, clicking Properties, and managing the list on the Dependencies
tab.
Adding OS packages
For the purpose of
establishing a build in MDT, a package is defined as a security update,
service pack, or language pack, and normally has a .cab or .msu file
extension. You can add these to the Deployment Workbench by following
these steps:
Choose Deployment Workbench =>
Distribution Share =>
OS Packages and then click the New option from the actions pane on the right.
On
the Specify Directory page, type the Package source directory to be
added to the distribution share. Then click Finish to complete the
operation.
Adding out-of-box drivers
An out-of-box (OOB)
driver refers to a driver that is not already included in the Windows
Vista image. Adding one is as easy as the previous items and may be
accomplished by performing the following operation:
Choose Deployment Workbench =>
Distribution Share =>
Out-of-box Drivers and click the New option from the actions pane on the right.
On
the Specify Directory page, specify the Driver source directory path as
the folder or share containing the device drivers to be added.
Select the driver group to assign the driver, or accept the default All Drivers. Then click Finish to complete the operation.
This operation adds all
the device drivers found in the specified folder and subfolders to take
care in how you establish this driver directory before adding it here.
