With everything installed and ready to go, it is time
to put the workbench to work. Because the most common use of MDT is
establishing and configuring LTI deployment, this section focuses on LTI
development and deployment. Follow these steps:
Create the task sequences that will automate the development of a baseline image.
Establish a distribution point from which to deploy the installation.
Take a time out to investigate the options provided by the task sequencer.
Create a deployment point for handling the deployment of our reference system. At this stage, you will be ready to prepare a reference computer.
With the reference computer established, you can then add the custom image to the distribution share.
After the custom image has been added, you can create a deployment build for it.
To realize the full power of MDT, you also need to create and configure a deployment database. After it is ready, you will need to populate it with data.
Take time to understand the deployment rules and how they may be leveraged.
Apply a level of customization to better automate an LTI image.
Deploy the custom image to test the deployment process.
The key
functionality of the Deployment Workbench is its Task Sequencer. Start
by creating task sequences to automate the creation of the baseline
image.
1. Creating task sequences
With a focus on the
deployment of Vista, the first thing you need is to establish a build. A
build is made up of several components including source files,
configuration settings, and the installation process (task sequence)
which defines how to create an image.
It should be the goal
of any administrator to automate the build process as much as possible.
Consistent reproducibility is crucial in controlling your baseline
configuration as changes, updates, and new hardware are introduced to
your network in the future.
Before you begin creating
task sequences it is important to establish a naming scheme to use for
task sequence IDs. While task sequence names can be modified later,
these task sequence IDs cannot. An example would be to use the version
of Windows, the edition, the service pack, and a descriptive label to
identify the customizations. Before you are carried away, know that
there is a 16-character limit to the task sequence ID value. This
information pertains to a full build and not to an individual task so
you may have only a limited number of such configurations. Table 1
provides some sample task settings to use as a guide, including one
that specifies a "configuration set." The concept here would be that you
may have multiple ways you wish to create a build of the same Vista
edition and service pack level. In this case, you name the configuration
in your build documentation and reflect it in the task sequence ID by
letter or numeral.
Table 1. Descriptive Task Setting Properties
| Task Sequence ID | Task Sequence Name | Task Sequence Comments |
|---|
| WinVistaBusSP0 | Windows Vista Business | Windows Vista Business Edition with no service pack |
| WinVistaEntSP1 | Windows Vista Enterprise SP1 | Windows Vista Enterprise Edition with Service Pack 1 |
| WinVistaUltSP1-a | Windows Vista Ultimate SP1 with Configuration Set A | Windows Vista Ultimate Edition with Service Pack 1 and a set of customizations documented and titled as configuration "Set A." |
The Task Sequencer is the tool to create, manage, and execute this build automation. To create a task, follow this procedure:
Choose Deployment Workbench =>
Task Sequences and click the New option from the actions pane on the right.
On
the General Settings page, enter the Task Sequence ID, Task sequence
name, and Task sequence comments as described previously. Click the Next
button to continue.
On the Select Template page, you may choose to select one of the four default templates, including:
Standard Client Task Sequence may be used to specify a default task sequence for deploying operating system images to client computers.
Standard Client Replace Task Sequence may be used to back up an entire system, its user state, and then wipe the disk.
Custom Task Sequence may be used to establish a blank task sequence which you can customize from scratch.
Standard Server Task Sequence may be used to create a default task sequence for the deployment of system images to server computers.
For
the purpose of establishing a Windows Vista build task, choose Standard
Client Task Sequence. Press the Next button to continue.
On the Select OS page, choose the operating system image to be installed with this task and press the Next button to proceed.
On the Specify Product Key page, you may choose to provide a product key (or not) and click the Next button to continue.
Normally, you would want to enter this to create an automated
installation process, but with no volume license key available, you may
not need to not use a product key when installing. This will prompt the
user for the key (in a LTI scenario) or you can make use of a Key
Management Service. There are actually a few ways to go about handling
the distribution of product keys including using the BDD database
capabilities to automate the process. For more details visit: http://blogs.technet.com/mniehaus/archive/2007/08/10/can-i-deploy-windows-vista-ultimate-with-bdd-2007.aspx.
On the OS Settings page, you may enter the Full Name, Organization, and Internet Explorer Home Page; then click Next to continue. Each of these values is required, but may be overridden during deployment using a wizard or rule.
On the Admin Password page, you can specify an Administrative password for the build.
The local administrator password is also specified in a task sequence
so you may choose: Do not specify an Administrator password at this
time. Furthermore, while protected to some degree, any password
specified is written into the unattend.xml file, which may not be secure against someone wishing to reverse the process used to obfuscate the password in this file.
Click Finish to complete the process.
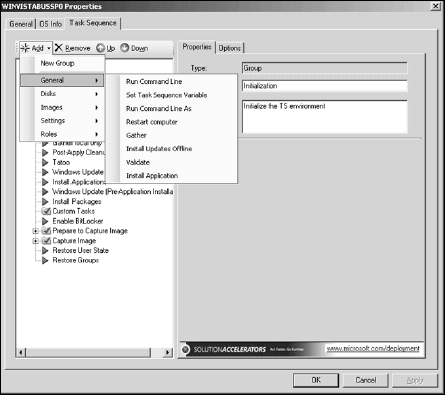
2. Investigating Task Sequencer options
The Task Sequencer is
a standalone task sequencer derived from System Center Configuration
Manager 2007. To better understand the full capabilities offered by this
powerful tool, we recommend that you browse the following options:
Choose Deployment Workbench =>
Task Sequences, right-click the task sequences created previously, and choose Properties.
Next, click the Task Sequence tab.
Explore
the options available by pressing on the Add button in the toolbar and
reviewing the options in each of the task groups listed (see
Figure 1).
NOTE
This example is
based on an x86 deployment. For a deployment of an x64 operating system,
replace all of the x86 entries with amd64.
3. Creating a deployment point
With the
deployment task established, the next step is to create a deployment
point from which it may be distributed. In this case, you are not
performing a live distribution, but are instead automating the
installation of a reference system which will be used to create our
deployment image. Do so by following these steps:
Choose Deployment Workbench =>
Deploy =>
Deployment Points and click the New option from the actions pane on the right.
On the Choose Type page, select the default Lab or single-server deployment option and then click Next.
On the Specify Deployment Point Name page, enter Image Creation for Deployment point name and click Next.
On
the Application List page, you may choose to allow users to select
additional applications when upgrading. In this case, you are provided
with a menu of applications to include in your baseline image. Select
the option and click the Next button to continue.
On the Allow Image Capture page, leave the Ask if an image should be captured option selected and click Next.
On
the Allow Admin Password page, you may select the Ask user to set the
local Administrator Password option, but because you will likely wish to
specify this when deploying the image, the setting is inconsequential
and should only be selected if needed. Click Next.
On the Allow Product Key page, you may select the option titled, Ask user for a product key. Click Next.
As with the previous setting, you may leave this deselected because the
image creation process will provide the ability to override what is
specified here.
On the Network Share page, you can change the default share name; then click Next. In most cases, the default "Distribution$" share name will be fine, but you may specify an alternate name if you wish.
On
the Configure User State, you can specify user data defaults. In this
case, you are not going to migrate any user data so you may choose the
Do not save data and settings option and click the Finish button to
complete the creation of the deployment point. However, if you were to use this in a live deployment scenario the other options available are:
Automatically determine the location on the network. This instructs the deployment process to browse the local network to determine the location for storing the user-state data.
Automatically determine the location on the Local System. This instructs the deployment process to browse the local system to determine the location for storing the user-state data.
Specify a location. This option lets you dictate manually to specify the location to save user-state data.
If further customization is necessary, right-click the new listing titled Image Creation and choose Properties.
On
the Windows PE tab ensure the Generate a Lite Touch bootable RAM disk
ISO image option is selected in the Images to Generate section at the
top left of the window and click OK to proceed.
In Deployment Workbench =>
Deploy =>
Deployment
Points right-click the newly created Image Creation deployment point
and choose Update to create the file structure that represents this
newly created deployment point.
