Configure the Backup Settings
By default, all the hard
drives on all your home computers will be backed up every night between
midnight and 6 a.m. You might just want to leave that setting the way
it is. You can customize these settings in the Windows Home Server
Console by using the Settings option if you want, though. Additionally,
the Windows Home Server Console offers an easy way to view the backups
that have taken place, to back up any computer right now, and to
configure what a backup should contain.
To view backup options, follow these steps:
1. | From
any networked computer with Windows Home Server Connector software
installed, right-click the Windows Home Server icon in the Notification
area of the taskbar.
|
2. | Click Windows Home Server Console.
|
3. | Type the password, and click the right arrow to proceed.
|
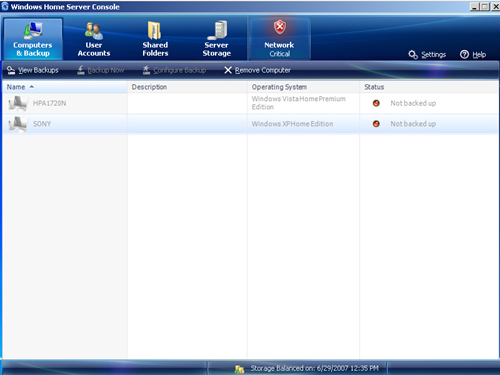
4. | Click the Computers & Backup tab.
|
5. | Click View Backups. From here you can do the following:
- a. View the backups that have taken place.
- b. Keep or delete a backup.
- c. Learn how to restore files from backup.
- d. Learn more about backup management and backup cleanup.
|
6. | Click Backup Now. From here you can do the following:
- a. Enter a name for the manual backup.
- b. Perform a manual backup.
|
7. | Select
a computer from the list of computers available on the Computers &
Backups tab. Click Configure Backup. From here you can do the following:
- a. Add files and folders to back up that are not configured automatically, such as Documents, Pictures, Music, and the like.
- b. Select the volumes to back up if more than one exists.
|
8. | Click Settings, and click the Backup tab in the Windows Home Server Settings dialog box, as shown in Figure 7.

|
9. | On the Backup tab in the Windows Home Server Settings dialog box, you can do the following:
- a. Change the start and end time the backup occurs.
- b. Change the amount of time to keep the backups.
- c. Perform a backup cleanup (which deletes old backups that aren’t needed).
|
Configure the Windows Home Server Settings
As shown in Figure 7,
the Settings dialog box offers lots of tabs for configuring how Windows
Home Server should perform. There are several categories, each of them
listed here with their options defined:
General
Configure the date and time.
Configure the regional settings.
Configure Windows Update.
Configure Customer Experience Improvement Program.
Configure Windows error reporting.
Passwords
Media Sharing
Remote Access
Configure Web site connectivity.
Configure your broadband router.
Configure your domain name.
Configure the settings for your Windows Home Server Web site.
Add-ins
Resources
Activate Windows Home Server.
View hardware information about your home server.
View Windows Home Server version information.
Learn more about Windows Home Server.
Connect to the Windows Home Server community.
Contact product support.
Finally,
you can shut down Windows Home Server from the Settings dialog box by
clicking Shut Down. For more information about Windows Home Server
Settings, click Help in the Windows Home Server Console.
View the Home Network Health
There’s one last item to
review before moving on, and that’s the Network icon in the Windows Home
Server Console. This icon offers a visual reference about how healthy
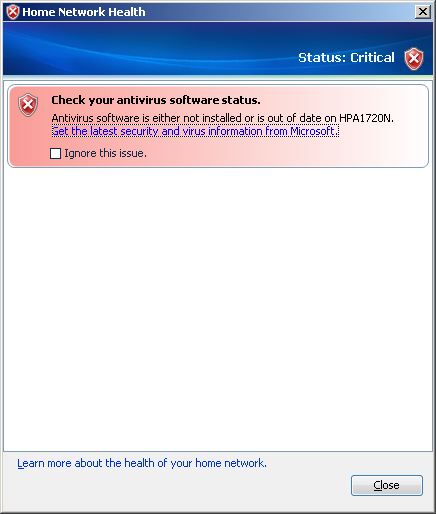
your network is. Figure 8 shows that the network health is critical. Clicking the Network Critical icon opens the screen shown in Figure 9,
which notes here that one of the computers on the network does not have
antivirus software installed. Anytime you see a critical icon, review
the information, and see whether the problem can be resolved. If it
cannot or if you want to ignore it, select Ignore This Issue.
Explore Additional Features
Windows
Home Server comes with additional features you might want to explore by
clicking Start, All Programs; these include Administrative Tools,
Remote Assistance, and Remote Access. With these tools you can further
personalize your Windows Home Server PC, access the PC from anywhere you
can gain Internet access through a Web browser, and perform such tasks
as setting local security policies, looking at performance logs, and
viewing items collected in Event Viewer.
