Understand What Windows Home Server Offers
Windows
Home Server is an operating system much like Windows Vista. You can
install programs and drivers on it, for instance, and even surf the
Internet. You can use Microsoft Paint, get e-mail, and access and use
items in the Accessories folder. Although Windows Home Server is an
operating system and does offer many of the familiar applications you’re
used to seeing in operating systems, it wasn’t created to be used as an
ordinary PC. Windows Home Server, once set up, is designed to be used
without a keyboard, mouse, or monitor and to act as a server for storing
and managing your network data—and nothing else.
|
With
Windows Home Server, you can recover from almost any disaster, even one
that destroys all the data on every computer on your network!
|
Windows Home Server
will manage your network data for you. You can configure Windows Home
Server to automatically back up data on every computer on your network
and use it to securely access your files and folders. You can even add
more hard drives to it if you need extra space. Of course, as easy as it
is to back up data, it’s equally simple to restore if a disaster
strikes. And, you can restore entire computers or only a few lost files.
Additionally, your home server comes preconfigured with shared folders
for photos, music, videos, and the like, and you get to specify who can
access what, just like you can on any PC equipped with the Windows Vista
operating system.
Windows Home Server
also monitors itself. It ensures backups are being performed regularly,
keeps two copies of shared data if space allows for it, and collects
security information from Windows Vista–based PCs on the network to
centrally monitor the health of the PCs on the network. You can access
the server remotely by using a Web browser on another computer, too.
This lets you access shared folders, applications, printers, and more,
from anywhere you can obtain access to the Internet.
Finally, you can stream media throughout your home by using the Windows Home Server Console. You can turn on media library sharing so that media can be accessed from an Xbox 360 or compatible digital media receiver attached to your home network.
Installation takes about an
hour of your own time (the actual installation process could take
several hours in total), but it’s really straightforward. A wizard walks
you through the installation process, and once installed, the Windows
Home Server Console makes configuring the server a breeze. However, it’s
important you understand and meet the minimum requirements for the
hardware and network, that you make the physical connection properly,
and that you install the software with the options on each computer on
your network.
Know the System Requirements
The hardware you
choose for your home server must meet minimum system requirements. For
the most part, the more you can improve on these minimum requirements,
the better the performance. Since this is a long-term data management
solution, try to meet the recommended requirements listed in the “Hardware Requirements”
section; you’ll be depending on this server for some time and want it
to be as powerful and reliable as possible. Keep in mind that you’ll
need only a monitor, keyboard, and mouse during installation and setup,
so there’s no need to improve on those items. In addition to hardware
requirements, the PC you select to act as the server must meet operating
system version requirements too.
Hardware Requirements
The PC you select to act
as your Windows Home Server must meet minimum requirements. Minimum
hardware requirements for installing Windows Home Server are as follows:
CPU 1GHz Pentium 3 or better
RAM 512 MB or more
Hard drive A 70-GB internal hard drive (IDE, ATA, SATA, or SCSI)
DVD A bootable DVD drive
Network interface card (NIC) 100-Mbps Ethernet
Motherboard ACPI-compliant and Windows Server 2003–compliant
You’ll also need a monitor, standard (QWERTY) keyboard, and mouse or compatible pointing device.
If you want to improve performance, try to meet these recommended requirements:
CPU 2 GHz or better
RAM 1 GB or higher
Hard drive A 70-GB hard drive for Windows Home Server and two 70-GB drives (or larger) for storage
DVD A bootable DVD drive
Network interface card (NIC) 100-Mbps Ethernet
Motherboard ACPI-compliant and Windows Server 2003–compliant
You’ll also need a monitor, QWERTY keyboard, and mouse or compatible pointing device.
Note
Laptops are not supported for Windows Home Server.
Network Requirements
Your network must also meet the following network requirements:
The server must connect to the network by using a 100-Mbps (or faster) wired connection.
The connection to the Internet must be through broadband.
There must be an external broadband router/firewall device with a 100-Mbps (or faster) wired Ethernet connection.
PCs on the network obtain their IP addresses from the router/firewall device on the network.
Note
You
must use an Ethernet cable to connect your server to your broadband
router. Wirelessly connecting your server to your broadband router or
switch is not supported.
Operating System Requirements
The computer you select to run Windows Home Server must be running one of the following operating systems:
Windows Vista Home Basic
Windows Vista Home Premium
Windows Vista Business
Windows Vista Enterprise
Windows Vista Ultimate
Windows XP Home with Service Pack 2 (SP2)
Windows XP Professional with SP2
Windows XP Media Center Edition 2005 with SP2 and rollup 2
Windows XP Media Center Edition 2005 with SP2
Windows XP Media Center Edition 2004 with SP2
Windows XP Tablet Edition with SP2
Windows Home Server Connector Software CD
Note
While installing Windows
Home Server, your hard drive will be formatted, meaning all data on the
drive will be lost. Make sure you back up any data you want to keep
prior to installation.
Run Windows Home Server Setup
Once
you’ve met the minimum requirements, all you have to do to get started
is make the Ethernet connection to the existing network, power on, and
run the Windows Home Server setup. Make sure you use a wired Ethernet
connection to your network. Disconnect any external USB or Apple
FireWire drives too; you can reconnect those drives after setup is
complete.
When you’re
ready to start installation, insert the Windows Home Server DVD into the
drive, restart the computer, and boot to the DVD. When you see the
Welcome screen, you’re ready to begin.
To install Windows Home Server, follow these steps:
1. | Insert
the Windows Home Server DVD, reboot, and press the appropriate key on
the keyboard to boot to the DVD. Wait while the files load.
|
2. | At the Welcome screen, click Next to begin.
|
3. | On
the Load Additional Storage Drivers page, verify all your hard drives
appear on this page. If they do not, click Load Drivers to load
additional drivers and add the missing drives. Click Next.
Tip
If a message appears
that no hard drive is found that is capable of hosting Windows Home
Server, you’ll need to browse to the location of the hard disk driver.
If you aren’t sure where that driver is stored, use Device Manager to
obtain the properties for the drive and the location of the drivers.
|
4. | On
the Select An Installation Type page, select New Installation, and
click Next. Note that all data on the drive will be erased. If you have
not backed up all the data you want to keep, click Cancel to end the
installation.
|
5. | On
the Select Your Regional And Keyboard Settings page, select the format
of your time and currency, and select the language of your keyboard or
input method. Then click Next.
|
6. | On
the End-User License Agreement page, review the end-user license
agreement. To continue, click I Accept This Agreement, and then click
Next.
|
7. | On the Enter Your Windows Home Server Product Key page, type your Windows Home Server product key, and then click Next.
|
8. | On the Name Your Home Server page, type a name for your home server, and then click Next.
|
9. | If prompted to disconnect external drives, do so.
|
10. | Review
the Formatting Hard Drives page. To continue, click I Acknowledge That
All Data On These Drives Will Be Lost, and then click Next. To confirm
that you want to continue, click Yes.
|
11. | On
the Ready To Install Windows Home Server page, click Start. The Windows
Home Server documentation states that this step may take several hours
to complete. Your home server will reboot multiple times during setup.
No additional input is required from you during this time.
Tip
During each reboot, you’ll see the option to boot to CD or DVD. Don’t do this, or the setup will start over!
|
12. | When Windows Home Server boots for the first time, click Welcome.
|
13. | Type
a password, confirm the password, and type a password hint. Make sure
you read and understand the requirements for creating a strong password.
It needs to be at least seven characters and include uppercase and
lowercase letters, as well as numbers and/or symbols. Click the right
arrow to continue.
|
14. | On
the Help Protect Windows Home Server Automatically page, click On or
Off next. The recommended setting is On to keep Windows Home Server
up-to-date. Click the right arrow to continue.
|
15. | On
the Customer Experience Improvement Program page, determine whether you
want to participate in this program, and click Yes or No. Click the
right arrow to continue.
|
16. | On
the Windows Error Reporting page, decide whether you want to
automatically send error reports to Microsoft, and click Yes or No.
Click the right arrow to continue.
|
17. | If setup did not automatically install a driver for your network card, the following message appears:
Make sure your home server is connected to the network and that
you have the appropriate drivers for your network card. To install the
correct driver, follow the instructions in “Adding Drivers for Your
Network Card” in Troubleshooting Setup before you shut down your home
server.
|
18. | Click Continue.
|
19. | Click Start, and select Log off.
|
20. | Restart the computer, and log on. Later, you’ll log off and disconnect the monitor, mouse, and keyboard.
|
Verify you can connect to the Internet from the new Windows Home Server.
Troubleshoot
You must be able to
connect to your network and the Internet before continuing. You can
perform several tasks if you are having trouble accessing your network
or the Internet, including verifying your workgroup name, creating a new
connection, and using Device Manager to update an Ethernet adapter,
controller, or similar device.
Verify Workgroup Name
Your new Windows Home
Server will need to have a unique computer name on your existing network
and be able to connect to it. Before continuing, verify that the
computer name and workgroup name are correct. If they are not correct,
make changes as noted here.
To verify the computer and workgroup name are configured correctly, follow these steps:
1. | Log on to Windows Home Server.
|
2. | Click Start, and right-click My Computer.
|
3. | Select Properties.
|
4. | On
the Computer Name tab, note the computer name. No other computer on the
network should have that name. Also, note the workgroup name. This
computer needs to be configured with the same workgroup name as your
existing network. If either of these needs to be changed, click Change.
|
5. | In the Computer Name Changes dialog box, type the desired computer name and workgroup name. Click OK.
|
6. | Click OK, OK, and OK again.
|
7. | Click Yes to restart the PC.
|
Note
You have 30 days
to activate Windows Home Server after installation is complete. If you
do not activate within 30 days, you cannot continue to use Windows Home
Server. You can activate Windows Home Server from the Resources page on
Windows Home Server Settings or via the pop-up that appears in the
taskbar.
Before continuing,
verify you can access the Internet from the Windows Home Server PC. If
you cannot, work through the next section.
Run the New Connection Wizard
If you can’t connect to the
Internet, you might need to run the New Connection Wizard. To create a
new connection by using this wizard, follow these steps:
1. | From the Windows Home Server PC, click Start, Control Panel, Network Connections, and New Connection Wizard.
|
2. | On the Welcome To The New Connection Wizard page, click Next.
|
3. | Click Connect to the Internet. Click Next.
|
4. | Select Connect Using A Broadband Connection That Is Always On. Click Next.
|
5. | Click Finish.
|
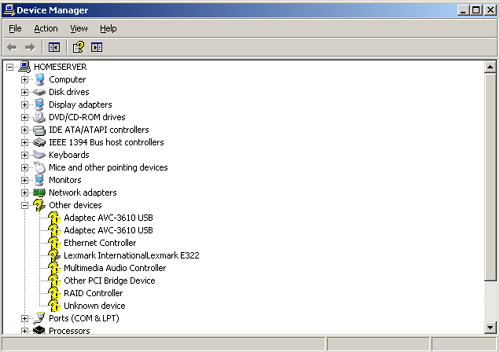
Update an Ethernet Driver in Device Manager
You
will not be able to connect to your network or the Internet if your
Ethernet adapter isn’t working properly. To see whether your Ethernet
adapter or controller is causing a problem, open Device Manager:
1. | From the Windows Home Server PC, Click Start, right-click My Computer, and click Properties.
|
2. | From the Hardware tab, click Device Manager.
|
3. | Look for any red Xs or yellow question marks in the list. Figure 1 shows a problematic Ethernet controller.
|
4. | Double-click the device that is not working, and from the Properties dialog box, select Driver.
|
5. | Click Update Driver.
|
6. | Select Install The Software Automatically (Recommended), and click Next.
|
7. | If
a driver is found, click Next to install it. If a driver is not found,
you’ll need to obtain the driver some other way. This may include
browsing to a driver disk that came with your PC, downloading a
compatible driver from the Internet, or waiting for Windows Update to
offer a driver to you at a future date. |
