4. Preparing the reference computer for imaging
After the reference
computer is customized for your environment, you must prepare it for the
imaging process. When imaging computers, a copy is made of one computer
and applied to others. This is both helpful and problematic. The
advantages have been discussed and primarily deal with reduced
deployment times and extremely consistent workstations.
The disadvantage of an
exact copy is that it is an exact copy. More specifically, items such as
the computer name, IP address, and Security Identifier (SID) are copied
to each and every computer. This problem is overcome by generalizing the system before creating an image from it. This generalization process is carried out using the System Preparation Tool (sysprep.exe). You can see the System Preparation Tool, which is located on Windows Vista systems in the c:\windows\system32\sysprep folder, in Figure 2.
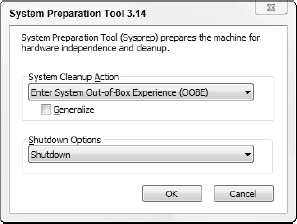
Cleanup action
The System
Preparation Tool allows you to adjust three settings in the user
interface. The first setting is the type of cleanup action. The choices
are OOBE or audit modes. When the cleanup action is set to OOBE mode,
the computer will begin Windows Welcome, also known as Out of Box
Experience, on the next reboot. This setting allows the user to name the
computer, configure network settings, join the computer to a domain,
and create user accounts and other setup items. You see this interface
when you turn on a new computer for the first time. In general, this is
the cleanup mode you should use for creating your images.
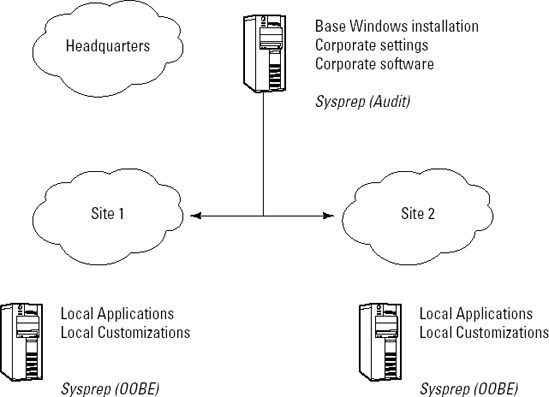
You may also select
System Audit Mode, which will bypass Windows Welcome on next reboot. By
circumventing Windows Welcome, you are given access to the desktop
without having to run through any wizards. On the other hand the
computer has not been properly configured for use. Audit mode is used
for either post-imaging configuration or multi-tiered image building,
where an organizational image is built and remote locations will
customize the image and then configure the cleanup action for OOBE, as
shown in Figure 3.
Generalize
The generalize option is
the main focus of the tool. When this option is selected, all unique
information is stripped from the computer. In particular, the computer
name, network settings, End User License Agreement acceptance, Product
Key, Security Identifier (SID), user name, and computer name are
removed. In addition, other system cleanup is performed and the Windows
activation grace period is reset. Typically, the machine would then shut
down. On the next startup, the computer would then presumably start
Windows Welcome to prompt the user for the missing information. However,
before starting Windows again an image will be captured while the
computer is in the generalized state.
Shutdown options
After the System
Preparation tool has completed its work, it can exit the program, reboot
the computer, or shut down the computer. When creating images, the most
common desire is to have the computer shut down so that you may then
proceed to capture an image. However, you may already have a bootable CD
or USB flash drive (UFD) attached and wish to immediately reboot.
|
Although an image can be
generalized as many times as you like, the Windows activation grace
period will only be reset a maximum of three times (five times for Vista
Enterprise). When the grace period expires, the computer will enter a
notification-based experience where the user is constantly prompted to
activate and becomes virtually useless to your end users. This
limitation is significant because it essentially limits the number of
times you can apply, modify, and recapture an image. It should now be
apparent why being able to modify an image offline is so useful.
Another approach
to managing images offline is to use a virtual machine as a Reference
Computer. Since a VM is nothing but a set of files, you just copy these
files before running Sysprep and then you run Sysprep on the copy. Doing
this means that the reference computer is not changed, so you can run
Sysprep as many times as desired. Keeping a running copy of the
reference computer also makes it a lot easier to update and patch
without having to perform these actions in an offline mode.
|
Answer file
The System Preparation
tool may also be run completely from the command line. You can see the
available command line parameters in Figure 4.
From the command line, Sysprep has the additional capability of
specifying an answer file, which cannot be done from the graphical user
interface. For this reason it is most likely you will desire to use
Sysprep from the command line and not from its graphical user interface.

When the /unattend
option is used with Sysprep, it specifies the answer file that should be
used on next reboot. The assumption is that the system has been
generalized and on next reboot will need information to be provided
before being ready for use by the end user. Normally, this information
would be provided as part of Windows Welcome. If you do not wish to
manually enter a product key, accept the license agreement, create user
accounts, or configure localization settings you may provide an answer
file to be used. The process here is very similar to the answer file you
provided to automate the setup of your reference computer, as the image
shipped on the Vista DVD is in a generalized state.
The answer file may be
given any valid Windows filename and may be stored in any currently
accessible location. The Sysprep utility will copy the file to C:\Windows\panther and rename it to unattend.xml.
Assuming there are no changes, you may reuse the answer file created to
automate the reference computer installation created in a previous
walkthrough.
5. Walkthrough: Preparing the computer for imaging
To generalize the
system, specify an answer file, and shut down the reference computer,
use the following command changing the path to the answer file to match
your needs. The entire command should be entered on a single line,
although it has been wrapped below due to length.
C:\windows\system32\sysprep\sysprep.exe /generalize /oobe /
   shutdown /unattend:w:\unattend\basic_unattend.xml
