Viewing Performance Information in the Event Log
The
Windows Vista operating system keeps track of numerous different events
that occur while the system is running. The types of messages include
notifications from applications, system-related details, and security
events. With relation to performance monitoring and optimization,
particular portions of the event logs can be useful.
Operations such as the
time it takes to boot the computer are measured and recorded. In some
cases, events can clearly identify that the system is working more
slowly than is expected. These details can help verify reports from
users about slow system performance. They can also be used to measure
the effects of making changes.
Event Viewer
is the standard application used to monitor events that are recorded on
the system. By default, Windows Vista includes dozens of groupings for
events. You can launch Event Viewer directly from the Start menu, but
the default display shows all of the available event logs on the system.
This often makes it challenging to filter the display to show just the
information you need.
One easy way to filter
the information to view performance-related details is to use the
Performance Information And Tools Control Panel window. To do this, in
Control Panel, click System And Maintenance and select Performance
Information And Tools. Click Advanced Tools, and then click View
Performance Details In Event Log. This automatically launches the Event
Viewer console and opens the Diagnostics-Performance section. Figure 6
shows an example of the types of events that you can view. (If
necessary, you can close the Actions pane to allow more room for you to
review these events. To close the Actions pane, click the Show/Hide
Action Pane button on the toolbar.)
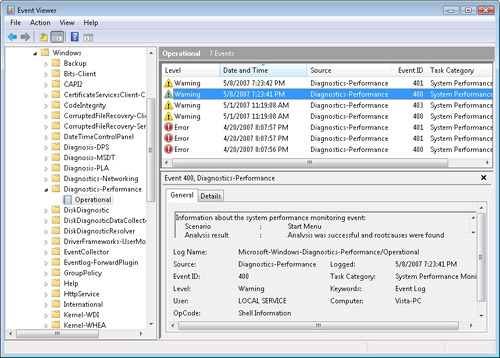
The actual events
that are stored are organized into three levels: Information, Warning,
and Error. By selecting an item in the list, you can view the details of
the issue. Often, the explanatory text gives you insight into the issue
and possible ways to resolve it. For example, the process of opening
many different windows while the Windows Aero user interface is enabled
might reduce overall system responsiveness. Windows Vista automatically
monitors for this issue and logs an event whenever it occurs. If the
event is occurring frequently, you might decide to either upgrade the
computer’s display adapter or disable the Windows Aero desktop feature. Overall, the Event Viewer can be an indispensible tool for viewing information about how Windows Vista is performing.
Configuring Windows Features
The
Windows operating system platform includes many potentially useful
applications and services. For security and performance reasons, many of
these options are not enabled by default on computers running Windows
Vista. This approach helps ensure that system resources are not being
used for programs that the user might not need. Some examples include
network applications such as the Telnet client and server and Tablet PC
Optional Components. Each of the available options is known as a Windows
Feature.
You can easily turn
Windows Features on or off based on users’ needs. If a user or
application requires a particular feature, you should probably enable
it. Alternatively, if you find that a feature is using a significant
amount of system resources even if it is not being used, you can choose
to disable it. These functions are available by using the Uninstall A
Program link in the Programs section of Control Panel. The Turn Windows
Features On Or Off link launches the Windows Features dialog box (see Figure 7).
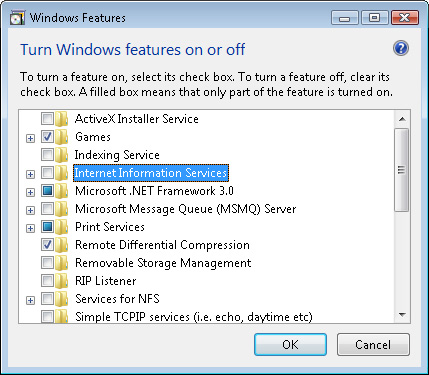
You
can turn some of the features in the list on or off simply by using the
check boxes that are located next to them. In addition, you can view
some services and components that provide additional subfeatures by
expanding the respective sections. When you click OK, Windows Vista goes
through the process of enabling and disabling the relevant features. In
some cases, you might be required to reboot the system before the
configuration will complete.
Configuring Windows ReadyBoost
One of the
easiest methods of improving overall system performance is to add more
physical memory (RAM) to the computer. Physical memory is consumed by
applications, processes, and services. When many different applications
are run on the computer at the same time, however, Windows Vista must
try to make the most efficient use of the available memory. Often, the
operating system will need to store memory information on the hard disk.
This operation is known as paging, and it can slow system performance significantly.
The obvious solution to this
problem is to add more physical memory to the computer. There are,
however, some potential barriers to this solution. First, purchasing
memory can be costly (although prices have decreased dramatically over
time). Second, the physical computer itself might not have enough room
for expansion. Some systems are physically limited by the number of
available memory slots and might have limitations on the storage
capacity of installed memory. Finally, there’s the issue of
installation: many end users are not comfortable with opening their
computers and installing additional memory.
Understanding Windows ReadyBoost
Windows
Vista includes a feature called Windows ReadyBoost that allows users to
use external memory devices to improve performance. Compatible devices
include USB memory drives (often called flash drives or thumb drives),
and multimedia cards such as those that are used for portable devices
like digital cameras.
ReadyBoost uses a method
known as write-through caching to improve performance. This works by
automatically storing data to the memory device as well as to the hard
disk. Writing to a memory device can be slower than writing to a hard
disk. The write-through cache approach ensures that the system does not
have to wait for the data to be written to the memory device. It also
protects against any potential data loss that might occur if the item is
unplugged from the system. For smaller operations, reading from a
memory device can be faster than reading from a hard disk. Depending on
the patterns of disk activity, Windows Vista can then read the data
directly from the memory device rather than going to the physical hard
disk. This operation is often significantly faster than accessing the
same data from the hard disk.
Note: The role of Windows ReadyBoost
When helping users
determine how to upgrade their systems, you’re likely to come across
questions about which types of upgrades are best. Should the user
purchase and install more physical memory, or will Windows ReadyBoost
meet their requirements? The ideal solution is to install more physical
RAM in the computer. Memory chips that are installed on the motherboard
of a computer run far faster than their flash-based counterparts.
Windows ReadyBoost is a good second choice if the user is unable or
unwilling to upgrade. A good rule of thumb is to use physical memory
whenever possible.
Windows ReadyBoost Requirements
There are several
technical and performance requirements that must be met for a device to
be compatible with Windows ReadyBoost. The device should be connected
directly to a USB 2.0 or media reader port on the computer for maximum
performance. When recommending devices to users, it’s best to look for
information that specifies that the device is compatible with Windows
ReadyBoost. Additionally, Windows ReadyBoost is limited to using up to a
maximum of 4.0 GB of space for the Windows ReadyBoost cache, even if
the size of the memory device is larger.
Enabling Windows ReadyBoost
The process of
enabling the Windows ReadyBoost feature is simple. The first step is to
connect an external memory device to the computer. For example, you
might connect a USB flash drive to a USB 2.0 port on the physical
computer. By default, Windows Vista automatically tests the performance
of the device. If it meets the requirements, Windows Vista then prompts
you as to
whether you would like to use the device with the Windows ReadyBoost
feature. If the device did not meet the performance requirements, you
can choose to retest it or to stop retesting it in the future. The same
options are also available by viewing the ReadyBoost tab in the
properties of a memory device. Figure 8 shows the available options.
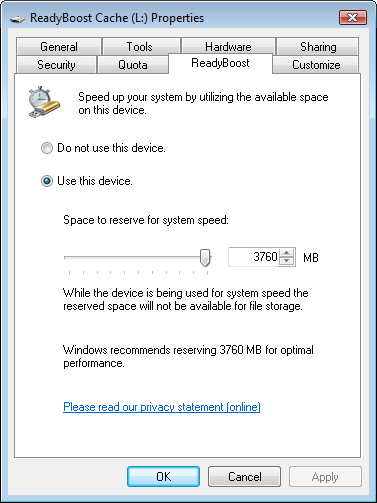
To enable Windows
ReadyBoost, the Use This Device option should be selected on the
Ready-Boost tab of the Properties dialog box for the device. Windows
Vista also attempts to detect automatically whether a memory device
meets the requirements for ReadyBoost when it is plugged in. If it does,
you can choose the Speed Up My System option to access these settings
directly. The slider enables users to choose how much memory they would
like to use on the device. All of the space that is used by Windows
ReadyBoost will be unavailable for storing other files. Therefore, users
should decide whether they want to use all of the available space, or
if they want to use only some of it. After you apply the settings,
Windows Vista automatically starts using the external memory device to
improve performance. As mentioned earlier, users can remove the memory
device at any time without risking the loss of data.
Managing Services
In addition to standard
programs that are configured to run on a Windows Vista–based computer,
services provide important functionality for keeping the system running
properly. Examples include the Workstation service (which enables
accessing files and resources over the network), the Windows Time
service (for automatically synchronizing the system clock), and the
Offline Files service (for automatically synchronizing files between
computers).
The default list of
services included with Windows Vista is a long one, although most of the
services are not enabled by default. Many of these perform important
system functions. In addition, the installation of new software might
result in the installation of new services.
Viewing Service Configuration Information
Services
are programs that are designed to run in the background without
requiring user input. They usually run on the system whether or not a
user is logged on. This often makes it difficult to “see” which services
are running. Even though they usually don’t have a user interface,
services do consume system resources while they are running.
The primary method of
configuring, starting, and stopping services is the use of the Services
console. You open this console by first opening Control Panel and then
clicking System And Maintenance. Click Administrative Tools, and then
double-click Services. Figure 9 shows the default display of the Services interface.
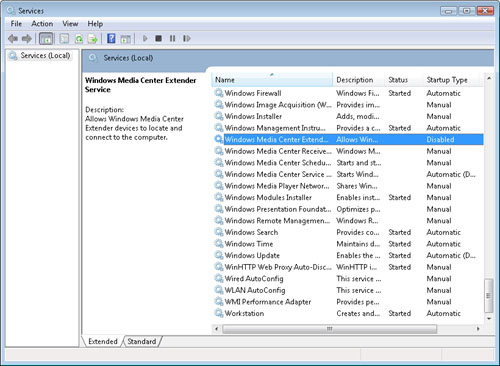
The important configuration-related details include the following:
Name
The friendly name of the service. Generally, this will provide an
overview of the feature or functionality that the service provides.
Description
A description of the purpose and function of the service in greater
detail. Often, the text will also mention which types of functionality
might be affected if the service is stopped or disabled.
Status
Information that specifies the status of the service. The most common
values are blank (indicating that the service is not running), or
Started (indicating the service is running).
Startup Type Startup
options that are generally configured in one of three states. Automatic
specifies that the service should start whenever the computer is
started. Manual specifies that the service will not start automatically,
but it can be started manually (by either a user or another program).
Finally, Disabled specifies that the service cannot be started by a user
or other program. This option is useful when troubleshooting potential
performance-related issues.
Log On As
A field that shows details about which account will be used. Because
services do not depend on a user to launch them manually, they must run
under the security settings of a particular user account. Most services
that are included with the Windows Vista operating system will run using
a built-in account such as Local System or Local Service. You can also
provide credentials related to a particular user account.
Although the
standard Services console display is simple, it does provide the
capability to sort the information. A common task is to click the Status
column heading to show all of the services that are currently running
at the top of the list. You can also click the Startup Type column
heading to sort by whether a service is set to Automatic or Manual. If a
service has an Automatic startup type, but it is not running, that
might indicate a potential configuration issue.
Starting and Stopping Services
The Services console
allows you to start and stop services easily. The easiest method is to
select the service you want to manage and then click the relevant
buttons in the console toolbar. The buttons are as follows:
Start Service Starts the service if it is currently stopped.
Pause Service Tells the service to run in a paused state.
Stop Service Stops the service if it is currently running.
Restart Service Stops the service and then immediately restarts it.
The actual effects of each
operation are dependent on the service itself. Some services might
execute cleanup-related tasks (such as deleting temporary files) before
ending. Although not all services can be paused, some can be placed in
this state temporarily to prevent them from responding to requests or
events.
Overall, by
monitoring and managing services, you can identify possible performance
issues. You can also make sure that only required programs are using
system resources.
