In many ways, it is human nature to want to optimize
the way a system or device behaves. Most of us would like our cars to
accelerate faster, especially if it requires only a few minor
modifications. The same is true for working with operating systems.
Although some users are willing to dedicate time and effort to squeeze
every last bit of performance out of their systems, most are not aware
of the many ways in which they can configure their systems to run more
efficiently.
An important goal for the
Windows Vista operating system is to provide the best possible
performance for users. When people can use programs more quickly, they
tend to be more productive. Numerous enhancements have been included in
the core operating system to improve memory, disk, CPU, and network
performance.
As a Consumer
Support Technician, you’re likely to hear complaints about performance
issues. For example, a customer might mention that her system is running
more slowly after she installed a new application. There are many
different aspects related to troubleshooting these issues, and
determining which applications and processes should be running is based
on the particular needs of the user. Sometimes, it might make sense to
remove an application or process that is not used. Spyware, viruses,
malware, and other unwanted programs are common examples.
Developing a Performance Optimization Approach
Perhaps one of
the most important aspects of troubleshooting is having a clear and
well-defined process. Technical professionals often jump into making
changes quickly without a full understanding of the problem. This can
lead to less-than-optimal configurations or other related problems.
A performance optimization approach should include several steps, including these important steps in the process:
Establish a baseline Because
the goal of making performance-related changes is to improve overall
performance, it’s important to know how the system is working currently.
Sometimes a baseline must be collected over a long period of time (for
example, an entire week or month). In the case of a consumer operating
system such as Windows Vista, it’s likely that the user has one or more
applications that are not running as fast as he or she would like.
Taking some brief measurements, such as the time to open a particularly
resource-intensive application, can be helpful in determining whether
changes have helped the problem.
Identify bottlenecks
Defined simply, a bottleneck is the slowest step in a given process.
Given a particular process or workload, it’s possible for the CPU,
memory, hard disk, or network subsystem to be the overall rate-limiting
component. Through the use of performance monitoring, you can determine
which aspects of the system are most overworked. These are the areas on
which to focus to realize the most improvement.
Implement a change
This step involves actually trying to improve performance. You’ll look
at many different examples in this lesson, but one idea to keep in mind
is that you should minimize the number and types of changes that you
make at the same time. For example, if you have three different ideas
about how to improve disk-related performance, it’s best to make one
change first and then measure its effects. Making multiple changes at
the same time can cause a variety of problems. Imagine, for example,
that you made three different changes. One increased performance by 15
percent, another decreased performance by 10 percent, and the third had
no effect. In this case, you have an overall positive effect (a 5
percent increase in performance), and you might conclude that the
changes were a positive step. Note, however, that one of the changes
actually decreased performance. It would have been easier to detect this
by making only one change at a time.
Measure performance
After you’ve made a change to the system, it’s time to determine its
effects. Ideally, you will have some kind of test that you can run to
see whether you’ve improved performance. In the previous lesson, you
looked at how the Windows Experience Index can provide a basic benchmark
of overall performance. Other measures might include the amount of time
it takes to start an application or to perform a particularly
resource-intensive task. If the change was beneficial, it should
probably be retained (unless, of course, it causes some unintended
negative effects). Otherwise, it should be rolled back, and another
approach should be attempted.
Repeat the process (if needed)
The process of performance optimization can often continue
indefinitely. For example, you can continue to isolate and reduce
bottlenecks to squeeze more capacity out of a system. The problem,
however, is that at some point, the amount of effort it takes to perform
optimizations will outweigh the potential benefits. For example, if it
takes several hours of time to find a way to increase performance by 2
percent, many users will not find this to be a worthwhile investment.
Although it doesn’t sound like optimization, often the rule for the process is to stop when performance is good enough.
It is important to keep
the steps of the performance optimization process in mind when looking
at ways to troubleshoot Windows Vista performance issues.
Using Performance Information and Tools
One of the
potential challenges related to changing operating system settings is
finding all of the available options. The Performance Information And
Tools link in Control Panel provides a starting point for viewing the
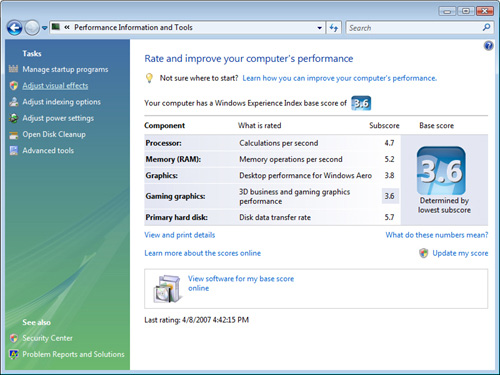
many available options and utilities. Figure 1 shows the tasks that can be launched quickly by using the links on the left side of the window.
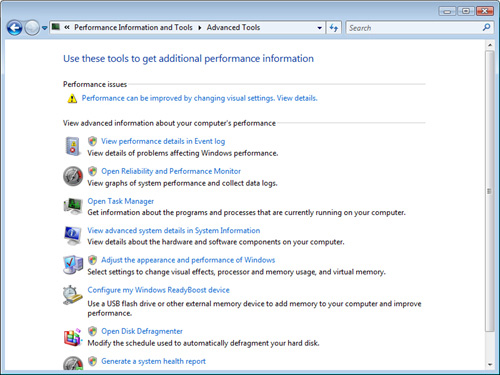
In addition to
these tasks, clicking Advanced Tools in the left pane of the Performance
Information And Tools window shows numerous other features that you can
launch directly from within Control Panel (see Figure 2).
You
can also launch all of these tasks in other ways. For example, you can
access Windows Defender through the Start menu. Indexing, visual
effects, and power settings can also be accessed directly from within
Control Panel. Overall, however, the Performance Information And Tools
window provides a good starting point for the optimization process.
You’ll learn more about these tasks in this lesson.
Managing Startup Programs
Like most modern
operating systems, Windows Vista provides programs with the ability to
launch automatically during the startup process. This provides users
with ready access to the applications and services that they plan to
use. Perhaps the most noticeable examples include the Windows Sidebar,
Windows Defender, and other applications that might automatically run
whenever a user logs on to the system.
Although
automatically running applications on startup or during the logon
process can be convenient, it can also lead to performance problems. In
some cases, unwanted applications such as malware might be configured to
run without requiring any user interaction. Often, users are completely
unaware that the program is running. Many of these applications and
processes can consume significant system resources, thereby reducing
performance.
When attempting to
diagnose performance-related problems in Windows Vista, it’s often
helpful to determine which applications or programs are configured to
run automatically. The actual configuration details might be stored in
one of several different places, including the Startup folder and several sections in the Windows Registry. Tracking down these different locations can be difficult.
Configuring Startup Items with MSConfig
Windows Vista
includes a System Configuration application known as MSConfig. It can be
launched from System Configuration or Msconfig in the Start menu. This
utility includes several different tabs that you can use to determine
how Windows Vista operates. Specifically, with relation to performance
optimization, the Startup tab is very useful. As shown in Figure 3,
this tab provides a list of all of the programs that are configured to
run automatically during the Windows Vista startup process.
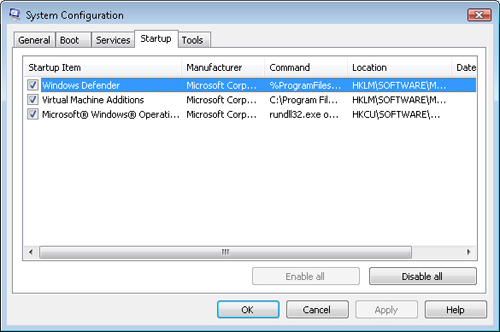
The columns include the following details:
Startup Item The name of the startup item.
Manufacturer
The manufacturer of the software. This is most commonly the name of a
software or hardware company (such as Microsoft Corp.) that created the
application.
Command
The full text of the actual command that is being run. Several startup
items might include configuration switches as part of the command line.
Location The file system or Registry location in which the startup information is stored for each item.
Date Disabled Displays the date on which an item was disabled. By default, this column is blank.
You
can disable a startup item by clearing the check box next to the name
of that item. This option is a convenient way to troubleshoot potential
performance problems caused by these items because clearing an item’s
check box does not remove the command and other information permanently.
If you disable an item, Windows Vista does not run it during the next
reboot or logon operation. Additionally, there is a Disable All button
that you can use to clear the check boxes automatically for all of the
startup items in the list. This option can be useful in cases in which
numerous startup programs are making the system slow and unresponsive. A
typical performance troubleshooting process involves enabling or
disabling an item, rebooting the computer, and re-evaluating system
performance.
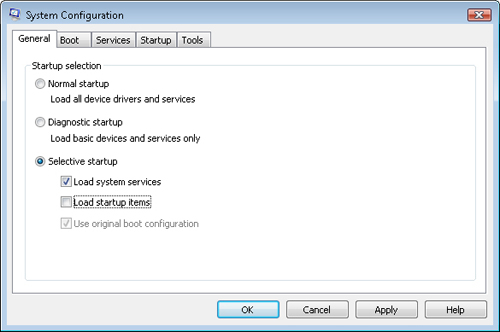
There is also another way to disable all startup items from running. The General tab (shown in Figure 4)
includes several options for enabling or disabling device drivers and
services. The Selective Startup option includes a Load Startup Items
check box. If you clear this check box, no startup items run, regardless
of their configuration on the Startup tab.
Managing Startup Programs with Windows Defender
Windows
Defender is an antispyware utility that is included with the Windows
Vista operating system. Although its focus is on detecting and removing
potentially malicious software, Windows Defender provides an option for
managing startup programs. You can open Windows Defender from the Start
menu or by clicking the Windows Defender system tray icon (if it is
present). You can launch this option by clicking Tools in the Windows
Defender Home view and then clicking the Software Explorer link. You can
also directly access this view by clicking Manage Startup Programs in
the Performance Information And Tools Control Panel window.
By clicking the Startup Programs category in the Windows Defender Software Explorer,
you can view a list of all of the programs that are configured to run
during the Windows Vista startup process. By default, the list of items
is grouped by the publisher of the software and sorted by the name of
each application or process. You can change the grouping to view
information based on startup type by right-clicking any item and
choosing Startup type (see Figure 5). The groups include the User Profile Startup Folder, the Current User Registry Key, and the Local Machine Registry Key.
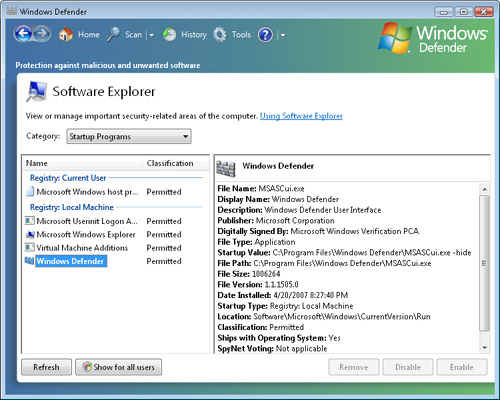
You can obtain more
details about a particular item by selecting it in the list. The right
pane then shows a long list of details about the application or process.
Some of the details include the file name of the program, the location
of the file, the size of the file, the date it was installed, and the
location of the startup information. Another useful detail specifies
whether the program shipped with the operating system. In general,
programs that shipped as part of Windows Vista should be considered safe
and are often required for the operating system to work properly.
The Classification
section is based on a centralized database known as SpyNet. The Windows
Defender Software Explorer can automatically query this database over
the Internet to determine which applications are known and which are
not. Spyware, malware, and other malicious programs will automatically
be prevented from running on the system. Of course, it is also possible
for some third-party applications and services to be listed as Not Yet
Classified.
When managing startup items, there are three primary configuration operations that you can perform:
Disable
This command prevents a specific item from running at system startup or
during the logon process. The definition of the item (including the
command and its file system or Registry location) will remain in the
system. Disabling is most useful for situations in which it is possible
that the startup item will be needed again.
Enable Startup items that have been marked as disabled can be configured to run at startup by re-enabling them.
Remove
This command permanently removes an item from the list of startup
programs. This usually involves the deletion of a shortcut or the
removal of the associated Registry key. The Remove command is most
appropriate for removing software items that are known to be unwanted.
Windows Defender
also includes a category for viewing which processes are currently
running on the system and for optionally terminating them. If a
particular program is known to be causing problems, you can use the End
Process command to stop that program immediately and return system
resources.
