1. Printing Your Photographs
Printing
your photographs used to be quite a challenge—depending on their format
and resolution, your pictures might be printed in different sizes or in
different orientations on the page. Windows Vista now makes your life a
lot easier by providing a wizard that lets you lay out the pictures
just as you want them, so you get exactly the desired results every
time.
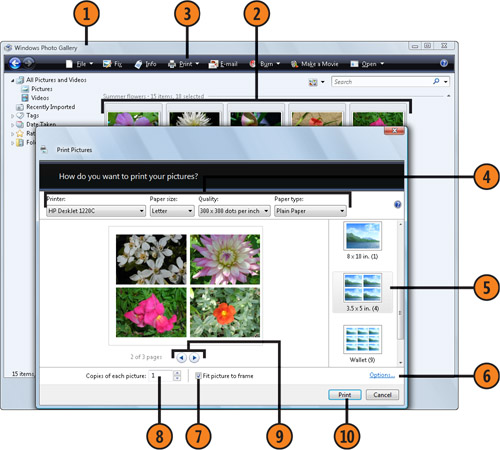
Print the Pictures
- 1. Start Windows Photo Gallery from the Start menu.
- 2. Select the photograph you want to print. If you want to print multiple photos, be sure to select all of them.
- 3. Click Print, and choose Print from the drop-down menu to display the Print Pictures dialog box.
- 4. Select your printer and the printer settings you want. The printer settings will differ depending on which printer you chose.
- 5. Select the layout you want.
- 6. Click to display the printer’s Properties dialog box if you want to make additional printer settings.
- 7. Select this check box to enlarge or crop the photo to the specified size.
- 8. Specify the number of copies you want of each photo.
- 9. Look at the preview to verify that the pictures will be printed the way you want. Use the arrows to view all your pages.
- 10. Click Print to print the photos.
Tip
To
send your pictures over the Internet to a photo-printing service, click
Print in the Windows Photo Gallery, and choose Order Prints from the
drop-down menu. |
Printing Web Pages
If
you’ve ever visited a Web page whose content you found so interesting
or informative that you wanted to print it out for yourself or for
someone else to read, the printed result might have been less than
satisfactory—odd-looking pages filled with cut-off text, for example,
and an indecipherable hodgepodge of disconnected graphics, tables,
frames, and text. However, using Internet Explorer, you can now convert
Web pages into a printable form. All you need to do is specify how you
want the pages to be set up, take a quick look at the layout to make
sure it includes the items you want to print, and then print the pages.
Fix the Layout
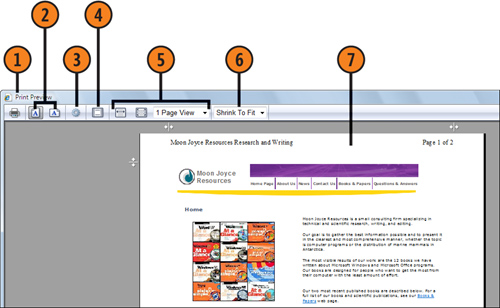
- 1. With the Web page you want to print displayed in Internet Explorer,
click the down arrow at the right of the Print button, and choose Print
Preview from the drop-down menu to display the Print Preview window so
that you can preview the page.
- 2. Select the orientation you want for the printed page.
- 3. If you want to change the paper size, paper source, header and footer
information, or margins, click the Page Setup button to display the
Page Setup dialog box. To change the contents of the header or footer,
use the codes in the table on this page. Click OK when you’ve finished.
- 4. Click to specify whether you want to show or hide the header and footer.
- 5. Click to adjust your view of the page or pages.
- 6. Select the scaling to fit the material onto the printed page. Select
Shrink To Fit to automatically scale the page so that the entire width
of the Web page is included, or select a scaling value for a custom fit.
- 7. Examine the layout based on your changes, and then click Print to print
the Web page, or click Close to return to the normal view without
printing the page.
Header and Footer Codes
| Code | Result |
|---|
| &b your text | Right-aligns text. |
| &b your text &b | Centers text. |
| &d or &D | Inserts short date or long date. |
| &p | Inserts page number. |
| &P | Inserts total number of pages. |
| &t or &T | Inserts time in 12- or 24-hour format. |
| &u | Inserts Web-page address. |
| &w | Inserts window title. |
