2. Managing the Windows Installer service
As you can see,
there's a lot to the basic Windows Installer architecture. Now that you
understand that Windows Installer is a transactional service that is
based on the MSI database, you're starting to see the value of such a
service in a managed network. Because Windows Installer is a service, it
needs to be managed like all the other components in your network.
Microsoft has made it easy to work with and manage this service. As
mentioned previously, much of the service administration is performed
through the msiexec.exe command.
However, Microsoft has also given you the ability to centrally manage
the behavior of the service through Group Policy Objects (GPO) and
Active Directory.
Working with Windows Installer installations
Because it is a
service, Windows Installer runs under the Local System account
privilege. This means that it has the right to perform almost any
installation operation even if users are in a locked-down environment.
Note that you may control if and how the ability to run installations
with elevated privileges should be handled via Group Policy (refer to
the AlwaysInstallElevated policy). There are several ways to start this
service, but they are all related to a Windows Installer or MSI
installation. Without the MSI, you cannot access the service. This means
you can launch a Windows Installer operation using any of the following
actions:
Double-click setup.exe for an MSI-based installation
Double-click an MSI file
Use the msiexec.exe command
Use Add/Remove Programs
Deploy an MSI product through Group Policy or through a software deployment tool that understands MSIs
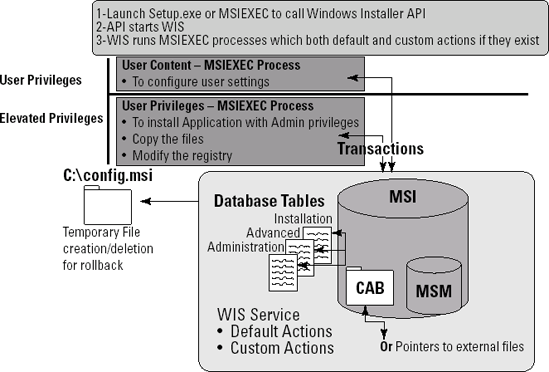
When an interactive
installation is initiated, it calls upon the Windows Installer
application-programming interface (API) to start the service and present
the appropriate dialog boxes to the user. To do this, the service runs
several processes, one in your user context with your user rights and
permissions and others in the Local System account context. This is why
it is best to deploy MSIs centrally: even if WIS has access to the Local
System account, if your credentials do not allow you to perform
installations, you won't be able to install a product interactively. On
the other hand, if you deploy the installation with the appropriate
settings the service will be able to perform the installation even if
the logged-on user does not have installation rights. In this case, the
processes that run in the user context are only run to configure actual
user settings and not to install the application. Remember that the user
has complete control over the user profile so running in the user
context allows WIS to complete installations properly.
One key element of an MSI
installation is context. You can work with Windows Installer to deploy
applications on either a per user or per machine basis. Using the
ALLUSERS=1 property during installation will tell Windows Installer to
perform a machine-based installation or an installation that will
configure settings within the All Users profile, letting any user who
has access to the machine have access to the installation. In most if
not all cases, you'll want to use per machine installations. That's
because if you install an application on a per user basis, only the user
who installed the application can remove it from the system because
only that user has access to the user profile in which the application
hooks reside. If multiple users installed the same application on a per
user basis, then it cannot be removed until each user has uninstalled
it. In managed environments, this can be quite a headache.
NOTE
The default
installation that Windows Installer performs is a per user installation.
That's because by default, the ALLUSERS property is not set and a user
installation is the default behavior. Make sure that you change this
value. As mentioned above, the value can be set directly within your own
packages, can be modified through a transform, or can be added to the
command line while installing a product.
There are a couple of
possible values that may be assigned to the ALLUSERS property, and they
can mean different things based on the rights of the individual
performing the installation:
ALLUSERS = 1 (All Users)
If the user
performing the installation is a standard user, the above will return an
error as an unprivileged user does not have sufficient permission to
install an application for all users. If the user has admin privileges,
the installation will be performed for all users (to the "All Users"
profile directory):
ALLUSERS = 2 (Current User)
While you would
expect setting ALLUSERS to 2 would always install just for the current
user, if the user has administrative privileges it will be installed for
all users even if this setting is specified. If you really do want to
install just for the current user and have administrative privileges,
this property should not be set at all so the default behavior of
installing just for the current user may be realized.
During the installation,
Windows Installer will back up any file it replaces in order to support
installation rollback. These files are copied to a temporary folder,
often the c:\config.msi folder. Of course, once the installation is
complete, it removes the files.
In addition, when it
finishes an installation, WIS will copy the installation's MSI file and
any associated MST file to a special folder called %windir%\installer
and rename it with a cryptic name. This allows it to manage the
installed product directly from the local machine without necessarily
requiring access to the original installation source (see Figure 4).
NOTE
The
%windir%\installer folder is a hidden folder by default. To view it,
type the address in Windows File Explorer. In addition, you'll notice
that all of the filenames are very cryptic. To view which product the
file matches to, right-click the Explorer sort bar at the top of the
Details pane and add both Title and Author to the detailed view. This
will show you which manufacturer and to which product the file relates.
Alternatively, you can simply hover over the file in Windows File Explorer to see its properties in a tooltip.
Leveraging GPO settings and policies
Corporate networks that
run Active Directory can centrally control the Windows Installer
service through Group Policy. If you don't have Active Directory, then
you'll have to use another centralized management tool to control these
settings or you'll have to do it through local policies.
There are quite a few policy settings for the Windows Installer service, especially after Server 2003 Service Pack 2. Table 4.2
outlines all of these settings and indicates some recommended settings
for them as provided with Server 2008. All specific settings for Windows
Installer are found by choosing Computer Configuration  Policies Administrative Templates Windows Components Windows Installer or User Configuration Policies Administrative Templates Windows Components Windows Installer. Software deployment settings are located in either Computer Configuration Policies Software Settings Software Installation or User Configuration Policies Software Settings
Software Installation. In most cases, you'll want to work with the
Computer Configuration portion of a Group Policy because you want to
avoid user-based software deployments as much as possible.
Policies Administrative Templates Windows Components Windows Installer or User Configuration Policies Administrative Templates Windows Components Windows Installer. Software deployment settings are located in either Computer Configuration Policies Software Settings Software Installation or User Configuration Policies Software Settings
Software Installation. In most cases, you'll want to work with the
Computer Configuration portion of a Group Policy because you want to
avoid user-based software deployments as much as possible.
NOTE
Networks running
Windows XP Service Pack 2 and Windows Server 2003 but without Service
Pack 1 for Windows Server 2003 need to add a special hotfix for Windows
Server. This hotfix allows you to open policies either from Windows
Server or from Windows XP with no error. This is described in article
number 842933 on the Microsoft Knowledge Base. It can be downloaded from
here: http://support.microsoft.com/default.aspx?kbid=842933.
In addition, tow
with the admin template files that are contained in Windows XP Service
Pack 2, you need to run the Group Policy Management Console (GPMC) from a
machine running XP SP2 and open each of the policies you want updated.
This automatically adds the appropriate admin template files to the
policies.
Table 2. Group Policy Settings for Windows Installer
| Group Policy Setting | Purpose | Recommended Setting | Notes |
|---|
| Computer Configuration =>
Policies =>
Administrative Templates =>
Windows Components =>
Windows Installer |
| Disable Windows Installer | Controls the use of Windows Installer | Not configured in Windows Server 2003 and later
In Windows 2000 Server networks, change to For non-managed apps only. | This
setting ensures only deployed software can be installed by normal
users. This is the default in Windows Server 2003 and later. |
| Always install with elevated privileges | Tells WIS to use system credentials to install software | Not configured | When
you have a systems management solution in place there is no need for
this setting (the solution's own agent is used instead). |
| Prohibit Use of Restart Manager | Controls if Restart Manager should detect files and use and mitigate a system restart when possible | Not configured | Enabled
by default, this feature is new to Vista and later systems and can
reduce the need for system restarts due to in-use files. |
| Prohibit rollback | Stops WIS from creating temporary files for rollback | Not configured | The
only reason to enable this setting is to save temporary disk space. Do
not use this setting in either Computer or User Configuration because
setting it in one automatically turns it on for the other. |
| Remove browse dialog box for new source | Stops users from browsing the file system when installing features in WIS | Not configured | The default behavior is sufficient in this case. |
| Prohibit patching | Stops users from patching WIS products | Not configured | By default, only administrators can patch products. |
| Prohibit Flyweight Patching | Controls the ability to turn off all patch optimizations | Not configured | By default, installations will be automatically analyzed to determine if optimization is possible. |
| Prohibit removal of updates | Protects updates from being removed | Not configured | By default, only administrators can remove updates. |
| Disable IE security prompts for Windows Installer scripts | Lets Web-based programs install without user knowledge | Not configured | Applying this can be a very high security risk. |
| Enable user control over installs | Gives users elevated privileges during installations | Not configured | Users
should not have the right to install software except under special
situations. In this case, there are better ways to give them these
rights than this policy. |
| Enable user to browse for source while elevated | Gives users access to restricted files and folders | Not configured | This
would let users use the Local System account to access restricted files
and folders during an installation. It is turned off by default. |
| Enable user to use media source while elevated | Gives users access to removable media during installations with high privileges | Not configured | Users
can access removable media during installations in their own security
context. Since you want only per machine installs, do not enable this
setting. |
| Enable user to patch elevated products | Gives users the ability to patch software, even when running with elevated privileges | Not configured | Patches should be delivered centrally to end users. |
| Allow admin to install from Terminal Services session | Lets administrators install applications when in a TS session | Enabled | This affects only system administrators and lets them install software through Terminal Services sessions. |
| Cache transforms in secure location on workstation | Saves transforms in secure location on the desktop | Not configured on Windows Server 2003 and later
Enabled on Windows 2000 Server | Caching
transforms into secure locations protects them from malicious
tampering. This is the default behavior in Windows Server 2003 and
later. This is also key to per machine installs because transforms can
only be used on the same machine when this setting is enabled. |
| Logging | Sets the logging level for WIS | Not configured | Use
this only when required. Logs are saved to the Temp folder of the
system volume. While logging is available at the command line, for
deployments via Group Policy this can prove a valuable feature. When
enabled, default logging is set to include status messages, warnings,
error messages, start up of actions, and terminal properties. |
| Disable logging via package settings | Controls if MSI packages may be authored to dictate their own logging settings | Enabled
Set to Disable logging via package settings on | Normally,
you specify logging at the command line or for all installations via
the Logging policy (above). This keeps setup authors from being able to
dictate logging behavior via the MsiLogging property |
| Prohibit user installs | Controls how user installs are configured | Enabled
Set to Hide User Installs | This
setting will prevent per user installations and allow only per machine
installations. Note: On Windows 2000, this setting disables all
installs. |
| Turn off creation of System Restore Checkpoints | Protects user systems by creating restore points on Windows XP and later systems | Not configured | This setting is enabled by default. |
| Enforce upgrade component rules | Controls how upgrades occur | Not configured | If
this setting is enabled, some upgrades may fail because you will have
to follow strict upgrade rules. It is not always possible to control how
upgrades are performed because you do not always control the source
code for the upgrades. |
| Prohibit non-administrators from applying vendorsigned updates | Controls the ability of non-administrators to install updates that have been digitally signed by the application vendor | Not configured | By default, updates that are properly signed by vendors can be installed by users. |
| Baseline file cache maximum size | Controls the percentage of disk space available for the baseline cache | Not configured | By
default, Windows Installer uses 10 percent of available free space for
this cache. Change it only if you feel 10 percent is not sufficient for
your needs. |
| Always install with elevated privileges | Tells WIS to use system credentials to install software | Not configured | When you have a proper MSI deployment tool in place, there is no need for this setting. |
| Search order | Tells WIS where to search for installation files | Not configured | By default, WIS searches the network first, then removable media, then the Internet. |
| Prohibit rollback | Stops WIS from creating temporary files for rollback | Not configured | The
only reason to enable this setting is to save temporary disk space. Do
not use this setting in either Computer or User Configuration because
setting it in one automatically turns it on for the other. |
| Prevent removable media source for any install | Controls if users can install software from removable media | Enabled | This
setting stops users from being able to install software from removable
media. Ideally, software should be installed from the network only. Even
if it is enabled, administrators can install from any location. |
| User Configuration =>
Policies =>
Administrative Templates =>
Control Panel =>
Add or Remove Programs |
| Hide the Add a program from CD-ROM or floppy disk option | Lets users add programs from removable media through the Control Panel | Enabled | This
setting is used in conjunction with the "Prevent removable media source
for any install" setting. Note: You might want to enable the Hide Add
new Programs page as this will stop users from adding programs through
the Control Panel. |
Make sure that you apply the settings from Table 2
to your production network and that you include testing computers with
these settings in your packaging lab. Doing this lets you test as a user
under full user conditions when preparing packages. As for software
delivery through Group Policy, it is recommended that you only use the
Computer Configuration portion of the GPO because you want to ensure all
installs be on a per machine basis.
Implementing software restriction policies
To protect your
systems further from unwanted software installations, you should make
use of Windows' Software Restriction Policies (SRP). SRPs are designed
to help control the execution of code within your network. SRPs rely on
four different rules to determine if software can execute in the
network. These rules include:
Hash rule:
A hash is a special identifier that is generated by performing
calculations on the binary elements of a file. Because of the way the
hash is calculated, no two-hash rules are the same. It is also
impossible to reverse the process to find the originating data. To use
hash rules, you need a hash-generating program.
Certificate rule:
A public key certificate that is included in both the SRP rule and in
the MSI packages. This is often the easiest way to use SRP because it is
easier for you to control certificates, especially because Windows
Server 2003 includes the ability to manage an internal public key
infrastructure (PKI).
Path rule:
One of the simplest SRP rules because it simply states which paths are
acceptable to host application setup packages. Be careful if you use
this method because if you allow *\softwaresource\*
for example, anyone can create a program that makes the
C:\softwaresource folder and run program installations from there. The
best way to use this rule type is to implement a distribution structure
based on the Distributed File System (DFS) that can present the same
installation source to all sites through DFS Namespaces.
Internet zone rule:
This rule is based on the zones perceived by Internet Explorer. This
method is slightly more risky because after a zone is allowed, any
installations from this zone will work.
Rules are applied in the
order they are listed here. Often the easiest way to implement SRPs is
to combine both a certificate rule with a path rule based on DFS
Namespaces. Because DFS Namespaces use the domain name in the universal
naming convention (UNC) rather than the server name, the same path can
be used anywhere in the network.
If you decide to
use certificate rules, you'll want to pre-deploy the certificates you
will use in your packages. That's because when you deploy a package with
an untrusted certificate, the user will have to accept the certificate
before the installation can proceed. If on the other hand you have
pre-deployed the certificate, then the installation can proceed
uninhibited. Fortunately, Windows Server 2003 and later support
certificate auto-enrollment. Therefore, users will not even be aware of
the need for or the issue of certificates for software deployment and
installation.
You might also consider the following:
Administrative
installations of MSI packages may change the nature of the package so it
is always best to install a certificate in the package after it has been installed to the administrative location.
Commercial
MSI packages may also already include digital signatures. In this case,
you can add the vendor's certificate to your SRP rules. If you modify
the package once deployed, it needs to be re-signed.
Make
sure that your certificates are managed properly and accessible to
anyone who needs to sign packages that are ready for deployment.
When you set up SRP,
you'll need to first generate the SRP objects in the Group Policy you
will use to manage them. These objects are not generated by default
within GPOs. Next, determine how it will be enforced. It is best to
enforce to all software except libraries (for example DLLs) and to all
users. This way, administrators are not affected. You'll also want to
configure how trusted publishers will be evaluated. It is a good idea To
Whom It May Concern: re-verify certificates before allowing the
publisher to be trusted. This way, you won't allow publishers with
outdated certificates to be trusted.
Managing source lists
Another aspect
of MSI package deployment that you need to take into consideration is
the installation source list. When you deploy an MSI package, Windows
Installer needs to maintain the ability to access the original deployed
package source for several reasons. One of the main reasons is package
self-healing. During the self-healing process, Windows Installer has to
connect to the original installation source to reinstall each feature
that has a missing or damaged key path. If the original source is no
longer available, WIS will ask the user to provide it with an
appropriate location. This is definitely not something you want users to
face because they have no idea where these files should be. As you
know, many of them will still attempt to resolve this situation
themselves before they think to call the Help Desk.
Another example is the
product upgrade. In some cases, you may upgrade a product that requires
access to the original source installation of the previous version in
order to remove it properly. A third example is the installation of
companion products. For example, if you install a third-party grammar
checker in Microsoft Office, it might require access to the original
Office installation files to add features that were not originally
selected during install.
All of these
situations can cause an installation to fail if source lists are not
properly managed. Some good news came with the arrival of Windows
Installer version 3.1, which mitigates the impact of these situations
because it leverages the locally stored MSI file (in the %windir%\installer
folder) to patch and upgrade products. Despite this, it is still very
important to maintain constant source lists. The SOURCELIST public
property can be used to specify more than one source, and Windows
Installer will try all locations listed before prompting the user with a
request for a valid location. In addition, the way WIS searches for
valid locations is controlled through the search order GPO setting in
user configurations. By default, WIS searches the network first, then
removable media, then the Internet. The key to source list management is
to make sure sources are available before WIS needs to verify their
location. From the command line, the SOURCELIST public property can
specify one or more paths separated by a semicolon as shown in the
following example:
msiexec.exe /i \\server\share\folder\package.msi SOURCELIST="\\dfspath\
   der\;c:\localsource;http://installationpoint.com/acnt"
There are a couple of ways
to deal with source list management. One is to design a proper package
delivery infrastructure in your network. As mentioned above, the best
way to do this is to use DFS Namespaces. The DFS service lets you create
a UNC, which is in the form of \\domainname\ share instead of \\servername\share.
The advantage is that with a DFS Namespace, there should be no reason
why the share name should ever change because Namespaces are stored
within Active Directory and are linked to target shares hosted on
servers throughout your infrastructure. This lets you modify the share
targets to your heart's content without ever affecting users or
installations. That's because the DFS Namespace can point to multiple
targets that can be in different locations. In addition, DFS Replication
(DFSR) can replicate data from target to target to make sure the
contents of all targets are identical.
Although the first
version of DFS relied on the File Replication Service (FRS) which only
replicated entire objects — copying a whole file even if only 1 byte has
changed — DFSR supports delta compression replications, replicating
only changes to existing files. This makes the DFSR engine even more
powerful and useful for this scenario.
The second prong of this
approach is to make sure that the source lists you include inside your
packages include all possible locations for a package. For example, DFS
Namespaces are wonderful for any system that is connected to the
network, but what happens when the package is on a portable that is no
longer connected to the network? Once again, users would be prompted to
specify a location for source files, and this situation would even be
worse since there would be no way a user could fix this problem short of
having the installation CD with them. One way to solve this issue is to
create a hidden partition on the hard drive of portable systems and
copy all packages to this location prior to their installation. That way
the location is available in the event of a problem with a product
while the user is traveling.
Of course, this means
that you need to maintain these special locations, but that is part of
your software deployment infrastructure design and operation. Also, the
vastly expanding default disk size on portables makes an approach such
as this quite viable today.
NOTE
If you have
already deployed packages and you have not managed source lists
properly, you have probably run into some issues with these
installations. There are several ways to repair source lists in deployed
products. One is by using features that are potentially provided with
your deployment tool. For example, if you are using Microsoft Systems
Center Configuration Manager 2007 (SCCM), you can modify source lists
after the fact for per machine product deployments. It is also possible
to use scripts to modify source lists. Finally, you can simply redeploy a
properly managed package. This also gives you the opportunity to
rectify other potential problems you may have introduced before you
standardized your application installation approaches (such as per user
installs instead of per machine installs).
For more on managing source lists, see the Product Source Update Manager Whitepaper from Microsoft at www.microsoft.com/downloads/details.aspx?FamilyID=32F40DB4-6706-4E62-B867-AA1D332B6403&displaylang=en
3. Changes to Windows Installer 4.0
Windows Installer
received a significant facelift to run with Windows Vista. Vista heralds
a whole series of changes and modifications in terms of both user
access and system protection. These changes affect application
installations. Because of this, the most significant changes in WIS 4.0
are related to the following:
Compatibility with Restart Manager
Compatibility with User Account Control
Compatibility with User Account Control Patching
Support for Windows Resource Protection
Most existing MSI
packages will run on Windows Vista, but it is always best to update your
own packages to run with this version of WIS to make sure you have the
latest built-in capabilities and compatibility.
Compatibility with Restart Manager
In order to avoid user
disruptions as much as possible, Vista includes a new feature, the
Restart Manager. By default, Vista relies on Restart Manager to stop and
restart applications rather than stopping and restarting the system. It
actually saves the state of applications and temporarily closes them to
prevent the need to restart. The system is restored after the
installation is complete without a restart.
Applications that are
compatible with WIS 4.0 will include a new MsiRMFilesInUse dialog that
will automatically link them with the Restart Manager's capabilities.
For applications to run properly with Restart Manager once installed,
they must include the new RegisterApplicationRestart function. Both can
be added as a transform to packages that are not designed for WIS 4.0.
Compatibility with User Account Control
User Account Control (UAC) is
a new security feature of Windows Vista that is designed to let all
users run with standard user privileges, even if you are logged in with
an administrative account. Each time an action requires administrative
privileges, UAC requests authorization from the user. The difference
lies in how it does this. When logged in as an administrator, UAC simply
requests you to allow or deny an action. When logged in as a standard
user, UAC requests the name of an account with administrative privileges
and its password to proceed.
Because of its
integration with UAC, administrators can rely on WIS 4.0 to install all
applications as managed applications. Managed applications are
automatically installed with elevated privileges and are stored in the HKEY_LOCAL_MACHINE
registry hive, which is the same as using the ALLUSERS=1 property.
After an application is registered as a managed application, it will no
longer prompt users or administrators during installation.
If applications are
not registered as managed, then standard users will require
over-the-shoulder credential assignment or asking someone else to fill
in the user name and password for the installation to complete.
Compatibility with User Account Control patching
Vista's UAC
supports the ability to patch applications without requiring elevated
privileges, but to do so, applications must be digitally signed. Several
other conditions are required:
The application must have been installed by WIS 3.0 or higher.
If
the application was installed on Windows XP, it must have been done
with removable media — CD or DVD — otherwise it will not work. Note that
this restriction does not apply to applications installed on Vista.
The application must have been installed for all users or per machine.
The
patch or the original package must include the MsiPatchCertificate
table, which in turn includes the digital certificate for the patch.
More conditions must be
met, but when patches are properly prepared for Vista, they will install
under standard user privileges. This is something you should always aim
for in your patches.
Support for Windows Resource Protection
Microsoft has renamed
Windows System File Protection to Windows Resource Protection (WRP) in
Windows Vista. WIS 4.0 may later integrate with WRP in the following
manner:
If system
files are contained within a package, WIS skips its installation and
logs an entry into the log file and continues the installation. This is
different from Windows 2000 and XP as WIS would call on SFP to install
the file for it.
WRP
protects both files and registry keys. As with files, if WIS encounters
a protected registry key in the installation, it skips it, logs a
warning in the log file, and moves on.
There is more
to the integration, but for administrators preparing software packages,
it is important to know that WRP does not allow WIS to update any
protected resource.
NOTE
Any internally
created packages should include a digital signature in order to support
User Account Control (UAC) patching. UAC patching enables the authors
of Windows Installer installations to identify digitally signed patches
that can be applied and removed in the future by non-administrator
users. This functionality is available beginning with Windows Installer
version 3.0. User Account Control (UAC) patching was called
least-privilege user account (LUA) patching in Windows XP. LUA patching
is not available on Windows 2000 and Windows Server 2003.
4. Changes to Windows Installer 4.5
Windows Installer is
available as a redistributable for Windows Vista SP1, Windows Server
2008, Windows XP SP2, and Windows Server 2003 SP1. It offers some new
functions and features including two worth mentioning specifically:
Transaction support: As of this release, Windows Installer can now perform multiple-package installations using transaction processing.
Custom user interface support: A custom user interface can now be embedded within a Windows Installer package.
It is a good idea to
deploy Windows Installer 4.5 as part of your Windows Vista corporate
image. Because it is not included, you will need to download and install
it manually.
