5. Export and Import Data with Registry Patches
Typing
in Registry data gets awfully tedious, particularly when the N key
breaks on your keyboard. Thankfully, it's not the only way to add keys
and values to the Registry.
A Registry patch is a plain-text file with the .reg filename extension that contains one or more Registry keys or values. Double-click on a .reg file, and Windows runs the Registry Editor, which "applies" the patch to the Registry, meaning that its contents are merged with the contents of the Registry.
Patch
files are especially handy for backing up small portions of the
Registry, distributing Registry settings to other PCs, and duplicating
keys.
For example, say you
spend an hour or so customizing the toolbars in a particular application
used by many employees in your office. Since most programs store their
toolbar settings in the Registry, you can use a Registry patch to not
only back up the completed toolbar setup—and thus save an hour of
reconfiguring should your PC subsequently burst into flames—but to
quickly copy the toolbar to all the other PCs in your office.
Or,
perhaps you've spent the last six months gradually customizing your
file types , only to find that a newly
installed application or a Windows upgrade erased all your hard work and
reset all your context menus. All you need to do is to make a Registry
patch containing all your saved file types, and then reapply it should
the need arise.
5.1. Create a Registry patch
Open the Registry Editor, and select a branch you wish to export.
The
branch can be anywhere from one of the top-level branches to a branch a
dozen layers deep. Registry patches include not only the branch you
select, but all of the values and subkeys in the branch. Don't select
anything more than what you absolutely need. |
|
From the File menu, select Export, type a filename and choose a destination folder, and click OK.
All of the values and subkeys in the selected branch will then be
stored in the patch file. Make sure the filename of the new Registry
patch has the .reg extension.
Clearly,
there's not much to making Registry patches with the Registry Editor.
But it gets a little more interesting when you modify them, or even
create them from scratch to automate Registry changes.
5.2. Edit a Registry patch
Since a Registry patch is just a plain-text file, you can edit it with any decent plain-text editor, or lacking that, Notepad (notepad.exe). The contents of the Registry patch will look something like the text shown in Example 1.
Example 1. Contents of a Registry patch created from HKEY_CLASSES_ROOT \.txt
Windows Registry Editor Version 5.00

[HKEY_CLASSES_ROOT\.txt]
@="txtfile"
"PerceivedType"="text"
"Content Type"="text/plain"

[HKEY_CLASSES_ROOT\.txt\ShellNew]
"ItemName"="@%SystemRoot%\\system32\\notepad.exe,-470"
"NullFile"=""
|
The first line, Windows Registry Editor Version 5.00,
tells Windows that this file is a valid Registry patch; don't remove
this line. The rest of the Registry patch is a series of key names and
values.
Registry
patches created in Windows 95, 98, or Me can be imported into the
Windows Vista Registry without a problem (that is, not taking into
account the screwy settings contained therein). However,
the same is not true the other way around. Patch files made in Windows
Vista, XP, 2003, and 2000 are encoded with the Unicode character set,
and as you've seen, bear a header indicating the 5.0 version number that
will choke the older Registry Editor. To use a Vista-created .reg file in Windows 9x/Me, you'll need to deal with both of these issues. First, replace the Windows Registry Editor Version 5.00 header line with REGEDIT4. Whew, that was hard. Next, to convert the Unicode .reg
file into an ASCII-encoded file, those earlier versions of Windows can
understand, open the file in Notepad. Then, from the Notepad's File menu, select Save As and choose a new filename, and from the little Encoding drop-down listbox at the bottom of the window, select ANSI. Click Save, and your patch is now backward-compatible. |
The key names appear in brackets ([...])
and specify the full path of the key, thus indicating where the values
that follow are to be stored. On each subsequent line until the next key
section begins, the name of a value is given first (in quotation
marks), followed by an equals sign, and then the data stored in the
value (also in quotation marks). A value name of @ tells the Registry Editor to place the value data in the (Default) value (as shown in the fourth line of the example).
You
can go ahead and make changes to anything in the Registry patch file as
long as you keep the format intact. Of course, those changes won't take
effect in the Registry until the Registry patch is merged back into the
Registry, a process described in the next section.
So,
why would you want to edit a Registry patch file? Modifying a large
number of Registry values often turns out to be much easier with a text
editor than with the Registry Editor, since you don't have to open—and
then close—each individual value.
It
may be tempting to perform a quick search and replace in the text
editor, and then apply your changes back to the Registry. But be
careful, as the effect may not be what you expected. If you replace any
text in the name
of a value (to the left of the equals sign) or even the name of a key
(the lines in brackets), Registry Editor will create new values and keys
with those names when you apply the patch, leaving the old values and keys intact. A better choice is to use a tool like Registry Agent. |
|
There's
no requirement that the keys in a Registry patch file need to have
lived next to one another in the Registry, or that they be in any
particular order. This means you can combine several separate patch
files into one, and use it to restore any number of keys in one step.
All it takes is a little copy and paste between side-by-side Notepad
windows. The only thing you need to do, besides making sure all the keys
and values remain intact, is to remove any extraneous Windows Registry Editor Version 5.00 header lines.
If
you're creating a Registry patch to be used on other PCs, make sure you
fix any references to absolute pathnames before you distribute the
file. If, for example, your patch file references D:\Windows\notepad.exe, it'll cause a problem on any PC where notepad.exe is located in C:\Windows\.
The best solution is to use expandable string values, along with the appropriate system variables,
like this: %SystemRoot%\notepad.exe. Now, since expandable string values are stored like Binary values in Registry patch files, such an entry would look like this:
"Open"=hex(2):26,00,53,00,79,00,73,00,74,00,65,00,6d,00,52,00,6f,00,6f,\
00,74,00,25,00,5c,00,6e,00,6f,00,74,00,65,00,70,00,61,00,64,00,2e,00,65,00,\
78,00,65,00,00,00
Now, as you may've guessed,
it's considerably easier to edit expandable string (and binary) values
in the Registry Editor than in any text editor, so you'll probably want
to make such corrections before
you export the key to a patch file. If you need to add a binary or
expandable string value to a Registry patch file you've already started
editing, though, all you have to do is return to the Registry Editor,
create a temporary key somewhere, and then create your new value. When
you're done, just export the key to a new file, delete the key from the
Registry, and then copy and paste the value to your other Registry patch
file.
5.3. Delete keys and values from a Registry patch
Although the Registry Editor won't ever create a patch that deletes Registry keys or values, it's easy enough to make one by hand. To delete a key with a Registry Patch, place a minus sign before the key name, like this:
-[HKEY_CURRENT_USER\Control Panel\don't load]
This patch, when applied,
deletes the specified key and all of its values, as well as any subkeys.
To delete a single value from a key, place a minus sign after the equals sign, like this:
[HKEY_CURRENT_USER\Control Panel\don't load]
"desk.cpl"=-
Of course, these tricks only work if you have sufficient permission to delete those keys.
5.4. Apply a Registry patch
To
copy the stuff from a Registry patch file back into your Registry, you
need to apply it. The easiest way is to double-click the file (it
doesn't matter if the Registry Editor is running or not).
If you see a UAC prompt at this point, click Continue. Then answer Yes when asked whether you're sure you want to add the information in the .reg file to the Registry, and finally, click OK when you see the "Information in MyPatch.reg
has been successfully entered into the Registry" message. (You can also
apply a patch from within the Registry Editor: from the File menu, select Import, select the patch file to apply, and click OK.)
To apply a Registry patch without any other warning messages, you need to use the command line. Either from an open Command Prompt window or from Start → Run, type the following: regedit /sc:\folder\mypatch.reg
where c:\folder\mypatch.reg
is the full path and filename of the patch file to import. Or, if you
want to get rid of the confirmation messages when you double-click a .reg file, add the /s switch (as shown here) to the .reg file type. |
|
If
the Registry Editor is already open and one of the keys modified by a
patch that was just applied is currently open, RegEdit should refresh
the display automatically to reflect the changes. If it doesn't, press
the F5 key or go to View → Refresh.
When you apply a Registry patch, you merge
the keys and values stored in a patch file with those in the Registry.
Any keys and values in the applied patch that don't already exist will
be created. If a key or value already exists, only its contents will be
changed. It's important to understand that if a key you're updating
already contains one or more values, those values will be left intact if they're not explicitly modified or deleted by the patch.
6. Prevent Changes to a Registry Key
Security
has always been one of Microsoft's favorite marketing buzzwords, and
never more so than when Windows Vista was introduced. But as it turns
out, Vista's security features are quite a bit more useful for
protecting your PC from itself than from any alleged intruders.
The permissions system doesn't just protect files and folders, it restricts who can read and
modify Registry entries. This feature is tremendously important, yet
most people don't even know it's there. It means you can lock a Registry
key to prevent employees from installing software on a company PC, or
prevent kids from disabling parental controls on a family PC.
Permissions also let you lock file type associations , preventing other applications from changing them. And by
locking certain other keys, you can help protect your PC from viruses
and spyware.
Here's how you do it:
Open the Registry Editor, and navigate to the key you want to protect.
You
can't protect individual values, but rather only the keys that contain
them. This means that if you lock a key to protect one of its values,
none of its values can be modified. You can, however, choose whether or
not your changes are made to the subkeys of the selected key. |
|
Right-click the key, and select Permissions.
Click Advanced, and then click Add.
If the Add
button is disabled (grayed out), you'll have to take ownership of the
key, close the Permissions window, and then reopen it before you can
make any changes to the permissions of this object.
|
|
In the Enter the object names to select field, type Everyone, and then click OK.
(The "Everyone" user encompasses all user accounts, including those
used by Windows processes and individual applications when they access
the Registry.)
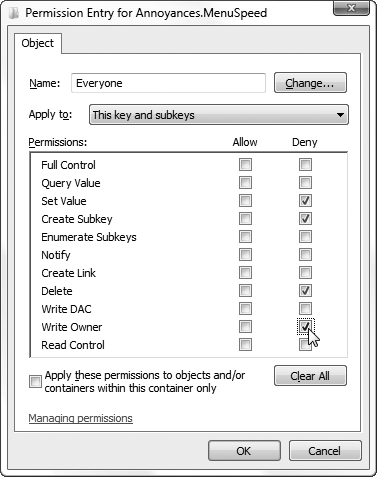
In the next window, "Permission Entry for...", click the checkbox in the Deny column, next to the actions you want to prohibit, as in Figure 5. See below for examples.
When you're done, click OK in each of the three open dialog windows. The change will take effect immediately.
Now, you may be tempted to remove Allow permissions for a particular user (or even all users), rather than add the Deny
entry shown here. The problem is that doing so wouldn't prevent an
application or Windows from taking ownership or adding the necessary
permissions and breaking your lock. Furthermore, it would make it much
more difficult to restore the old permissions should you need to remove
the lock; using this procedure, all you need to do is remove the Deny
rule and you're done.
This
works because Windows gives Deny rules priority over Allow rules, which
means you can lock a key even if there's another Allow rule that
expressly gives a user permission to modify the item.
So, which keys do you lock, and which actions do you forbid? Here are some examples:
Make a read-only key.
To lock a value yet still allow applications and Windows to read it, place a Deny checkbox next to Set Value, Delete, and Write Owner, as in Figure 3-10.
Create a complete lock-out.
To prevent all applications from reading, modifying, or deleting a value, place a Deny checkbox next to Full Control.
Keep away ShellNew.
To prevent applications from making new keys under the selected key, place a Deny checkbox next to Create Subkey.
For instance, you can do this to file type keys to prevent applications from adding themselves to Windows
Explorer's New list.
Enforce security policies.
To prevent another user from modifying a security policy , use the procedure in "Section 3.3," earlier in this article, to locate the corresponding key in the Registry. Then, instead of adding a Deny
rule to the key as described above, remove any permissions that allow
anyone other than an administrator to delete, modify, or add subkeys to
the key. Make sure that there's still at least one rule for the
Administrators group (or at least your own administrator-level account)
that affords Full Control.
